Welcome to the bold and adventurous world of amigurumi! 🚒✨ Today, I’m excited to share my free crochet pattern for an Amigurumi Fire Truck—a dynamic and detailed creation perfect for vehicle enthusiasts, little firefighters, or anyone who enjoys crafting playful and realistic plush designs! 🧶 Whether you love stitching up emergency vehicles, creating textured and lifelike figures, or simply want to add a heroic fire truck to your handmade lineup, this pattern will guide you through crafting a beautifully sculpted plush with sturdy wheels, a classic ladder, and a touch of rescue-ready charm! 🔥
This design embraces bold colors, structured shaping, and intricate details to bring an exciting and action-packed presence to your crochet projects! 🧶✨ I’ve carefully outlined each step to ensure your Amigurumi Fire Truck turns out just right—ready to race into your collection or become a treasured handmade gift! 🎁 So grab your hooks, pick out vibrant reds, deep blacks, and metallic silvers, and let’s stitch up a heroic fire truck! 🚒
🚒 Amigurumi Fire Truck Crochet Pattern
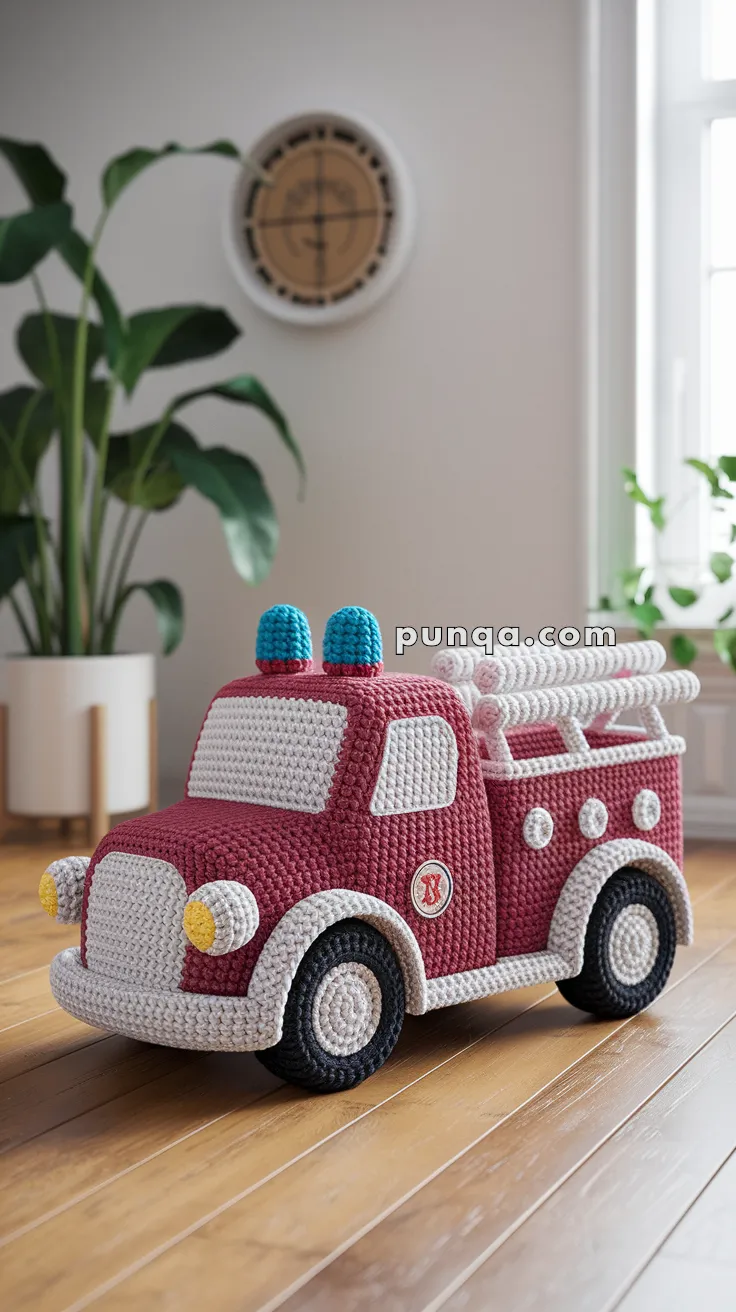
A plush, boxy, and detailed fire truck featuring a muted burgundy body, cream trim, thick applied wheel arches, horizontal ridged windows, turquoise sirens, stacked wheels, and a white ladder with pink accents. Complete with a rounded cab front, side badge, bumper shaping, and rear horizontal tubes.
✨ Skill Level
Advanced — includes structured shaping, layered construction, dense stitching, and multi-piece assembly that requires confident amigurumi experience.
📏 Finished Size
Approx. 30 cm (12 in) long × 18 cm (7 in) tall.
🧶 Yarn & Materials
Burgundy (Body) – 180 g
Cream (Trim, Ladder, Wheel Arches) – 150 g
White (Windows, Ladder Stripes, Bumper Panel, Side Caps) – 90 g
Black (Outer Tires) – 40 g
Gray (Inner Wheel Rings) – 30 g
Beige (Wheel Plates) – 20 g
Yellow (Headlight Domes) – 10 g
Turquoise (Sirens) – 15 g
Soft Pink (Ladder Accents) – small amount
Polyfill stuffing – approx. 120 g
3.5–4.0 mm crochet hook
Yarn needle, scissors
Optional: plastic canvas sheets cut to rectangle shape for internal support
🔤 Abbreviations (US Terms)
MR – Magic Ring
sc – Single Crochet
inc – Increase (2 sc in same stitch)
dec – Decrease (sc2tog)
ch – Chain
sl st – Slip Stitch
st(s) – Stitch(es)
FO – Fasten Off
BLO – Back Loop Only
🛠 Truck Body (Burgundy)
Base Rectangle
Ch 30
R1: sc 29
R2–20: ch 1, turn, sc 29
FO.
Walls
Attach burgundy anywhere along edge.
Work sc evenly around rectangle (approx. 90 sts).
Continue working in the round for 22–24 rounds to form height.
Stuff as you build.
Insert optional plastic canvas panels at base and inner sides.
Leave top open.
🚗 Front Cab Curve
Attach yarn at center of top front edge.
Work 8–10 short rows:
• sc across front width
• dec 1 at each end of rows
This brings sides inward slightly, creating the soft curved slope.
Stuff firmly and stitch curve down smoothly.
🧱 Front Bumper (Cream)
Ch 26
R1: sc 24, 3 sc in last, sc 23 along underside, 2 sc in final st (52)
R2: sc, inc, sc 23, inc, sc, inc, sc 23, inc around (56)
R3: sc around (56)
FO and pin along lower front edge, wrapping corners slightly before sewing.
💡 Headlights (2)
White Base
MR, 8 sc
R2: inc around (16)
FO.
Yellow Dome
MR, 6 sc
R2: inc around (12)
R3: sc around
Lightly stuff.
Sew dome onto white base.
Attach one to each bumper side corner.
⚙️ Wheels (4)
Each wheel is layered:
Black Tire
MR, 6 sc
R2: inc (12)
R3: (sc, inc) × 6 (18)
R4: (2 sc, inc) × 6 (24)
R5: (3 sc, inc) × 6 (30)
Gray Inner Ring
MR, 6 sc
R2: inc (12)
R3: (sc, inc) × 6 (18)
R4: (2 sc, inc) × 6 (24)
Beige Plate
MR, 6 sc
R2: (sc, inc) × 6 (18)
Burgundy Hub
MR, 6 sc
R2: (1 sc, inc) × 3 (9)
Stack and stitch center-to-center.
Lightly pad.
Attach two wheels to each side, placed at lower edge.
🧵 Applied Wheel Arches (Cream)
Front Arch (2)
Ch 10
R1: sc 9
R2: inc, sc 7, inc (11)
R3: inc, sc 9, inc (13)
R4: sc across (13)
Rear Arch (2)
Ch 8
R1: sc 7
R2: inc, sc 5, inc (9)
R3: sc across (9)
Pin arches around wheel edges and sew down.
Slightly pad with thin felt or stuffing for thickness.
🪟 Windows (White, Horizontal Rib)
Front Windshield
Ch 16
R1: sc 15
R2–8: ch 1, turn, sc 15 in BLO
Side Windows (2)
Ch 11
R1: sc 10
R2–6: ch 1, turn, sc 10 in BLO
Position with horizontal ridges.
Sew windshield centered on cab front.
Place side windows on upper body sides.
🪪 Side Badge
White circle
MR, 6 sc
R2: inc around (12)
Stitch a burgundy shield shape over the circle, then add a cream X.
Attach on the front half of the side body, above and slightly ahead of the first wheel.
🔵 Sirens (2 – Turquoise)
MR, 6 sc
R2: inc × 6 (12)
R3: (sc, inc) × 6 (18)
R4–6: sc around
R7: (sc, dec) × 6 (12)
R8: dec to close (6)
Stuff and sew them close together at the front center of the roof.
🪜 Ladder (White with Pink Accent Rings)
Rails (2)
Ch 42
R1–3: sc rows (41)
Rungs (5)
Ch 7
R1: sc 6
Make 5 total.
Attach rungs evenly between rails.
Wrap several soft-pink rings at alternating rung ends.
Sew ladder running lengthwise along the right upper roof edge.
🔁 Rear Horizontal Tubes (Cream)
Make 4
MR, 6 sc
Continue 20–22 rounds of sc
Stuff lightly as you go.
Wrap pink yarn rings near tube ends.
Mounting Bars
Cream
Ch 22
R1–2: sc rows
Attach one bar near roof edge at rear, second parallel behind it.
Lay the 4 tubes side-by-side across and secure to each bar.
⚪ Side Hose Caps (3)
White
MR, 6 sc
R2: inc × 6 (12)
Place in a gentle row on visible body side:
• one just behind the badge
• one at the central section
• one slightly forward of rear wheel
If desired, add three more on hidden side for symmetry.
🪟 Roof & Contour Lines
Using cream yarn, surface crochet smooth lines:
• along the roof rear edge
• around upper front border
• tracing the bumper-top shape
This creates clean contours like in the photo.
✋ Assembly
Stuff body fully and evenly before sealing top.
Shape cab curve and stitch down.
Add bumper, headlights, and wheel arches.
Attach wheels.
Sew windshield and side windows.
Position badge.
Sew sirens on roof center front.
Add ladder along roof length.
Secure rear tubes to bars.
Attach hose caps.
Add surface trim lines.
Gently reshape.
🎨 Finishing Touches
Light vertical embroidery lines on the bumper center create a grille effect.
Add subtle white surface stitching on front cab corners and wheel arches.
Press shape lightly by hand after stuffing.
Enjoy your detailed fire truck – rounded cab, turquoise roof lights, cream arches, bold wheels, ribbed windows, white ladder with pink rings, side badge, and rear horizontal tubes. Perfect for nursery décor, shelf display, or play.