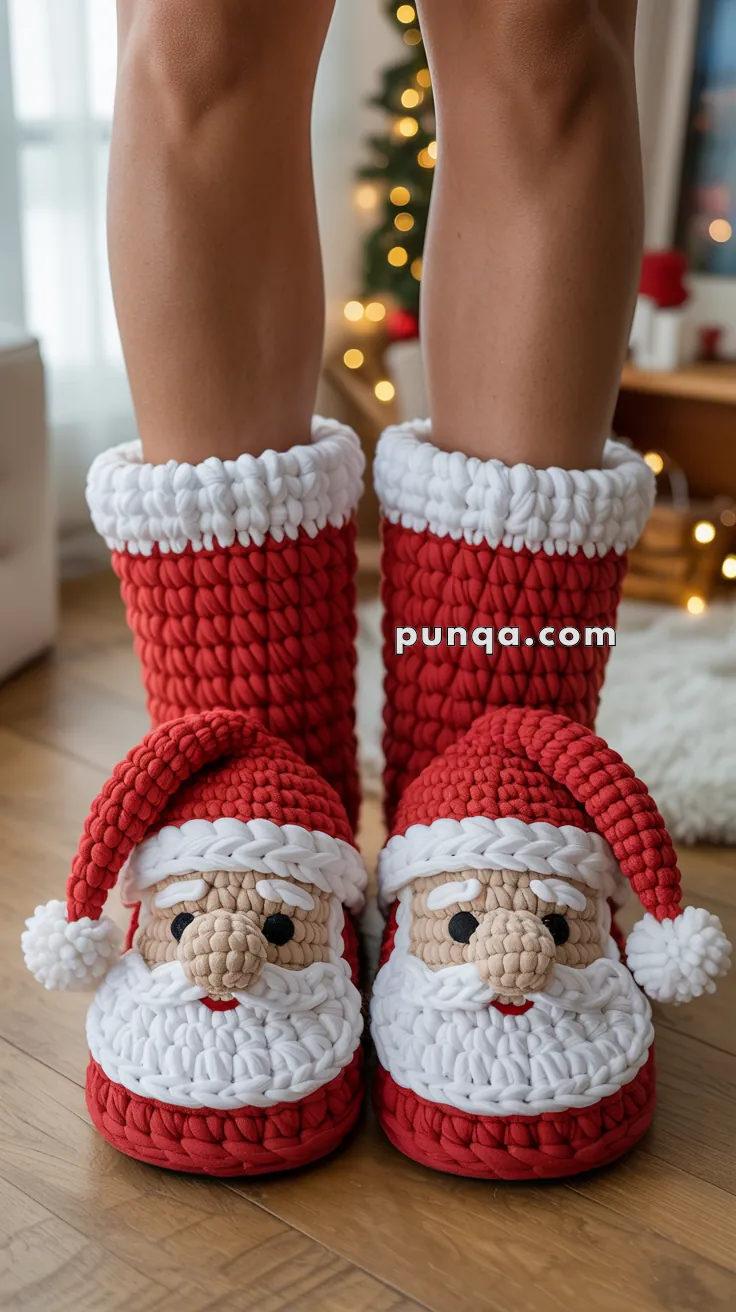
Wrap your feet in festive cheer with the Cozy Santa Face Slippers, a crochet project that’s as adorable as it is comfortable! 🎅🧶 These slippers look just like a tiny Santa is giving your feet a warm hug—complete with a plush face, fluffy beard, red hat topped with a pom-pom, and a soft white cuff. Designed to mimic that chenille, squishy look, they’re the perfect blend of holiday spirit and cozy comfort.
Whether you’re lounging during Christmas movie nights, opening presents on a magical morning, or matching pajamas with the whole family, these slippers bring joy to every step. Quick to make and irresistibly charming, the Cozy Santa Face Slippers are a delightful way to crochet celebration, coziness, and a sprinkle of handmade magic—one loop at a time! 🧵✨🎄
🎅🏻Cozy Santa Face Slippers Crochet Pattern
These cozy Santa slippers look just like a tiny Santa is hugging your feet – complete with a plush face, fluffy beard, red hat with pom-pom, and soft white cuff. They’re designed to mimic the chenille, squishy look in the photos and are perfect for Christmas mornings, movie nights, or matching family pajamas.
You’ll first crochet a simple red bootie, then layer on Santa’s face, beard, hat, and cuff as appliqués.
⭐ Skill Level: Intermediate to Advanced — requires confident shaping, appliqué layering, precise stitch placement, and neat embroidery to achieve the photo-accurate facial details and structured hat.
🧶Materials
Yarn (to mimic the photo look)
Use super bulky chenille yarn (or similar, #6) for the main parts so they look plush:
- Red – bootie body + Santa hat
- White – cuff, beard, hat trim, pom-pom
- Beige / Light Tan – Santa face
- Small amounts of black (worsted or DK) – eyes/eyebrows if embroidered
- Optional: small amounts of pink – cheeks
You can also use worsted or DK acrylic, but the look will be less plush and more structured.
Hooks & Notions
- 6.0–7.0 mm crochet hook (for chenille)
- 3.0–3.5 mm hook (for small facial details if using thinner yarn)
- 6–8 mm black safety eyes (or embroidery)
- Tapestry needle
- Stitch marker
- Polyester fiberfill (tiny amount for nose & pom-pom)
- Scissors
📏Size Guide (Approx.)
Because yarns and tension vary, treat these as a starting point and adjust length by adding/removing rounds in the sole section.
- Kids (EU 28–32 / US 11–2)
Foot length: ~18–20 cm - Women (EU 37–39 / US 6.5–8.5)
Foot length: ~23–25 cm - Men (EU 42–44 / US 9–11)
Foot length: ~26–28 cm
I’ll write the instructions for Women’s size and note where to adjust for Kids/Men.
🆎Abbreviations (US Terms)
- MR – magic ring
- ch – chain
- sc – single crochet
- hdc – half double crochet
- dc – double crochet
- sl st – slip stitch
- inc – increase (2 sc in same st)
- dec – decrease (sc2tog)
- st(s) – stitch(es)
- FO – fasten off
Work in continuous rounds unless otherwise stated. Use a stitch marker to mark the first stitch of each round.
Bootie Base (Red)
Make 2.
This is a simple rounded‐toe slipper, worked from the toe back toward the heel, then up the sides.
Toe & Foot
With red chenille and 6–7 mm hook:
R1. MR, 6 sc (6)
R2. inc in each st (12)
R3. (sc, inc) × 6 (18)
R4. (2 sc, inc) × 6 (24)
R5. (3 sc, inc) × 6 (30)
For Kids: stop increasing at 24 sts (skip R5 and work foot on 24).
For Men: add one more increase round: (4 sc, inc) × 6 (36), then continue.
From here, work straight for the length of the toes and mid-foot:
R6–R10 (Women). sc in each st around (30)
- Kids: work fewer rows (R6–R8)
- Men: work more rows (e.g. R6–R12, on 36 sts)
Try the slipper against the foot – this tubular part should reach to the beginning of the ankle.
Heel Shaping (Back of Foot)
We’ll flatten the heel area with short rows.
Still with 30 sts (Women’s):
R11. sc in 22 sts, turn (leave 8 sts unworked)
R12. ch 1, sc 22 back, turn
R13. ch 1, sc 22 back, turn
FO leaving a long tail.
Use the tail to sew the 22-st section to the top edge of the unworked 8 sts to close the heel. This creates a snug heel and full opening around the ankle.
For Kids on 24 sts: work 18–20 sts in rows instead of 22.
For Men on 36 sts: work 28–30 sts in rows.
Ankle Wall & Cuff (White)
Turn the slipper so the opening faces you. You’ll now work around the entire opening to build a low boot and then add the fluffy cuff.
Red Ankle (Optional extra height)
If you want a taller slipper before the cuff (like in some photos) you can add 1–2 rounds of red:
Join red anywhere around the opening.
Work 1–2 rounds of sc evenly around (do not overthink stitch count; just keep it flat and even). FO and weave in.
White Fluffy Cuff
With white chenille or fluffy yarn:
Join yarn to any stitch around the opening.
Cuff R1. sc in each st around, sl st to first sc to join (count not critical; just keep it even)
Cuff R2–R3. ch 1, sc in each st around, sl st to join
FO and weave in ends.
The cuff should look chunky and plush, rolling slightly outward.
Santa Face (Beige Oval)
Make 2 (one per slipper).
With beige/tan chenille and 6–7 mm hook:
R1. ch 6
R2. sc in 2nd ch from hook, sc 3, 3 sc in last ch; now work on other side of chain: sc 3, 2 sc in last st (the same base as first st) (12)
R3. (sc 4, inc) × 2 (14)
R4. (sc 5, inc) × 2 (16)
R5. sc around (16)
FO leaving a long tail for sewing. Lightly flatten into an oval.
For Kids: stop at R4. For Men: add one more increase round: (sc 6, inc) × 2 (18) then 1 round sc.
Nose (Beige)
With beige (you can switch to a smaller hook for more control if using very thick yarn):
R1. MR, 6 sc (6)
R2. sc around (6)
Lightly stuff, FO leaving tail. This is a tiny bump nose.
Eyes, Smile & Cheeks
You can either use safety eyes or embroidered eyes.
Safety Eyes (Preferred)
- Place two 6–8 mm safety eyes on the face oval between R3–R4, spaced about 2–3 sts apart, slightly above center.
- Once you’re happy with placement, secure backs.
Embroidered Eyes
With black yarn or thread, create:
- Two small horizontal stitches for eyes
- Optionally add a short upward flick at the outer corner for a “smiley” look.
Smile
With red thread (thinner yarn):
- Stitch a shallow curved line under the nose.
- You can build it with 2–3 small stitches to give a smooth curve.
Cheeks (Optional)
With pink yarn or blush:
- Embroider or lightly dab blush on both sides below the eyes.
Beard & Moustache (White)
Beard (White)
With white chenille:
R1. ch 8
R2. sc in 2nd ch from hook, sc 5, 3 sc in last ch; continue on other side of chain: sc 5, 2 sc in last st (the same base) (15)
R3. sc around (15)
FO with long tail. Beard should be a slightly wider oval than the face base.
To mimic the fluffy lower edge in the photo, you can add tiny “bumps”:
Join white at one side of beard’s lower edge and work:
(sl st, ch 2, sl st in next st) across the bottom 5–7 stitches, then FO.
Moustache (White, Optional Extra)
With white (switch to smaller hook if needed):
R1. ch 7
R2. sc in 2nd ch, hdc, dc, hdc, sc, sl st in last ch
FO and pinch the middle slightly when sewing to form a gentle “M” moustache under the nose.
Santa Hat (Red + White)
Make 2.
With red chenille:
R1. MR, 4 sc (4)
R2. (sc, inc) × 2 (6)
R3. sc around (6)
R4. (2 sc, inc) × 2 (8)
R5. sc around (8)
R6. (3 sc, inc) × 2 (10)
R7–8. sc around (10)
R9. (4 sc, inc) × 2 (12)
R10–11. sc around (12)
You want a short, fat cone, not a very long one – it should look like in the photos where the hat tip just bends a bit.
FO red.
Hat Trim Band (White)
With white:
Join at the base of R11.
R1. sc in each st around (12)
R2. sc in each st around (12)
FO, weave in ends.
The hat should now have a chunky white band.
Pom-Pom (White)
Make 2.
Using white yarn:
- Wrap yarn around two fingers 25–30 times.
- Slide off carefully and tie tightly at the center with a separate strand.
- Cut all loops.
- Trim into a neat small ball (about 2–2.5 cm diameter).
Sew pom-pom securely to the tip of the red hat (not the toe of the slipper).
Assembly – Building the Santa on the Slipper
Do all assembly on the top front of the slipper, centered over the toe.
1. Position the Face & Beard
- Place the beard first on the red toe, with the wider side toward the front.
- Pin it in place and sew around the top and sides, leaving the very bottom free if you want a bit of lift.
- Place the face oval overlapping the upper half of the beard (so the beard looks like it’s under the chin).
- Sew the face down securely all around.
2. Attach the Nose & Moustache
- Sew the nose bump in the center of the face, slightly above halfway vertically.
- If using a moustache, stitch it directly under the nose, curving the ends out a little.
3. Add Eyes, Smile & Cheeks
- If you haven’t already attached safety eyes, do it now, or embroider eyes directly on the face.
- Embroider the smile under the nose (over the beard top edge or just above it).
- Add blush to cheeks if desired.
4. Attach the Hat
- Position the hat so the white trim band overlaps the very top of the face (just above eyes), like Santa is wearing it low on his forehead.
- The hat should angle slightly to one side, with the pom-pom flopping toward the outer side of the slipper.
- Sew the hat around its base and along the back where it touches the slipper, leaving the tip loose so it can bend.
5. Final Details
- Make sure all pieces are sewn very securely, especially if these will be worn by children.
- Lightly tug and shape the hat so the pom-pom falls cutely to the side.
- Fluff the beard and cuff with your fingers to make them look extra soft.
Adjusting Sizes (Kids, Women, Men)
- Foot Length:
Add or remove straight rounds in the toe/foot section (R6–R10) before heel shaping. - Width:
For wider feet (men), add one extra increase round in the toe.
For narrower feet (kids), stop increasing earlier (24 sts) and work fewer foot rounds.
The Santa face pieces can be scaled by:
- Using thinner yarn and smaller hooks for kids
- Or adding 1 extra increase round on the face/beard for men’s sizes
Keep proportions similar: face slightly narrower than bootie width, beard just a bit wider than face, hat base matching face width.
Care & Use
- Hand wash in cool water; squeeze gently, don’t wring.
- Reshape Santa’s face, beard, and hat while damp.
- Lay flat to dry.
- Store in a dry place and avoid hanging by the hat (it may stretch).
With the layered face, beard, hat, and plush cuff, these slippers now match the intricate Santa design in your reference photos far more closely. They’ll look like tiny Santas parked at the ends of your toes – cozy, festive, and very hand-crochet-achievable. 🎅🧶


Magnifique travail