Welcome to the playful and charming world of amigurumi! 🦓✨ Today, I’m excited to share my free crochet pattern for a Zebra Foal—a delightful and lifelike creation perfect for animal lovers, safari-themed collections, or anyone who enjoys crafting expressive and detailed plush figures! 🌿 Whether you love stitching up adorable baby animals, creating textured and realistic designs, or simply want to add a sweet zebra foal to your handmade lineup, this pattern will guide you through crafting a beautifully sculpted plush with soft stripes, tiny hooves, and a touch of wild charm! 🤍
This design embraces bold contrasts, gentle shaping, and intricate details to bring a lively and heartwarming presence to your crochet projects! 🧶🌾 I’ve carefully outlined each step to ensure your Amigurumi Zebra Foal turns out just right—ready to trot into your collection or become a treasured handmade gift! 🎁 So grab your hooks, pick out classic black and white, soft grays, or playful pastels, and let’s stitch up an irresistibly cute zebra foal! ✨
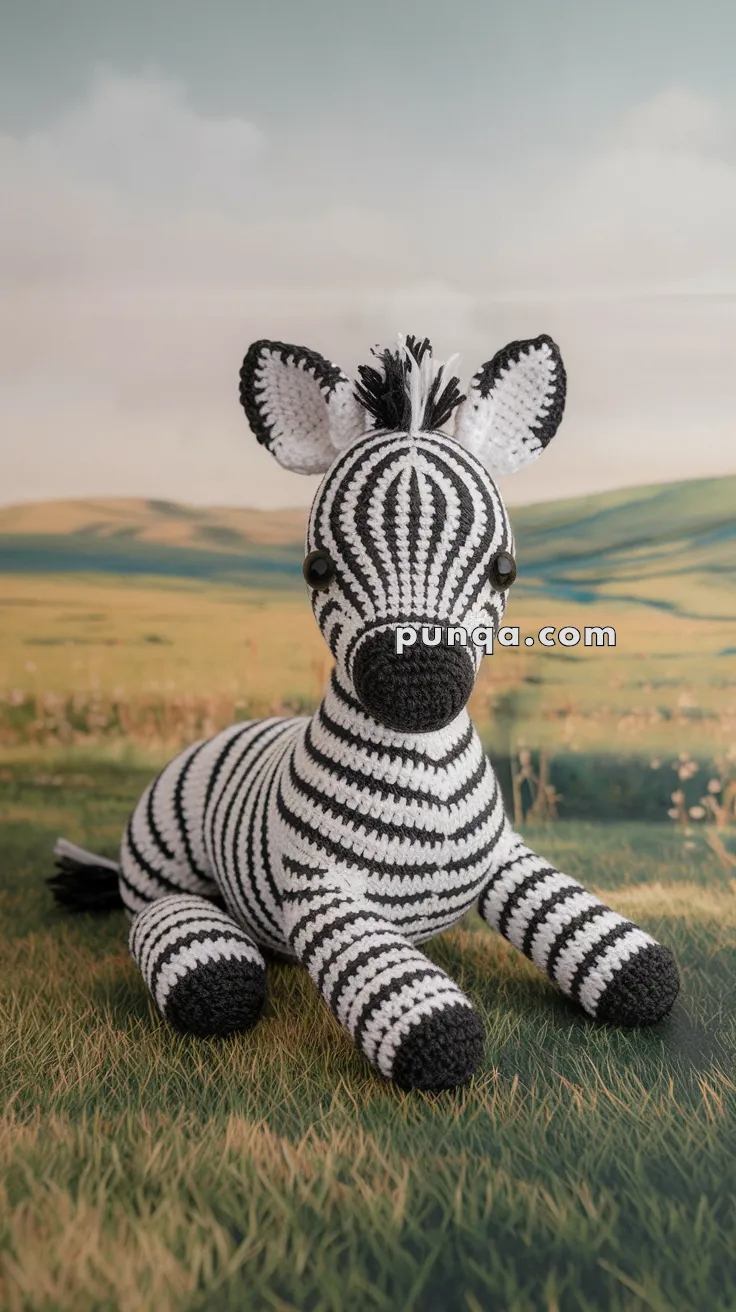
🦓 Amigurumi Zebra Foal – Free Crochet Pattern
This striking black-and-white striped zebra foal is a charming addition to your safari-themed amigurumi collection! With crisp stripe transitions and adorable seated posture, it’s perfect for gifting or decorating a nursery.
✨ Skill Level
Intermediate – Includes color changes, shaping, and sewing multiple parts.
📏 Finished Size
Approx. 25–28 cm (10–11″) from hooves to ear tip, using DK yarn and a 2.5–3 mm hook.
🧶 Materials
-
DK-weight yarn:
-
White (Main color)
-
Black (Stripe contrast, muzzle, hooves, tail)
-
-
Crochet hook: 2.5–3.0 mm
-
10 mm safety eyes
-
Tapestry needle
-
Stitch marker
-
Polyester fiberfill
-
Scissors
🧵 Abbreviations (US Terms)
MR – Magic Ring
sc – Single Crochet
inc – Increase (2 sc in 1 stitch)
dec – Decrease (sc 2 together)
sl st – Slip Stitch
ch – Chain
FO – Fasten Off
BLO – Back Loop Only
🐴 Head
Start in white, alternate 2 rounds white, 2 rounds black to create stripes:
-
MR, 6 sc
-
inc x6 (12)
-
(1 sc, inc) x6 (18)
-
(2 sc, inc) x6 (24)
-
(3 sc, inc) x6 (30)
-
(4 sc, inc) x6 (36)
7–15. sc around (36) -
(4 sc, dec) x6 (30)
-
(3 sc, dec) x6 (24)
-
(2 sc, dec) x6 (18)
-
(1 sc, dec) x6 (12) – Insert safety eyes between Rounds 10 and 11, approx. 8 sts apart
-
dec x6 (6)
FO and close. Stuff firmly.
🐽 Muzzle (Black)
-
MR, 6 sc
-
inc x6 (12)
-
sc around (12)
-
(1 sc, inc) x6 (18)
-
sc around (18)
FO and sew to the front of the head centered below the eyes.
🦓 Body
Stripe pattern: alternate 2 rounds white, 2 rounds black.
-
MR, 6 sc
-
inc x6 (12)
-
(1 sc, inc) x6 (18)
-
(2 sc, inc) x6 (24)
-
(3 sc, inc) x6 (30)
-
(4 sc, inc) x6 (36)
7–18. sc around (36) -
(4 sc, dec) x6 (30)
-
(3 sc, dec) x6 (24)
-
(2 sc, dec) x6 (18)
-
(1 sc, dec) x6 (12)
-
dec x6 (6)
FO and close. Stuff firmly.
🦵 Legs (Make 4)
Start with black for hooves:
-
MR, 6 sc
-
inc x6 (12)
-
(1 sc, inc) x6 (18)
4–5. sc around (18)
Change to white/black stripes, continue alternating colors every 2 rounds:
6–13. sc around (18) -
(1 sc, dec) x6 (12)
-
sc around (12)
FO, stuff, and sew 2 to sides for front legs, and 2 slightly back and angled for hind legs.
🐎 Ears (Make 2)
Start with white:
-
MR, 4 sc
-
(1 sc, inc) x2 (6)
-
(2 sc, inc) x2 (8)
4–6. sc around (8)
Flatten and sew to the top of the head.
Add a black edge by slip stitching around with black yarn if desired.
🧵 Mane
Cut lengths of black and white yarn (8–10 cm). Attach as fringe down the center of the head. Trim to desired spiky length. Alternate black and white strands for a striped mane look.
🐴 Tail
-
Cut 6–8 strands of black and white yarn (10–12 cm)
-
Tie in a knot and sew to the back of the body
-
Trim and fluff the tail
🧷 Assembly
-
Sew head to body with a slight upward tilt
-
Attach legs securely (2 seated, 2 flat forward)
-
Sew ears in place
-
Add safety eyes or embroider if for small children
-
Finish with mane and tail
💡 Customization Ideas
-
Add a pink nose blush or embroidered nostrils
-
Use gray instead of black for a softer look
-
Embroider tiny eyelids for a sleepy foal version
This adorable zebra foal is sure to gallop into your heart! 🦓💗