Amigurumi Zatanna – FREE Crochet Pattern

Amigurumi Zatanna – FREE Crochet Pattern
Spread the love

Welcome to the spellbinding world of amigurumi! 🎩✨ Today, I’m excited to share my free crochet pattern for an Amigurumi Zatanna—a dazzling and magical creation perfect for comic book fans, fantasy lovers, or anyone who enjoys crafting expressive and iconic plush designs! 🧶 Whether you love stitching up legendary characters, creating textured and lifelike figures, or simply want to add a touch of stage-ready enchantment to your handmade lineup, this pattern will guide you through crafting a beautifully sculpted plush with Zatanna’s signature top hat, flowing black hair, and a touch of mystical charm! 🔮

This design embraces bold contrasts, intricate shaping, and captivating details to bring a theatrical and mesmerizing presence to your crochet projects! 🧶✨ I’ve carefully outlined each step to ensure your Amigurumi Zatanna turns out just right—ready to dazzle in your collection or become a treasured handmade gift! 🎁 So grab your hooks, pick out deep blacks, crisp whites, and shimmering silvers, and let’s stitch up a magical Zatanna! 🎩
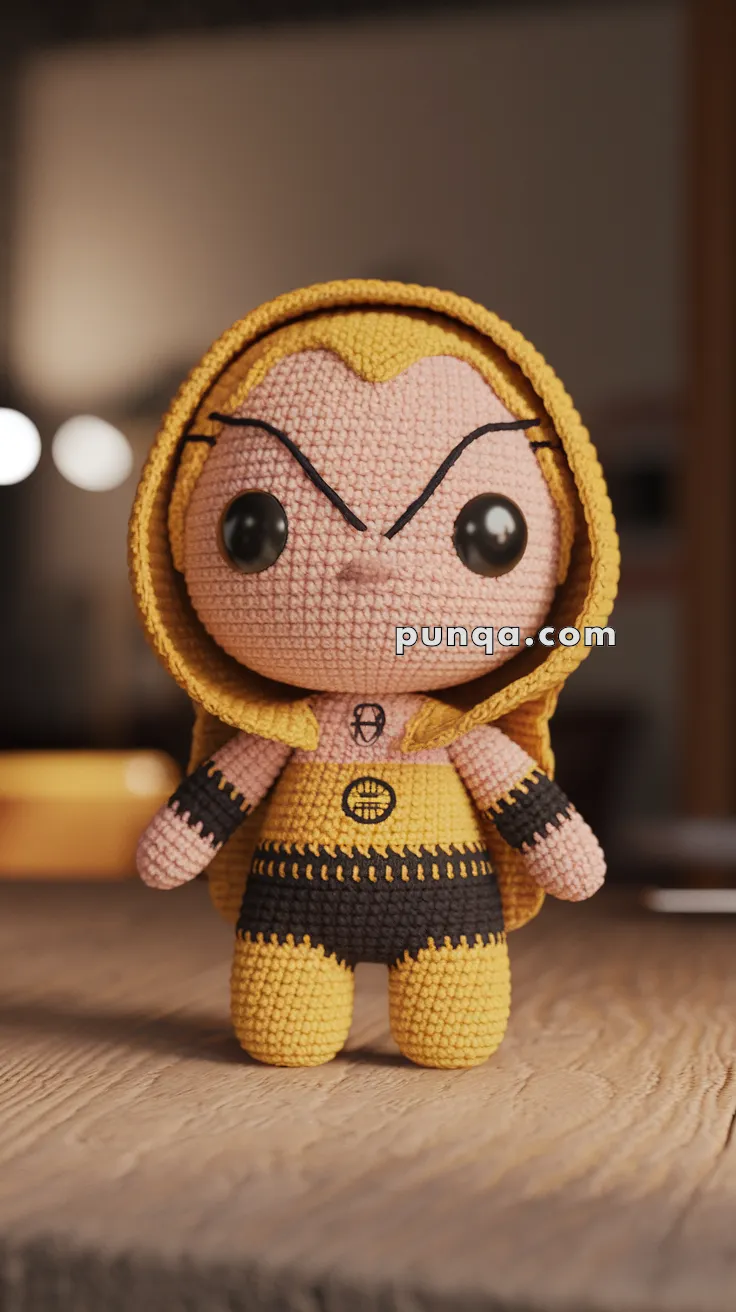
Realistic crochet image for Amigurumi Zatanna - FREE Crochet Pattern

Copyright & Pattern Usage Policy

✨ Amigurumi Yellow-and-Black Hooded Heroine Crochet Pattern

Bring bold comic-book energy to your amigurumi collection with this yellow-and-black hooded heroine. Her oversized head, dramatic embroidered brows, enormous dark eyes, fitted two-tone suit, chunky yellow boots, black wrist guards, symbolic chest markings, and structured hooded cape create a striking chibi-style display doll. 🖤💛

The doll is designed with a compact body and very large head. The legs are joined directly into the torso for a cleaner finish, while the hood and cape are worked separately so they frame the face without covering the costume details.


✂️ Skill Level

Intermediate to Advanced

This project includes:

  • Large head shaping
  • Joined-leg body construction
  • Multiple color changes
  • Embroidered facial features
  • Separate hood and cape
  • Layered costume markings
  • Standing-pose assembly
  • Light facial sculpting

📏 Finished Size

Using sport-weight cotton yarn with a 2.5 mm crochet hook, the finished doll measures approximately:

  • 21–23 cm (8¼–9 in) tall
  • 11–12 cm (4¼–4¾ in) across the head
  • 7–8 cm (2¾–3¼ in) across the shoulders

Finished measurements may vary with yarn, hook size, stuffing, and tension.


🧶 Yarn Requirements

Use smooth sport-weight or light DK cotton yarn.

  • Peach or light beige for the skin: 55–65 g
  • Golden yellow for the hood, cape, boots, suit, and markings: 75–90 g
  • Charcoal black for the shorts, wrist guards, eye details, and costume accents: 35–45 g
  • Small amount of white for optional eye highlights: 2–3 g

Polyester fiberfill: approximately 80–110 g


🧵 Materials

  • 2.5 mm crochet hook
  • Two 14–16 mm black safety eyes
  • Polyester fiberfill
  • Tapestry needle
  • Fine embroidery needle
  • Stitch markers
  • Pins
  • Scissors
  • Black embroidery floss
  • Optional plastic pellets for standing stability
  • Optional plastic canvas for the boot soles

Safety eyes are not recommended for children under three. Embroider the eyes when necessary.


🔤 Abbreviations — US Terms

  • MR — Magic Ring
  • sc — Single Crochet
  • inc — Increase: 2 sc in one stitch
  • dec — Invisible Decrease
  • sl st — Slip Stitch
  • ch — Chain
  • hdc — Half Double Crochet
  • dc — Double Crochet
  • BLO — Back Loop Only
  • FLO — Front Loop Only
  • FO — Fasten Off
  • st — Stitch

Work in continuous rounds unless instructed otherwise.


🧠 Oversized Head

The head is large, broad, and slightly flattened at the front. Use skin-tone yarn.

R1

MR 6. (6)

R2

inc ×6. (12)

R3

(1 sc, inc) ×6. (18)

R4

(2 sc, inc) ×6. (24)

R5

(3 sc, inc) ×6. (30)

R6

(4 sc, inc) ×6. (36)

R7

(5 sc, inc) ×6. (42)

R8

(6 sc, inc) ×6. (48)

R9

(7 sc, inc) ×6. (54)

R10–20

sc around. (54)

Insert the safety eyes between Rounds 14 and 15, approximately 10 stitches apart.

R21

(7 sc, dec) ×6. (48)

R22

(6 sc, dec) ×6. (42)

R23

(5 sc, dec) ×6. (36)

Begin stuffing firmly.

R24

(4 sc, dec) ×6. (30)

R25

(3 sc, dec) ×6. (24)

Continue stuffing, keeping the cheeks full and the front smooth.

R26

(2 sc, dec) ×6. (18)

R27

(1 sc, dec) ×6. (12)

R28

dec ×6. (6)

FO and close.

Gently shape the head into a broad oval. Lightly press the eye area inward while keeping the cheeks rounded.


👂 Ears — Make 2

Using skin-tone yarn:

R1

MR 6. (6)

R2

(1 sc, inc) ×3. (9)

R3

sc around. (9)

FO, leaving a sewing tail.

Flatten each ear and sew one to each side of the head, level with the lower half of the eyes.

Only the lower portions of the ears should remain visible beneath the hood.


😊 Facial Details

Eyebrows

Using black embroidery floss, create two thick angular eyebrows.

Each eyebrow should:

  • Begin close to the center forehead
  • Angle sharply upward and outward
  • Extend slightly beyond the outer edge of the eye
  • Be thicker near the center

Work several stitches over the same path for a bold comic-style expression.

Eyelashes

Add three short lashes to the outer edge of each eye.

Angle them upward and outward.

Nose

Using skin-tone yarn, make one small horizontal stitch between the eyes and slightly below them.

Pull gently to form a subtle raised nose.

Mouth

Using red or dark-pink embroidery thread, stitch a tiny centered mouth.

Keep it narrow and almost straight, with only a slight upward curve.


💛 Forehead Hood Insert

A small golden point descends from the hood onto the forehead.

Using yellow yarn:

Row 1

Ch 7.

Starting in the second chain, sc across. (6)

Row 2

Ch 1, turn, dec, 2 sc, dec. (4)

Row 3

Ch 1, turn, dec twice. (2)

Row 4

Ch 1, turn, dec. (1)

FO, leaving a sewing tail.

Position the wide edge at the hairline and point the narrow end downward between the eyebrows.

Sew it flat to the forehead after the main hood has been positioned.


🦵 Legs and Boots — Make 2

The legs begin with wide golden boots and continue upward in skin tone.

Begin with yellow yarn.

R1

MR 6. (6)

R2

inc ×6. (12)

R3

(1 sc, inc) ×6. (18)

R4

(2 sc, inc) ×6. (24)

R5–8

sc around. (24)

R9

BLO (2 sc, dec) ×6. (18)

R10–13

sc around. (18)

Switch to skin tone.

R14

BLO sc around. (18)

R15–22

sc around. (18)

Stuff the boots firmly and the upper legs moderately.

FO after completing the first leg.

Make the second leg but do not fasten off.


🧍‍♀️ Joining the Legs

Position the legs side by side with the toes facing forward.

Joining Round

From the second leg:

Ch 3, join to the first leg with sc.

Work 18 sc around the first leg, 3 sc along one side of the joining chain, 18 sc around the second leg, and 3 sc along the opposite side of the chain.
(42)

Place the marker at the center back.


🖤 Shorts and Lower Torso

Continue using black yarn.

R1–5

sc around. (42)

R6

(5 sc, dec) ×6. (36)

R7–8

sc around. (36)

The black section creates the fitted shorts.


💛 Yellow Bodice

Switch to yellow yarn.

R9

BLO sc around. (36)

R10–14

sc around. (36)

R15

(4 sc, dec) ×6. (30)

R16–18

sc around. (30)

R19

(3 sc, dec) ×6. (24)

R20–21

sc around. (24)

Stuff the legs and torso firmly.

Switch to skin tone.

R22

BLO sc around. (24)

R23

(2 sc, dec) ×6. (18)

R24–25

sc around. (18)

FO, leaving a long tail for attaching the head.

The two skin-tone rounds form the visible neck and upper chest.


🖤 Shorts Leg Edging

Attach black yarn to the unused front loops of Body R9.

Work one round of loose slip stitches around each upper leg opening.

FO neatly.

This creates the clean lower edge visible between the shorts and golden boots.


🖤 Waistband

Using black yarn:

Ch enough stitches to wrap around the waist, approximately 39–42 chains.

Join without twisting.

R1–2

sc around.

FO.

Place the waistband across the transition between the yellow bodice and black shorts.

Sew at several points.


💛 Waist Stitching

Using yellow embroidery yarn, work short evenly spaced vertical stitches around the black waistband.

The stitches should resemble small golden loops or dashes.


💪 Arms — Make 2

The arms include skin-tone hands, black forearm guards, and skin-tone upper arms.

Begin with skin-tone yarn.

R1

MR 6. (6)

R2

inc ×6. (12)

R3–6

sc around. (12)

R7

(2 sc, dec) ×3. (9)

R8–10

sc around. (9)

Switch to black.

R11

BLO sc around. (9)

R12–15

sc around. (9)

Switch back to skin tone.

R16

BLO sc around. (9)

R17–21

sc around. (9)

Stuff the hand and forearm lightly.

Leave the upper arm almost unstuffed.

Flatten the opening.

FO, leaving a long sewing tail.


💛 Wrist-Guard Stitching

Using yellow yarn, embroider small vertical stitches around:

  • The upper edge of each black guard
  • The lower edge of each black guard

Space the stitches evenly for the stitched armor effect.


🪡 Attaching the Arms

Position the arms on the upper sides of the torso.

Angle them slightly downward.

The hands should rest near the hips.

Sew through each flattened shoulder opening.


🖤 Bodice Markings

The costume has asymmetrical black markings across the chest and shoulders.

Left Shoulder Patch

Using black yarn:

Row 1

Ch 6.

Starting in the second chain, sc across. (5)

Rows 2–3

sc across. (5)

FO.

Sew the patch high on one side of the chest.

Right Chest Bars — Make 2

Using black yarn:

Row 1

Ch 8.

Starting in the second chain, sc across. (7)

Row 2

sc across. (7)

FO.

Sew the bars horizontally on the opposite upper chest.

Leave one round of yellow visible between them.


⭕ Abdomen Emblem

Black Base

Using black yarn:

R1

MR 6. (6)

R2

inc ×6. (12)

FO.

Golden Center

Using yellow embroidery yarn, stitch:

  • One vertical line through the center
  • Three short horizontal bars across it
  • A small circular outline inside the black edge

Sew the emblem to the center of the yellow bodice.


🖤 Neck Symbol

Using black embroidery floss, stitch a small oval symbol on the visible upper chest.

Add:

  • One vertical center line
  • One short horizontal line
  • A curved outer outline

Keep the design small enough to remain fully visible beneath the chin.


💛 Hood Crown

The hood is worked as a large rounded cap that frames the entire face.

Using yellow yarn:

R1

MR 6. (6)

R2

inc ×6. (12)

R3

(1 sc, inc) ×6. (18)

R4

(2 sc, inc) ×6. (24)

R5

(3 sc, inc) ×6. (30)

R6

(4 sc, inc) ×6. (36)

R7

(5 sc, inc) ×6. (42)

R8

(6 sc, inc) ×6. (48)

R9

(7 sc, inc) ×6. (54)

R10

(8 sc, inc) ×6. (60)

R11–17

sc around. (60)

Do not close the piece.

FO, leaving a long sewing tail.


💛 Hood Face Opening

Flatten the hood with the joining seam centered at the back.

Mark approximately 38 stitches across the front.

These stitches will form the open face area.

Join yellow yarn to the first marked stitch.

Row 1

sc across the back 22 stitches only. (22)

Turn.

Rows 2–8

Ch 1, turn, sc across. (22)

FO.

These rows extend the back of the hood while leaving the front open.

Sew the lower corners to create a curved hood opening.


💛 Hood Border

Join yellow yarn at the lower front corner.

Work sc evenly around the entire face opening.

Border Round 2

Work loose slip stitches around the same edge.

FO.

The border should form a thick raised frame around the face.


🧥 Cape

The cape is attached to the lower back edge of the hood and extends behind the doll.

Using yellow yarn:

Row 1

Join yarn across 24 centered stitches along the lower back of the hood.

Ch 1, sc across. (24)

Row 2

Ch 1, turn, (3 sc, inc) ×6. (30)

Row 3

sc across. (30)

Row 4

(4 sc, inc) ×6. (36)

Row 5

sc across. (36)

Row 6

(5 sc, inc) ×6. (42)

Rows 7–15

sc across. (42)

Row 16

(6 sc, inc) ×6. (48)

Rows 17–19

sc across. (48)

FO.

The cape should fall behind the body and end near the upper legs.


💛 Cape Border

Join yellow yarn at one upper cape corner.

Work sc evenly down one side, across the bottom, and up the opposite side.

At each lower corner, work 3 sc in the same stitch.

Work one additional row of loose slip stitches around the same edge.

FO.


💛 Hood Tips

The lower front corners of the hood extend into two pointed tabs.

Make 2 using yellow yarn:

Row 1

Ch 9.

Starting in the second chain, sc across. (8)

Row 2

Ch 1, turn, dec, 4 sc, dec. (6)

Row 3

Ch 1, turn, dec, 2 sc, dec. (4)

Row 4

Ch 1, turn, dec twice. (2)

Row 5

Ch 1, turn, dec. (1)

FO.

Sew one pointed tab to each lower front side of the hood.

Angle the tips inward toward the chest.


🪡 Fitting the Hood

Place the hood over the head.

The opening should:

  • Follow the rounded outline of the face
  • Sit just outside the eyebrows
  • Leave the ears covered or mostly concealed
  • Extend below the cheeks
  • Meet near the upper chest
  • Frame the forehead insert

Sew the hood to the head at several hidden points around the crown and sides.

Do not sew the border completely flat; allow it to project slightly.

Attach the forehead insert after securing the hood.


🪡 Attaching the Head

Center the head over the neck opening.

Add additional stuffing between the pieces if required.

Sew around the neck several times using skin-tone yarn.

Ensure the embroidered chest symbol remains visible.

The large head should sit upright with only a slight forward tilt.


✨ Final Shaping

  • Keep the head much larger than the body.
  • Position the eyes low enough to leave room for the brows.
  • Make the eyebrows bold and sharply angled.
  • Center the tiny mouth beneath the nose.
  • Keep the hood opening broad and symmetrical.
  • Let the hood border project slightly from the face.
  • Position the forehead point between the brows.
  • Keep the torso compact.
  • Place the black shorts high on the hips.
  • Make both yellow boots large and evenly shaped.
  • Angle the arms gently downward.
  • Keep the cape flat behind the body.
  • Check that the doll stands without leaning forward.

💡 Stability Tips

  • Add a small sealed pouch of plastic pellets to each boot.
  • Insert plastic-canvas circles inside the boot soles.
  • Stuff the legs and torso firmly.
  • Reinforce the head-to-body seam several times.
  • Tack the cape lightly to the back of the legs if it curls forward.
  • Keep the hood and cape lightly blocked rather than heavily stiffened.
  • Pin both arms and legs before sewing permanently.

🧼 Care Instructions

Spot clean gently with a damp cloth.

Allow the doll to air dry completely.

Avoid machine washing when safety eyes, pellets, or plastic canvas are used.

Store upright without placing pressure on the hood border, cape, eyebrows, or costume appliqués.


🌟 Final Thoughts

Your yellow-and-black hooded heroine is ready to bring fierce comic-book style to your handmade collection. 💛🖤

With her enormous expressive eyes, angular brows, tiny determined mouth, sculpted hood, flowing cape, symbolic costume details, black wrist guards, fitted shorts, and chunky golden boots, this chibi doll has a bold silhouette from every angle.

Happy Crocheting! 🧶✨


Spread the love

Comments

No comments yet. Why don’t you start the discussion?

Leave a Reply

Your email address will not be published. Required fields are marked *