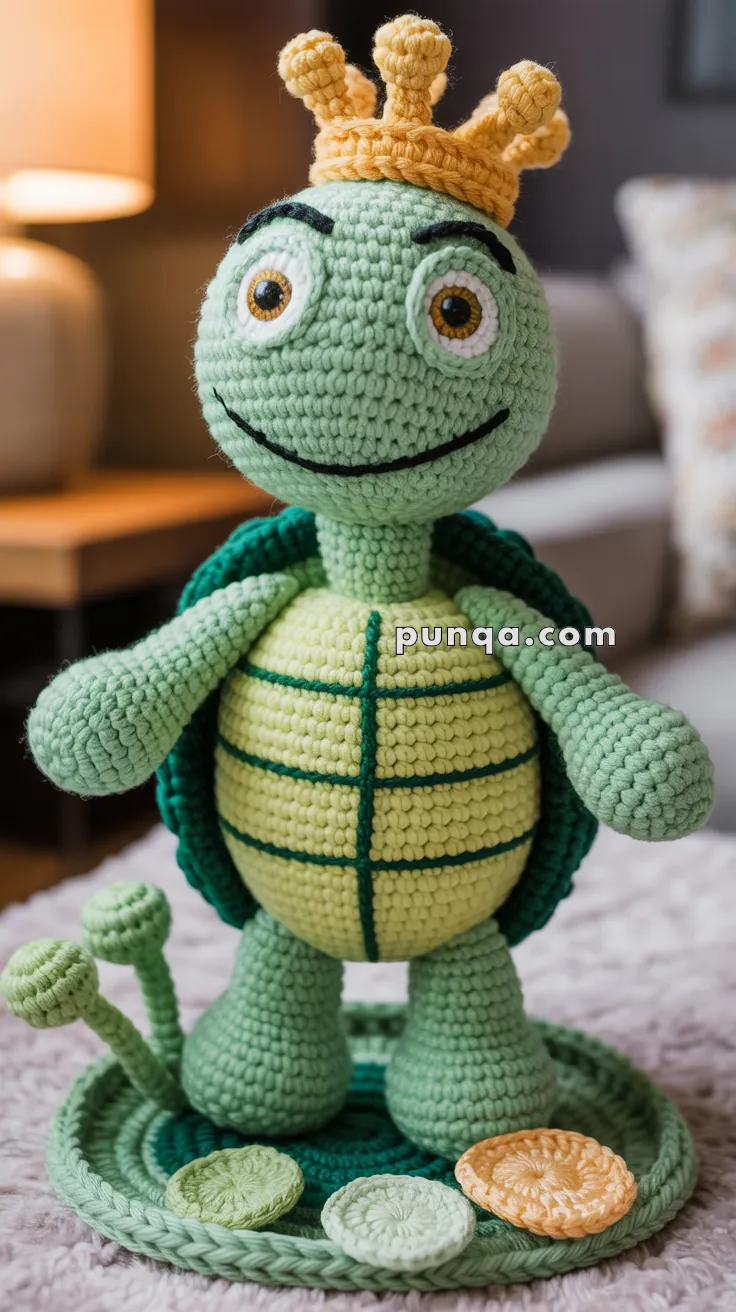
🧶 Step into the whimsical world of Dr. Seuss with this charming Amigurumi Yertle the Turtle crochet pattern! Inspired by the ambitious little ruler from the classic tale, Yertle comes to life with a regal shell, curious eyes, and a personality that’s equal parts adorable and mischievous. Whether you’re a fan of storybook characters or simply love crafting unique creatures, this project is a delightful way to bring a bit of literary magic to your yarn stash. Perfect for gifting, storytelling props, or adding a playful twist to your amigurumi collection!
With his stackable potential and expressive features, Yertle invites you to experiment with color, texture, and even a few accessories—perhaps a tiny crown or a miniature throne? 🐢✨ This pattern is a fun challenge for intermediate crocheters and a great opportunity to explore character design through stitches. Whether perched proudly on a shelf or nestled among other handmade friends, Yertle the Turtle is sure to spark smiles and conversations wherever he goes. Let your creativity reign and stitch up your own tiny turtle kingdom! 👑💚

🐢 Amigurumi “Yertle the Turtle” Crochet Pattern
Make your own regal turtle friend with this charming amigurumi pattern! Yertle wears a golden crown, stands proudly on his lily pad, and features a detailed shell and cheerful embroidered face. This pattern is written in US crochet terms.
✨ Skill Level
Intermediate – Includes color changes, surface stitching, and multiple pieces to assemble.
📏 Finished Size
Approx. 28–32 cm (11–12.5 in) tall when standing, using worsted weight yarn and a 3.0–3.5 mm hook.
🧶 Materials
- Yarn (Worsted/Aran weight):
- Light Green (Head, Arms, Legs, Shell Base)
- Dark Green (Shell Rim, Shell Back, Lily Pad)
- Pale Yellow/Light Chartreuse (Belly/Tummy Plate)
- Golden Yellow (Crown, decorative discs)
- Black (Eyebrows, mouth embroidery)
- White (Eye whites)
- Brown/Gold (Eye detail)
- Crochet hook: 3.0–3.5 mm
- Safety eyes: 12–14 mm
- Tapestry needle, scissors
- Stitch markers
- Polyfill stuffing
- Optional: Small wire or pipe cleaners for crown shaping
🧵 Abbreviations (US Terms)
MR – Magic Ring
sc – single crochet
inc – increase (2 sc in same st)
dec – decrease
sl st – slip stitch
ch – chain
BLO – back loop only
FLO – front loop only
hdc – half double crochet
dc – double crochet
tr – treble crochet
FO – fasten off
🐢 Head (Light Green)
- MR, 6 sc (6)
- inc x6 (12)
- (1 sc, inc) x6 (18)
- (2 sc, inc) x6 (24)
- (3 sc, inc) x6 (30)
- (4 sc, inc) x6 (36)
- (5 sc, inc) x6 (42)
8–16. sc around (42) – 9 rounds
Insert safety eyes between rounds 11–12, about 12–14 sts apart. - (5 sc, dec) x6 (36)
- (4 sc, dec) x6 (30)
- (3 sc, dec) x6 (24)
Stuff firmly. - (2 sc, dec) x6 (18)
- (1 sc, dec) x6 (12)
- dec x6 (6)
FO, close hole.
😊 Eye Whites (Make 2, White)
- MR, 6 sc (6)
- inc x6 (12)
- (1 sc, inc) x6 (18)
FO with long tail and sew under the safety eyes.
👁 Eye Detail
- Embroider a small gold/brown circle around the safety eye edge.
- Add a black line above each eye for eyebrows.
😃 Mouth
Using black yarn, embroider a simple curved smile under the eyes.
🐢 Neck (Light Green)
- MR, 6 sc (6)
- inc x6 (12)
3–10. sc around (12) – 8 rounds
Stuff lightly. FO.
🐢 Arms (Make 2, Light Green)
- MR, 6 sc (6)
- inc x6 (12)
3–12. sc around (12) – 10 rounds - (4 sc, dec) x2 (10)
Stuff lightly. Flatten the opening and close with 5 sc through both layers. FO.
🐢 Legs (Make 2, Light Green)
- MR, 6 sc (6)
- inc x6 (12)
- (1 sc, inc) x6 (18)
- (2 sc, inc) x6 (24)
5–8. sc around (24) – 4 rounds - (2 sc, dec) x6 (18)
10–14. sc around (18) – 5 rounds
Stuff firmly. FO with long tail.
🐢 Belly Plate (Pale Yellow)
Work in joined rounds:
- MR, 6 sc, join (6)
- inc x6, join (12)
- (1 sc, inc) x6 (18)
- (2 sc, inc) x6 (24)
- (3 sc, inc) x6 (30)
- (4 sc, inc) x6 (36)
- (5 sc, inc) x6 (42)
- (6 sc, inc) x6 (48)
FO, leaving a tail for sewing. Use dark green yarn to embroider the grid lines on the belly (one vertical and several horizontal lines).
🐢 Shell (Dark + Light Green)
Shell Back (Dark Green)
- MR, 6 sc (6)
- inc x6 (12)
- (1 sc, inc) x6 (18)
- (2 sc, inc) x6 (24)
- (3 sc, inc) x6 (30)
- (4 sc, inc) x6 (36)
- (5 sc, inc) x6 (42)
- (6 sc, inc) x6 (48)
- (7 sc, inc) x6 (54)
- (8 sc, inc) x6 (60)
FO.
Shell Rim (Dark Green)
Join yarn to outer loop of the back piece and crochet 2 rounds of sc. This creates a raised rim. FO.
👑 Crown (Golden Yellow)
Base Band:
- ch 30 (adjust to fit turtle’s head), join to form ring.
2–3. sc around.
Crown Points (repeat 5 times):
(sl st, ch 3, 3 dc in next st, ch 3, sl st) across band.
Add small bobble tips (optional): At the tip of each point, make 4 hdc bobble, ch 1, sl st.
FO and weave ends.
🌿 Lily Pad Base (Dark Green + Light Green)
Dark Green:
- MR, 6 sc (6)
- inc x6 (12)
- (1 sc, inc) x6 (18)
- (2 sc, inc) x6 (24)
- (3 sc, inc) x6 (30)
- (4 sc, inc) x6 (36)
- (5 sc, inc) x6 (42)
- (6 sc, inc) x6 (48)
Switch to light green for the edging: - FLO (sl st, ch 3, 2 dc in next st, ch 3, sl st) repeat to form small wavy edge. FO.
🌼 Decorative Discs (Make 3 in assorted colors)
- MR, 6 sc (6)
- inc x6 (12)
- (1 sc, inc) x6 (18)
FO and weave in ends.
🧩 Assembly
- Body + Shell: Sew the belly plate to the front of the body, and the dark green shell back to the back, aligning at the sides.
- Head + Neck: Attach the neck to the body top, then sew the head to the neck firmly.
- Arms and Legs: Sew arms to each side of the body just below the neck. Attach legs to the bottom so Yertle stands firmly.
- Face Details: Add embroidered eyebrows and mouth.
- Crown: Place the crown on the head and secure with hidden stitches.
- Lily Pad: Place Yertle on the lily pad and stitch lightly if you want it fixed. Arrange decorative discs on the lily pad.
🌟 Finishing Touches
- Adjust the shape of the crown tips and shell edges by hand.
- Weave in all loose ends.
- Lightly blush the cheeks (optional).
- Add extra details like a tiny scarf or collar if you want to customize Yertle.
This adorable turtle with his royal crown will make a perfect whimsical centerpiece or toy. Have fun bringing your Yertle to life! 🐢👑


