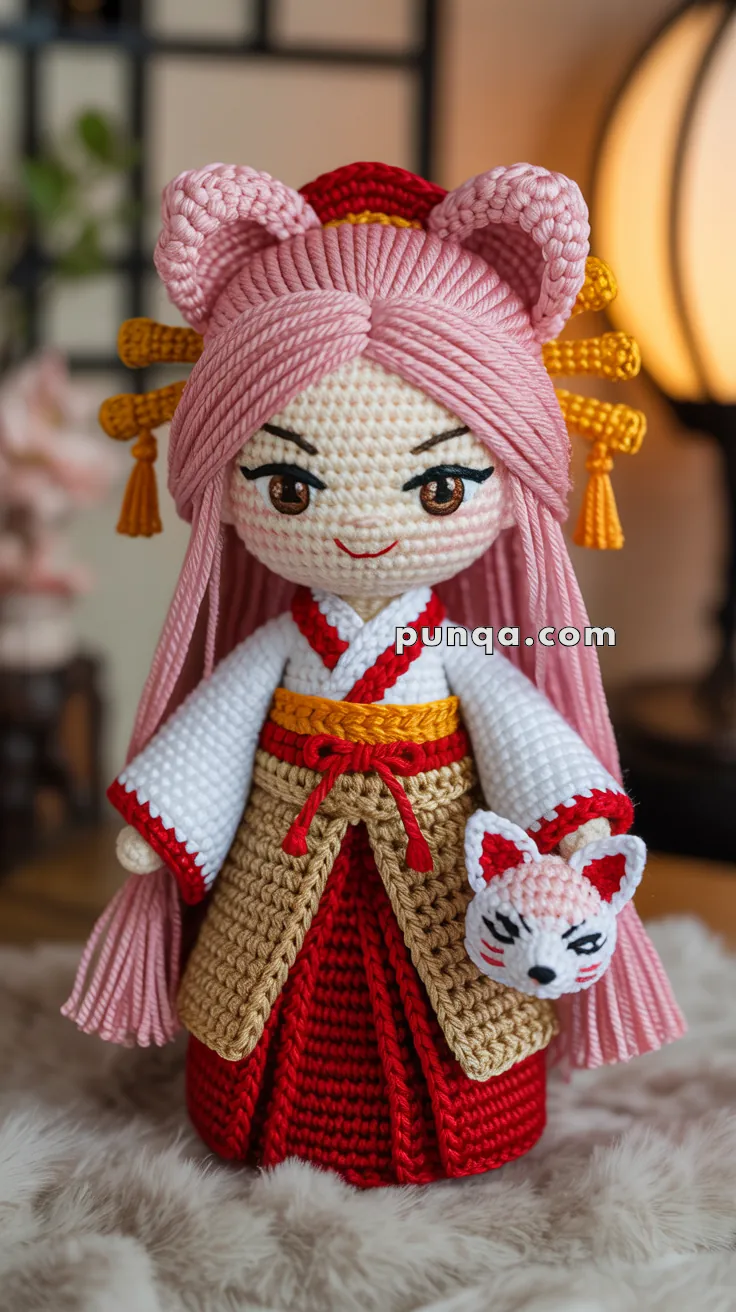
Step into the mystical world of Inazuma with this enchanting Amigurumi Yae Miko crochet pattern! Inspired by the elegant shrine maiden from Genshin Impact, this design captures her graceful charm, flowing pink hair, and signature outfit with delightful detail. Whether you’re crafting for a fan of the game, building a character-themed collection, or simply love bringing powerful personalities to life in yarn, Yae Miko is sure to cast a spell on your heart—one stitch at a time. 🧶🩷🦊
Designed for flair and finesse, this pattern invites you to explore intricate shaping, vibrant colorwork, and fun extras like her ornate accessories, fox-like ears, or even a tiny Electro vision. Customize her look with shimmering yarns or embroidered accents to reflect her divine elegance. Whether perched on a shelf, nestled in a gift basket, or starring in a handmade tribute to the world of Teyvat, this Yae Miko Amigurumi is a joyful and satisfying project—perfect for stitching up a little handmade magic, one loop at a time! 💖✨🌸
🦊 Amigurumi Yae Miko Crochet Pattern
This elegant Yae Miko-inspired amigurumi doll captures the essence of her graceful shrine maiden aesthetic, complete with fox ears, long pink hair, detailed kimono layers, and a little kitsune mask. This pattern is written in US crochet terms and includes key detailing tips to bring her personality to life.
✨ Skill Level
Advanced – Detailed construction, shaping, and layered clothing.
📏 Finished Size
Approximately 18–22 cm (7–9 in) tall using DK or worsted yarn and a 2.5–3.0 mm hook.
🧶 Materials
- Yarn (Cotton or acrylic DK/Worsted):
- Pale Pink – hair
- White – kimono top
- Red – kimono skirt, trim, and bow
- Golden Yellow – obi and hair ornaments
- Tan – overlayer skirt panels
- Flesh/Beige – skin tone
- Dark Brown – eyes, eyebrows
- Black – eyeliner details
- Small bits of pink/red/white/black for the fox mask
- Crochet hook: 2.5–3.0 mm
- Tapestry needle
- Polyfill stuffing
- Stitch markers
- Fabric glue (optional for eye/facial details)
- Thin cardboard/plastic insert for base stability (optional)
🧵 Abbreviations (US Terms)
MR – Magic Ring
sc – Single Crochet
inc – Increase
dec – Decrease
sl st – Slip Stitch
ch – Chain
BLO – Back Loop Only
FLO – Front Loop Only
FO – Fasten Off
Head
With skin-tone yarn:
- MR, 6 sc (6)
- inc x6 (12)
- (1 sc, inc) x6 (18)
- (2 sc, inc) x6 (24)
- (3 sc, inc) x6 (30)
- (4 sc, inc) x6 (36)
- (5 sc, inc) x6 (42)
- Rounds 8–16: sc around (42)
- (5 sc, dec) x6 (36)
- (4 sc, dec) x6 (30)
- (3 sc, dec) x6 (24)
- (2 sc, dec) x6 (18)
- Stuff firmly
- (1 sc, dec) x6 (12)
- dec x6 (6)
FO and close.
Face Details:
- Eyes: either use safety eyes + embroidered lids, or crochet circles with brown iris, black linework, and white highlight.
- Embroider brows and eyeliner with dark brown and black.
- Use red thread to embroider a small smiling mouth.
Hair Cap Base
With pale pink yarn:
- Repeat head pattern through 42 sts
- 3–4 rounds of sc around (42)
- FO and stitch to head.
Side Bangs and Fringe Strips:
Cut multiple strands (~15–18 cm), fold in half, and attach using latch-hook method to the front hairline and sides. Separate to frame the face.
Back Hair Panels:
Attach multiple strands to back of the head, letting them hang freely and trimming evenly at the bottom. Secure with glue or stitches at the scalp.
Ears (Make 2)
With pink yarn:
- MR, 6 sc (6)
- (1 sc, inc) x3 (9)
- (2 sc, inc) x3 (12)
- (3 sc, inc) x3 (15)
- 1 round sc around (15)
Switch to light pink: - 2 rounds sc around
- Flatten and sew to top sides of head. Shape into upright fox-like ears.
Body
With skin tone:
- MR, 6 sc (6)
- inc x6 (12)
- (1 sc, inc) x6 (18)
- sc around for 4 rounds
Switch to white: - 1 round sc
- Switch to red:
- Work 1 round and continue base of skirt as part of body flare (see skirt below).
Stuff body firmly. Do not close bottom – you’ll attach skirt and base later.
Kimono Sleeves (Make 2)
With white:
- MR, 6 sc
- (1 sc, inc) x3 (9)
- Work 12–14 rounds sc (adjust length)
Switch to red for trim: - 2 rounds sc
FO. Leave a tail to attach to body sides.
Optional: crochet sleeve lining in red and stitch inside for contrast.
Arms (Make 2)
With skin tone:
- MR, 6 sc
- inc x6 (12)
- 3 rounds sc
Switch to white: - 6–7 rounds sc
Stuff lightly and attach to sleeves, then attach whole unit to the sides of the body.
Skirt (Red Undergarment)
With red yarn:
- Ch a length to fit around body base
- Work 5–6 rows of sc, then a few rows of vertical post stitches (alternating FPsc/BPsc) for pleated effect
FO and sew to the body base.
Tan Apron Skirt Panels
Make 2 rectangles with tan yarn:
- Ch ~10
- Work 6–8 rows of sc
- Add red belt tie (ch 30–40, wrap around waist and tie)
Sew each panel to the front over the red skirt layer.
Obi Sash and Bow
With gold:
- Ch ~25 and work 2–3 rows of sc for the belt
- Add red bow at center front (ch 20, tie, and stitch down)
Hair Accessories
With gold yarn:
- Make 4–6 tassels (ch 6–8, sl st back, tie together)
- Attach in pairs behind each ear.
Optional: Add fan or scroll accessories for detail.
Fox Mask
With white yarn:
- MR, 6 sc
- (1 sc, inc) x3 (9)
- (2 sc, inc) x3 (12)
- (3 sc, inc) x3 (15)
Work a few more rounds to form a slightly pointed oval.
Add details:
- Pink for inner ears and forehead
- Black for eye slits
- Red for nose and cheek markings
Attach to the hand with a thread loop or sew directly.
Assembly
- Sew head to body securely.
- Attach sleeves + arms to sides.
- Secure the skirts, aprons, and obi around the waist.
- Shape hair and sew down the cap and loose strands.
- Attach fox ears and hair accessories.
- Stitch on the fox mask to one hand.
- Add final facial embroidery and smooth out the hair.
✨ Finishing Touches
- Carefully trim the hair to even out strands.
- Add light blush to cheeks using pink pastel or fabric-safe paint.
- Lightly steam-block skirts and accessories if needed.
- Use invisible thread for any delicate accessory attachment.
This detailed Yae Miko amigurumi doll is a beautiful tribute to her graceful shrine maiden style. With intricate layering and expressive features, she’ll make a stunning centerpiece for any collection. Whether displayed on a shelf or gifted to a fellow fan, her presence is bound to enchant! 🦊💮