Bring a touch of nature-inspired charm to your crochet collection with this Amigurumi Woodland Bird House pattern! Whether you’re crafting for bird lovers, adding a cozy woodland accent to your handmade creations, or simply enjoy making adorable amigurumi designs, this free pattern lets you stitch up a delightful birdhouse bursting with personality. With its rustic shape, tiny entrance, and charming details, this crochet birdhouse captures the essence of a peaceful forest retreat in every stitch. Perfect for gifting to fellow crochet enthusiasts, decorating a nature-themed space, or simply celebrating the joy of handmade creations, this amigurumi woodland birdhouse is sure to bring smiles—one stitch at a time! 🐦✨
Designed for customization, this pattern allows you to experiment with different shades of earthy tones, embroidered details, or even tiny accessories like miniature birds or leafy vines for extra personality. Craft a classic wooden birdhouse with warm browns, create a whimsical version with bright colors, or even stitch up a full woodland-inspired set with matching creatures! Whether gifted as a cherished keepsake, displayed as a cozy accent, or made simply for the joy of crafting, this Amigurumi Woodland Bird House is a fun and creative project—perfect for bringing a touch of handmade nature to every stitch! 🧶🌿
🏡 Woodland Birdhouse & Forest Friend Crochet Pattern
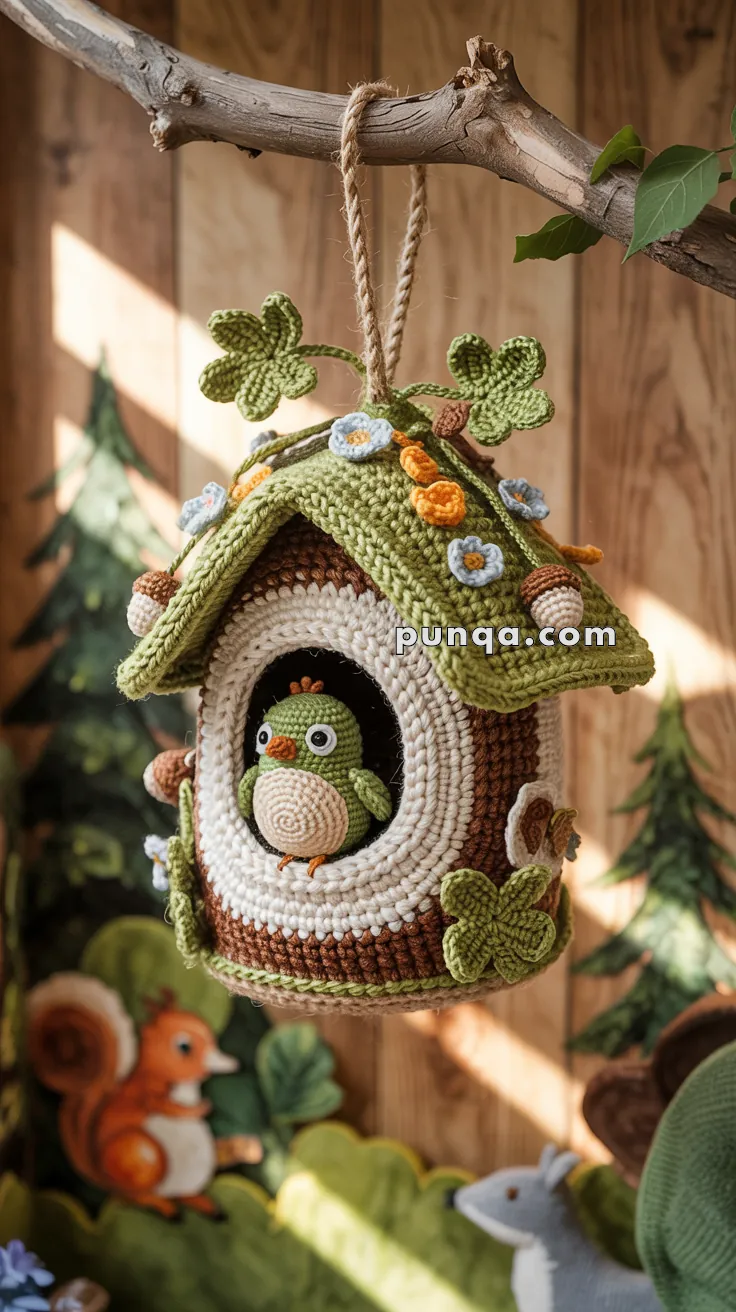
Create a whimsical woodland birdhouse adorned with clovers, tiny blossoms, leafy accents, and a sweet little bird peeking out from its doorway. This pattern combines dimensional details with a soft, storybook feel — perfect for nurseries, seasonal décor, or handmade gifting.
✨ Skill Level
Intermediate – involves shaping, color changes, layered appliqués, decorative elements, and final assembly.
📏 Finished Size
Approx. 8–10 in (20–25 cm) tall and 5–6 in (13–15 cm) wide when made with worsted yarn and a 3.0 mm hook.
🧺 Materials
- Worsted-weight yarn:
- Brown (body & knobs) – ~80 g
- Cream or beige (door ring & belly accents) – ~40 g
- Green (roof, trim, leaves, clovers) – ~70 g
- Blue, yellow, white (flowers) – ~15 g total
- Orange (bird tuft & feet) – small amount
- Black & white (bird eyes) – scraps
- Crochet hook: 3.0 mm
- Polyfill stuffing
- Floral wire (for clover stems), 7–12 cm pieces × 3–5
- 8–10 mm safety eyes or felt circles
- Scissors, tapestry needle, hot glue
- Twine or rope for hanging
- Optional: stiff felt/cardboard for base support
🧵 Abbreviations (US)
MR – Magic ring
sc – single crochet
inc – increase (2 sc in same st)
dec – decrease (sc2tog)
sl st – slip stitch
ch – chain
st(s) – stitch(es)
FO – fasten off
BLO – back loop only
🍂 Birdhouse Body
Worked in three color bands with strong vertical walls.
Bottom (Brown):
MR, 6 sc (6)
inc ×6 (12)
(1 sc, inc) ×6 (18)
(2 sc, inc) ×6 (24)
(3 sc, inc) ×6 (30)
(4 sc, inc) ×6 (36)
(5 sc, inc) ×6 (42)
(6 sc, inc) ×6 (48)
(7 sc, inc) ×6 (54)
(8 sc, inc) ×6 (60)
R11–R16: sc around (60)
Middle Band (Cream):
R17–R24: sc around (60)
Top (Brown):
R25: BLO sc around (60) ← roof join ridge
R26–R33: sc around (60)
Stuff base lightly. Optional: insert stiff felt/cardboard circle.
FO, leave long tail.
🌿 Bottom Green Edging
Attach green yarn at very base edge.
Round 1: sc around
Round 2: (sl st, ch 3, sc in next st) repeat to end
This forms mossy leafy texture.
⚪ Door Ring (Double Layer)
Make 2 identical pieces:
MR, 6 sc
inc ×6 (12)
(1 sc, inc) ×6 (18)
(2 sc, inc) ×6 (24)
(3 sc, inc) ×6 (30)
(4 sc, inc) ×6 (36)
Diameter should be approx. 3.75–4 in (9.5–10 cm).
Do not close center.
Place rings together, stitch around outer edge. Lightly stuff or insert thin felt for thickness.
Sew centered to front of house.
🌱 Roof (Soft Dome)
MR, 6 sc
inc ×6 (12)
(1 sc, inc) ×6 (18)
(2 sc, inc) ×6 (24)
(3 sc, inc) ×6 (30)
(4 sc, inc) ×6 (36)
(5 sc, inc) ×6 (42)
(6 sc, inc) ×6 (48)
(7 sc, inc) ×6 (54)
(8 sc, inc) ×6 (60)
(9 sc, inc) ×6 (66)
R12: BLO sc around (66) ← gentle ridge
R13–R22: sc around (66)
FO, leave long tail.
Sew roof to body aligning ridge lines.
Allow slight overhang on all sides.
🍀 Clover Leaves (Make 15 total leaves → 5 clovers)
Each leaf is made separately (3 per clover):
Leaf (make 15):
MR
(ch 3, sl st to ring) ×3
Pull tight. FO with long tail.
Group 3 leaves together at points to form each clover.
Clovers in image:
- 3 on roof peak
- 1 below doorway
- 1 lower right side
Sew securely.
🌿 Clover Stems (3–4)
Cut floral wire 7–12 cm long.
Wrap green yarn tightly around wire.
Secure ends with tiny glue dot.
Attach stems at top peak, angle outward.
Sew clovers to stem tips.
🌼 Flowers (8–10)
Use blue, yellow, white.
MR
(ch 3, sl st to ring) ×5
Tighten, FO with tail.
Arrange mostly along roof ridge and upper roof sides.
🌰 Decorative Knobs (4)
Base (Brown):
MR, 6 sc
inc ×6 (12)
R3: sc around (12)
R4: dec ×6 (6)
FO, stuff lightly.
Cap Texture (Green or Tan):
Join at top, work 1 round in front-post double crochets or bobble stitch for ribbed look.
Attach 2 on left side of doorway and 2 on right side.
🐦 Bird
Body (Green)
MR, 6 sc
inc ×6 (12)
(1 sc, inc) ×6 (18)
R4–R7: sc around (18)
(1 sc, dec) ×6 (12)
Stuff lightly
dec ×6 (6)
FO and close.
Spiral Belly (Cream)
MR, 6 sc
(inc ×6) (12)
(1 sc, inc) ×6 (18)
(2 sc, inc) ×6 (24)
Flatten; sew securely over lower front.
Wings ×2 (Green)
MR, 5 sc
(1 sc, inc) ×4 (8)
R3: sc around
Flatten and sew at sides.
Eyes (White)
MR, 6 sc
FO
Add black felt dot or stitch pupil.
Sew eyes wide apart on head.
Beak (Orange)
Ch 3, sl st back
Sew between eyes.
Top Tufts (Orange)
Attach 3–4 short yarn strands on top center. Trim slightly.
Feet (Orange)
Ch 5, sc back
Make two short pieces.
Sew peeking below belly.
Placement:
Position bird at doorway lip so head protrudes, belly rests outside ring, and feet are visible below opening.
🍃 Base Clovers & Extra Leaves
Base clovers:
- One below door
- One at lower right
Small leaves:
Make 2–3 additional mini appliqué leaves and sew randomly along lower body.
Mini leaf (small):
Ch 4
sl st, sc, hdc, dc in across chain
FO
🪝 Hanging Loop
Cut twine/rope ~16–20 in long.
Fold in half.
Sew firmly to roof peak.
🪡 Final Assembly
- Sew thick double-ring doorway centered on front.
- Attach roof, matching ridge line from BLO row.
- Work 2-round green trim at base.
- Add all clovers:
- Three on roof peak
- One below doorway
- One lower right
- Sew clover stems at top with slight outward tilt.
- Scatter 8–10 flowers across roof.
- Add four textured knobs beside doorway.
- Place bird in doorway, half inside, half out, feet visible.
- Add mini leaves to base area.
- Attach hanging loop.
🌟 Finishing Touches
- Lightly stuff inside body if you want fuller shape.
- Steam-block roof edges for smooth drape.
- Pose clover stems outward for whimsical flair.
- Consider blush or soft paint on bird cheeks.
Your woodland birdhouse is complete — a magical little forest home full of gentle texture, tiny flora, and a sweet bird friend greeting the world from its leafy doorstep. 🌿🐦✨