Hit the road with a smile and a hook in hand with this Amigurumi Wanderlust Car With Suitcases crochet pattern! Inspired by the iconic VW Beetle, this charming little car is packed with personality—from its rounded shape and stitched-on license plate to the adorable stack of tiny suitcases riding on the roof. Whether you’re crafting for a travel lover, decorating a nursery, or just love whimsical amigurumi, this pattern lets you stitch up a joyful tribute to adventure and nostalgia. 🚗🧳🌍
Designed for detail and delight, this pattern invites you to play with bold colors, clever shaping, and fun extras like side mirrors, bumpers, and even a tiny windshield. Add a little map, a crochet camera, or personalize the license plate for extra flair. Whether it’s a gift for a globetrotter or a keepsake for your own wanderlust spirit, this Amigurumi Wanderlust Car With Suitcases is a heartwarming and satisfying project—perfect for bringing a touch of handmade adventure to every stitch! 🧶💖✨
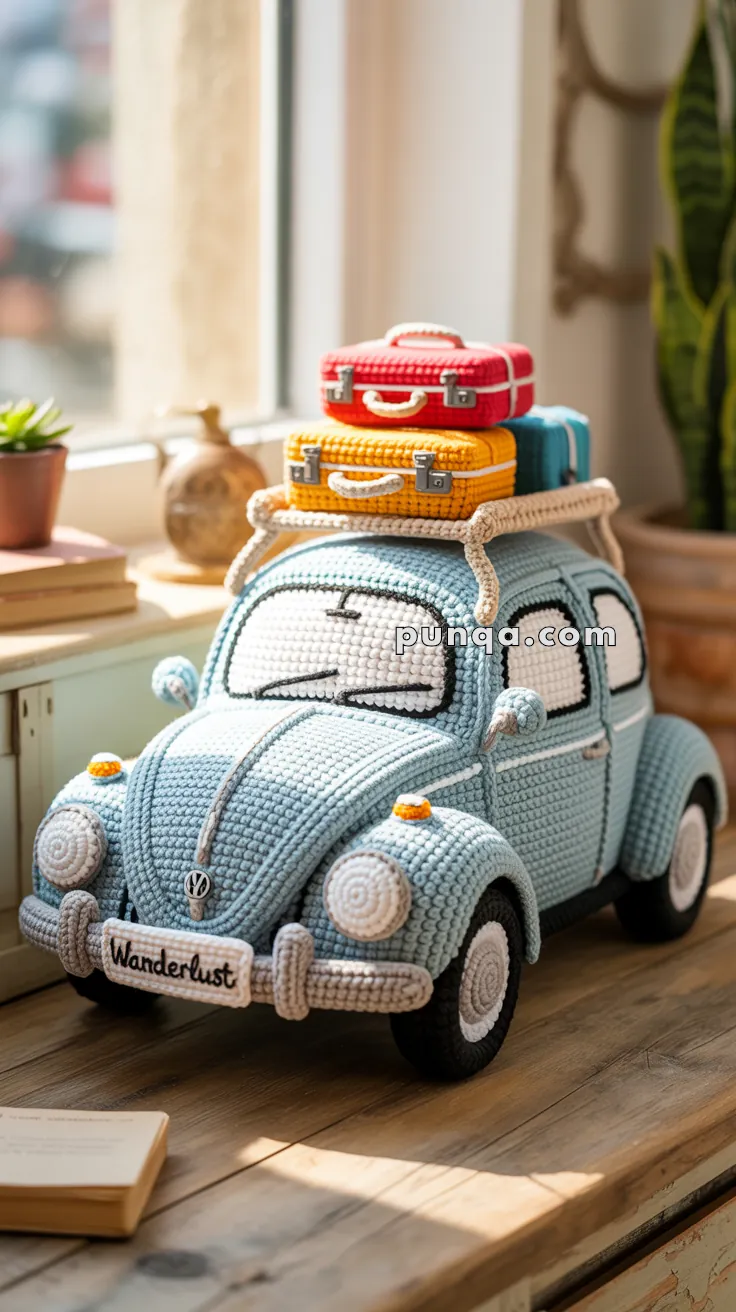
Amigurumi Wanderlust VW Beetle Crochet Pattern
Bring vintage travel vibes to life with this charming crocheted VW Beetle complete with stacked suitcases!
There’s something magical about a classic VW Beetle loaded with suitcases, ready for adventure. This amigurumi pattern captures that nostalgic wanderlust perfectly – from the iconic two-tone paint job to the tiny “Wanderlust” license plate. Whether you’re a travel enthusiast, vintage car lover, or just looking for your next crochet challenge, this project is sure to steal your heart!
What You’ll Create
This isn’t just any amigurumi car – it’s a fully detailed, vintage-inspired VW Beetle that measures approximately 25 cm (10 inches) long and stands 18 cm (7 inches) tall with its luggage stacked high. The two-tone design features a soft duck egg blue body with cream accents, just like the classic Beetles that cruised highways in the 1960s.
Before You Begin
Skill Level
Advanced – This pattern requires experience with shaping, color changes, embroidery, and precise assembly. It’s perfect if you’ve completed several amigurumi projects and are ready for something more complex.
Time Commitment
Expect to spend 15-25 hours on this project, depending on your crochet speed. It’s a labor of love, but the result is absolutely worth it!
What You’ll Need
Yarn Colors
- Light blue/duck egg blue – main body
- Cream/beige – fenders, running boards, bumpers, luggage rack
- White – windows, headlights, whitewall tires
- Black – tires, details, embroidery
- Grey – hubcaps, mirror faces, suitcase hardware
- Orange – turn signals
- Red, yellow/orange, turquoise – three stacked suitcases
I recommend worsted weight or plush yarn for the best texture and structure.
Tools & Supplies
- 3.0–3.5 mm crochet hook
- Fiberfill stuffing
- Plastic canvas or stiff cardboard (for base & suitcase structure)
- Tapestry needle
- Stitch markers
- Black embroidery floss
- Scissors
Abbreviations Guide
Here are the US crochet terms used throughout this pattern:
- MR = Magic Ring
- sc = single crochet
- inc = increase (2 sc in same stitch)
- dec = decrease (invisible sc2tog)
- ch = chain
- sl st = slip stitch
- hdc = half double crochet
- dc = double crochet
- st = stitch
- BLO = back loop only
- FLO = front loop only
- FO = fasten off
Building the Main Body
The heart of your VW Beetle is the rounded, dome-shaped body. This is where the magic begins!
Creating the Oval Base
Start with light blue yarn and work in continuous rounds:
R1: MR, 6 sc [6]
R2: inc × 6 [12]
R3: (1 sc, inc) × 6 [18]
R4: (2 sc, inc) × 6 [24]
R5: (3 sc, inc) × 6 [30]
R6: (4 sc, inc) × 6 [36]
R7: (5 sc, inc) × 6 [42]
R8: (6 sc, inc) × 6 [48]
R9: (7 sc, inc) × 6 [54]
R10: (8 sc, inc) × 6 [60]
R11: (9 sc, inc) × 6 [66]
R12: (10 sc, inc) × 6 [72]
R13: (11 sc, inc) × 6 [78]
R14: (12 sc, inc) × 6 [84]
R15: (13 sc, inc) × 6 [90]
R16: (14 sc, inc) × 6 [96]
Continue increasing until you reach approximately 100-104 stitches. Your oval should measure about 20 cm long.
Pro tip: Insert a stiff cardboard or plastic canvas oval into the base now. This will help your car maintain its shape and sit flat.
Building the Vertical Walls
R17-R32: sc around [100-104]
Work straight without increases for about 16 rounds. These vertical walls give your Beetle its height and distinctive profile.
Shaping the Iconic Rounded Roof
This is where your car really starts to look like a Beetle! The gradual decreases create that unmistakable dome shape.
R33: (23 sc, dec) × 4 [96-100]
R34-R36: sc around
R37: (22 sc, dec) × 4 [92-96]
R38-R40: sc around
R41: (21 sc, dec) × 4 [88-92]
R42-R44: sc around
R45: (20 sc, dec) × 4 [84-88]
R46-R48: sc around
R49: (12 sc, dec) × 6 [78-82]
R50-R52: sc around
R53: (11 sc, dec) × 6 [72-76]
R54-R56: sc around
R57: (10 sc, dec) × 6 [66-70]
R58-R60: sc around
R61: (9 sc, dec) × 6 [60-64]
R62-R64: sc around
R65: (8 sc, dec) × 6 [54-58]
R66-R68: sc around
R69: (7 sc, dec) × 6 [48-52]
Continue decreasing every 3-4 rounds until your opening is about 40 stitches. Stuff the body very firmly – this is crucial for maintaining the shape!
For the final rounds, decrease evenly until closed, or crochet a flat panel across the top. Fasten off and weave in ends.
Adding the Two-Tone Magic
The cream-colored running boards along the lower sides are what give this Beetle its classic vintage look. Don’t skip this step!
Running Boards & Side Panels
Make 2 (left and right):
Ch 50 (adjust length to fit from front to back wheel area)
Row 1: sc in 2nd ch from hook, sc across [49]
Row 2: ch 1, turn, sc across [49]
Row 3-4: repeat Row 2
FO, leaving a long tail for sewing.
Placement: Sew these cream panels along the lower sides of the body, just above the base. They should run from the front bumper area to the rear bumper, creating that distinctive two-tone stripe.
Crafting the Wheels
Every good road trip starts with four solid wheels! These feature the classic whitewall tire look.
Making the Tires (Make 4)
Start with black yarn:
R1: MR, 6 sc [6]
R2: inc × 6 [12]
R3: (1 sc, inc) × 6 [18]
R4: (2 sc, inc) × 6 [24]
R5: (3 sc, inc) × 6 [30]
R6-R12: sc around [30] (creates cylinder wall)
Adding the Whitewall Detail
Switch to white:
R13: sc around [30]
R14: sc around [30]
Switch back to black:
R15-R16: sc around [30]
Close one end by decreasing evenly to create a flat circle. Stuff each tire firmly so they hold their shape and support the car’s weight.
Hubcaps (Make 4 in grey)
R1: MR, 6 sc [6]
R2: inc × 6 [12]
R3: (1 sc, inc) × 6 [18]
R4: (2 sc, inc) × 6 [24]
FO, leaving a tail. Sew each hubcap centered on the flat side of a wheel.
Creating the Rounded Fenders
The cream-colored fenders are essential for that authentic VW look. They create the bulbous wheel arches that are so characteristic of the Beetle.
Fender Construction (Make 4 in cream)
Using short-row shaping to create curves:
Ch 20
Row 1: sc in 2nd ch from hook, sc across [19]
Row 2: ch 1, turn, sc 16, turn [16]
Row 3: ch 1, turn, sc 16 [16]
Row 4: ch 1, turn, sc 12, turn [12]
Row 5: ch 1, turn, sc 12 [12]
Row 6: ch 1, turn, sc 8, turn [8]
Row 7: ch 1, turn, sc 8 [8]
FO, leaving a long tail.
This short-row technique creates a beautifully curved dome. Fold and shape each piece to form a 3D bulge.
Adding texture: After shaping, embroider 2-3 horizontal lines in cream across the curve to mimic the ribbed appearance of vintage fenders.
Placement: Sew one fender above each wheel position, curving it naturally around the wheel arch.
Lighting the Way
Headlights (Make 2 in white)
R1: MR, 6 sc [6]
R2: inc × 6 [12]
R3: (1 sc, inc) × 6 [18]
R4-R6: sc around [18]
FO, leaving a tail. Stuff lightly to create a dome shape.
Sew headlights at an angle on the front fenders, positioned toward the outer front corners of the car.
Turn Signals (Make 2 in orange)
R1: MR, 6 sc [6]
R2: inc × 6 [12]
R3: sc around [12]
FO, leaving a tail. Stuff lightly.
Sew these cheerful orange signals on top of the front fenders, just above the headlights.
Front & Rear Bumpers
These cream bumpers with their subtle ribbed texture complete the vintage aesthetic.
Bumper Construction (Make 2 in cream)
Ch 35 (adjust to fit the width of your car)
Row 1: sc in 2nd ch from hook, sc across [34]
Row 2-5: ch 1, turn, sc across [34]
Adding ribbed texture: After completing the base rectangle, use cream yarn to embroider vertical lines every 3-4 stitches across the bumper surface. This creates that classic chrome bumper look!
FO, leaving a tail.
Shaping: Curve each bumper slightly to follow the car’s rounded front and back.
Placement: Sew one bumper centered on the front, one on the rear, positioned just below the body curve.
Side Mirrors for Vintage Charm
Mirror Construction (Make 2)
Mirror Face (grey):
R1: MR, 6 sc [6]
R2: inc × 6 [12]
R3: (1 sc, inc) × 6 [18]
R4: sc around [18]
FO, flatten slightly.
Mirror Arm (cream):
Ch 8
sc in 2nd ch from hook, sc across [7]
FO.
Sew the arm to the mirror face, then attach the assembled mirror to the body sides near the front windshield area.
Windows That Tell a Story
The windows bring character to your Beetle, especially with careful embroidery details.
Front Windshield (white)
Ch 22
Row 1: sc in 2nd ch from hook, sc across [21]
Row 2-8: ch 1, turn, sc across [21]
FO.
Shape by curving gently to match the front slope of the car.
Embroidery details using black embroidery floss:
- Outline the entire windshield edge
- Add 2 curved windshield wipers
- Add a center vertical seam line (this detail is key!)
Side Windows (Make 4 in white)
Ch 12
Row 1: sc in 2nd ch from hook, sc across [11]
Row 2-6: ch 1, turn, sc across [11]
FO.
Outline each window in black embroidery.
Rear Window (white)
Ch 16
Row 1: sc in 2nd ch from hook, sc across [15]
Row 2-5: ch 1, turn, sc across [15]
FO.
Outline in black embroidery.
Placement tip: Sew all windows onto the body surface in their appropriate positions – windshield on front, side windows along the upper body, rear window on back. The windows should sit on the upper portion of the body for that authentic look.
The Iconic Luggage Rack
This is where your Beetle transforms into a traveler’s dream! The cage-like luggage rack with its arched ribs is what makes this project truly special.
Rack Base (cream)
Ch 38 (should fit the width of your roof)
Row 1: sc in 2nd ch from hook, sc across [37]
Row 2-5: ch 1, turn, sc across [37]
FO.
Arched Support Ribs (Make 6 in cream)
These create that distinctive curved cage structure.
Ch 26
Row 1: sc in 2nd ch from hook, sc across [25]
Row 2: ch 1, turn, sc across [25]
FO, leaving a long tail.
Shaping: Curve each strip into an arch or hoop shape. They should form graceful curves that go over the roof.
Assembling the Rack
- Position the rack base on the roof
- Sew 3 arched ribs evenly spaced across the left side of the roof (perpendicular to the base)
- Sew 3 arched ribs evenly spaced across the right side
- The arches should curve over the roof to create that cage appearance
- Optional detail: For a striped/ribbed effect, embroider horizontal lines connecting the arches, or weave thin cream yarn between the ribs
Packing the Suitcases
No road trip is complete without luggage! Each suitcase is constructed as a 3D box with realistic details.
Small Red Suitcase (Top of Stack)
Front/Back panels (Make 2):
Ch 13
Row 1: sc in 2nd ch from hook, sc across [12]
Row 2-8: ch 1, turn, sc across [12]
FO.
Side panels (Make 2):
Ch 5
Row 1: sc in 2nd ch from hook, sc across [4]
Row 2-8: ch 1, turn, sc across [4]
FO.
Top/Bottom panels (Make 2):
Ch 13
Row 1: sc in 2nd ch from hook, sc across [12]
Row 2-4: ch 1, turn, sc across [12]
FO.
Assembly:
- Sew all 6 panels together to form a box
- Insert a small piece of cardboard inside for structure
- Stuff lightly but firmly
Handle (cream):
Ch 12, sc across, FO. Curve and sew to the top of the suitcase.
Straps (grey – Make 2):
Ch 15, sc across, FO. Wrap around the suitcase and sew in place.
Clasps (grey – Make 2):
Create small squares: Ch 4, sc 3 rows, FO. Sew centered on the front – these look like tiny metal locks!
Medium Yellow/Orange Suitcase (Middle of Stack)
Front/Back panels (Make 2):
Ch 17
Row 1: sc in 2nd ch from hook, sc across [16]
Row 2-10: ch 1, turn, sc across [16]
FO.
Side panels (Make 2):
Ch 6
Row 1: sc in 2nd ch from hook, sc across [5]
Row 2-10: ch 1, turn, sc across [5]
FO.
Top/Bottom panels (Make 2):
Ch 17
Row 1: sc in 2nd ch from hook, sc across [16]
Row 2-5: ch 1, turn, sc across [16]
FO.
Assembly: Follow the same process as the red suitcase – sew panels, add cardboard, stuff.
Handle (cream): Ch 14, sc across, curve and sew.
Straps (grey – Make 2): Ch 18, sc across, wrap and sew.
Clasps (grey – Make 2): Ch 4, sc 3 rows, sew on front.
Large Turquoise Suitcase (Bottom of Stack)
Front/Back panels (Make 2):
Ch 21
Row 1: sc in 2nd ch from hook, sc across [20]
Row 2-12: ch 1, turn, sc across [20]
FO.
Side panels (Make 2):
Ch 7
Row 1: sc in 2nd ch from hook, sc across [6]
Row 2-12: ch 1, turn, sc across [6]
FO.
Top/Bottom panels (Make 2):
Ch 21
Row 1: sc in 2nd ch from hook, sc across [20]
Row 2-6: ch 1, turn, sc across [20]
FO.
Assembly: Same as the previous suitcases – sew panels, add cardboard for structure, stuff.
Handle (cream): Ch 16, sc across, curve and sew.
Straps (grey – Make 2): Ch 22, sc across, wrap and sew.
Clasps (grey – Make 2): Ch 4, sc 3 rows, sew on front.
The Finishing Touches
License Plate (white)
Ch 18
Row 1: sc in 2nd ch from hook, sc across [17]
Row 2-5: ch 1, turn, sc across [17]
FO.
Embroidery: Using black embroidery floss, carefully stitch the word “Wanderlust” across the center. Take your time with this – neat lettering makes all the difference!
VW Badge (grey or black)
R1: MR, 6 sc [6]
R2: inc × 6 [12]
FO, flatten.
Embroidery: Stitch a small “VW” logo in the center using black floss. This tiny detail adds so much authenticity!
Bringing It All Together: Assembly Guide
Follow this order for the best results and easiest assembly:
Step 1: Wheels & Foundation
Sew 4 wheels evenly spaced on the underside of the car body (2 front, 2 rear). Make sure the car sits level!
Step 2: Two-Tone Body Details
Sew the cream running board panels along the lower body sides, creating that classic stripe.
Step 3: Fenders
Attach the cream fenders above each wheel, creating those iconic rounded arches. The fenders should hug the wheels naturally.
Step 4: Front Bumper
Sew the cream front bumper centered below the body curve.
Step 5: Rear Bumper
Attach the cream rear bumper centered on the back.
Step 6: Headlights
Sew the white dome headlights on the front fenders at an angle, positioned toward the outer corners.
Step 7: Turn Signals
Add those cheerful orange signals above the headlights.
Step 8: Side Mirrors
Sew one mirror on each side of the body near the windshield area.
Step 9: Windows
Sew the white windshield on front, then add side windows, and finally the rear window.
Step 10: Window Details
This is where the magic happens! Using black embroidery floss, add:
- Outlines around all windows
- Windshield wipers
- That center hood and roof seam line (essential for the vintage look!)
Step 11: Luggage Rack Installation
- Position the rack base on the roof
- Sew the arched ribs to create that cage structure
- Make sure the ribs curve evenly for symmetry
Step 12: Stacking the Suitcases
Time to pack for the journey!
- Place the turquoise suitcase (largest) directly on the rack base
- Stack the yellow/orange suitcase (medium) on top
- Add the red suitcase (smallest) on the very top
- Sew the suitcases together and to the rack for stability
Step 13: License Plate
Sew the white “Wanderlust” plate to the front center bumper. Road trip ready!
Step 14: VW Badge
Sew the grey circle with the VW logo to the center of the hood. So authentic!
Step 15: Final Embroidery
Add that center seam line down the hood and roof using black floss. This vintage detail really brings the whole piece together.
Optional Extra Details
Want to take your Beetle to the next level? Consider adding:
- Door handles: Embroider small cream rectangles on the sides
- Exhaust pipe: Create a small grey tube and attach it to the rear
- Antenna: Use thin wire or embroider a line on the roof
- Chrome trim: Add silver or grey embroidered lines along body edges for extra shine
Pro Tips for Success
Stuffing Strategy
Stuff the body very firmly to maintain that iconic rounded shape. Don’t be shy with the fiberfill! A well-stuffed Beetle will hold its shape beautifully for years.
Structure Is Everything
Those cardboard inserts in the base and suitcases aren’t optional – they’re essential for stability. Your car needs to sit flat and your suitcases need to hold their boxy shape.
Color Choices Matter
Use soft, muted blues and creams for that authentic vintage aesthetic. Bright, saturated colors will look more toy-like than vintage.
Embroidery Excellence
Take your time with the black details – they truly make or break the realistic appearance. Use embroidery floss rather than yarn for cleaner, more precise lines.
Wheel Placement
Position the wheels carefully so your car sits level and balanced. Test the placement before sewing permanently!
Don’t Skip the Luggage Rack Details
Those arched ribs are key to the authentic look. Yes, they take extra time, but they’re what make people say “Wow!” when they see your finished car.
The Two-Tone Is Essential
The cream fenders and running boards are what give this Beetle its classic VW appearance. A single-color car just won’t have the same vintage charm.
Troubleshooting Common Issues
My car won’t sit flat
Solution: Check that your base is truly oval (not circular) and that wheels are evenly spaced. Add more stuffing to the body and ensure your cardboard base is stiff enough.
The roof isn’t domed enough
Solution: You may need to decrease more aggressively in the shaping rounds. Also ensure you’re stuffing very firmly to push the shape outward.
My suitcases are floppy
Solution: Add more cardboard pieces inside and stuff more firmly. The suitcases should feel solid, not squishy.
The fenders don’t look rounded
Solution: The short-row shaping can be tricky. Make sure you’re curving and shaping the piece as you work. Light stuffing can help add dimension.
My embroidery looks messy
Solution: Use embroidery floss (6 strands) rather than yarn, and work slowly with short stitches. It’s okay to redo sections until you’re happy!
Display Ideas
Your finished Wanderlust Beetle deserves a special spot! Here are some ideas:
- Nursery décor: Perfect on a shelf in a travel-themed nursery
- Bookshelf companion: Nestle it among travel books and photo albums
- Desktop inspiration: Keep it on your work desk as a reminder to book that next adventure
- Window display: Place it on a windowsill with some small plants
- Gift presentation: This makes an incredibly thoughtful gift for travel lovers, car enthusiasts, or anyone who appreciates handmade art
Customization Ideas
Make this pattern your own!
Color Variations
- Mint green with white – another classic VW color combo
- Sunshine yellow with cream – bright and cheerful
- Coral pink with white – perfect for a feminine touch
- Classic VW colors: Try the iconic orange and white, or red and white
License Plate Messages
Change “Wanderlust” to:
- Your name or initials
- “Adventure”
- A meaningful date
- “Road Trip”
- A favorite destination
Suitcase Variations
- Use different colors for each suitcase to match your décor
- Add embroidered stickers or patches to the suitcases
- Create vintage leather-look suitcases with brown yarn
- Make patterned suitcases using striped or variegated yarn
Seasonal Themes
- Winter: Add a tiny wreath to the front, snow on the roof
- Spring: Attach tiny flowers to the luggage rack
- Beach trip: Make blue suitcases and add a surfboard on top
- Christmas: Santa hat on the mirror, presents instead of suitcases
The Story Behind the Pattern
The VW Beetle represents more than just a car – it’s a symbol of freedom, adventure, and the joy of the open road. From its distinctive rounded shape to its cheerful personality, the Beetle has captured hearts for generations.
This amigurumi version captures that same spirit. The carefully stacked suitcases tell a story of adventures taken and journeys yet to come. The two-tone vintage coloring brings back memories of simpler times when a full tank of gas and a map were all you needed for an unforgettable road trip.
Whether you’re creating this for yourself or as a gift, you’re not just making a crochet car – you’re crafting a piece of wanderlust, a reminder to embrace adventure, and a celebration of the journey itself.
Final Thoughts
This Wanderlust VW Beetle is admittedly one of the more complex amigurumi projects you’ll tackle, but the result is absolutely magical. The combination of the iconic car shape, vintage color palette, and whimsical stacked suitcases creates something truly special – a piece that tells a story and sparks joy every time you look at it.
Take your time with each component. Enjoy the process of watching your Beetle take shape, from the rounded body to the final embroidered details. Don’t rush the assembly – careful placement of each element is what brings the whole piece together beautifully.
And when you’re finally done? Step back and admire what you’ve created. You’ve crocheted more than a toy or decoration – you’ve brought a tiny dream machine to life, complete with packed suitcases and ready for adventure.
Happy crocheting, and may your hook always lead you to new adventures! 🚗✨🧵