Start your crochet day with something sweet—this Amigurumi Waffle Buddy pattern is the perfect way to stitch up a cozy and delightful breakfast-inspired creation! Whether you’re crafting for food-themed decor, playful gifts, or simply love quirky crochet designs, this free pattern lets you whip up a fluffy, textured waffle with all the charm of the real thing. With its soft grid pattern and golden tones, this amigurumi waffle adds a touch of handmade joy to your collection. Perfect for toy kitchens, cute plush decorations, or even as a fun keychain, this adorable waffle is sure to bring smiles!
Designed for customization, this pattern lets you play with different shades and toppings to make your waffle extra special. Add a swirl of syrup with embroidered details, craft tiny berries for a fresh touch, or even place a little crochet pat of butter on top! Whether displayed in a playful setup, gifted to a fellow crochet foodie, or crafted just for fun, this amigurumi waffle is a quick and satisfying project that looks good enough to eat—one stitch at a time! 🧇🧶✨
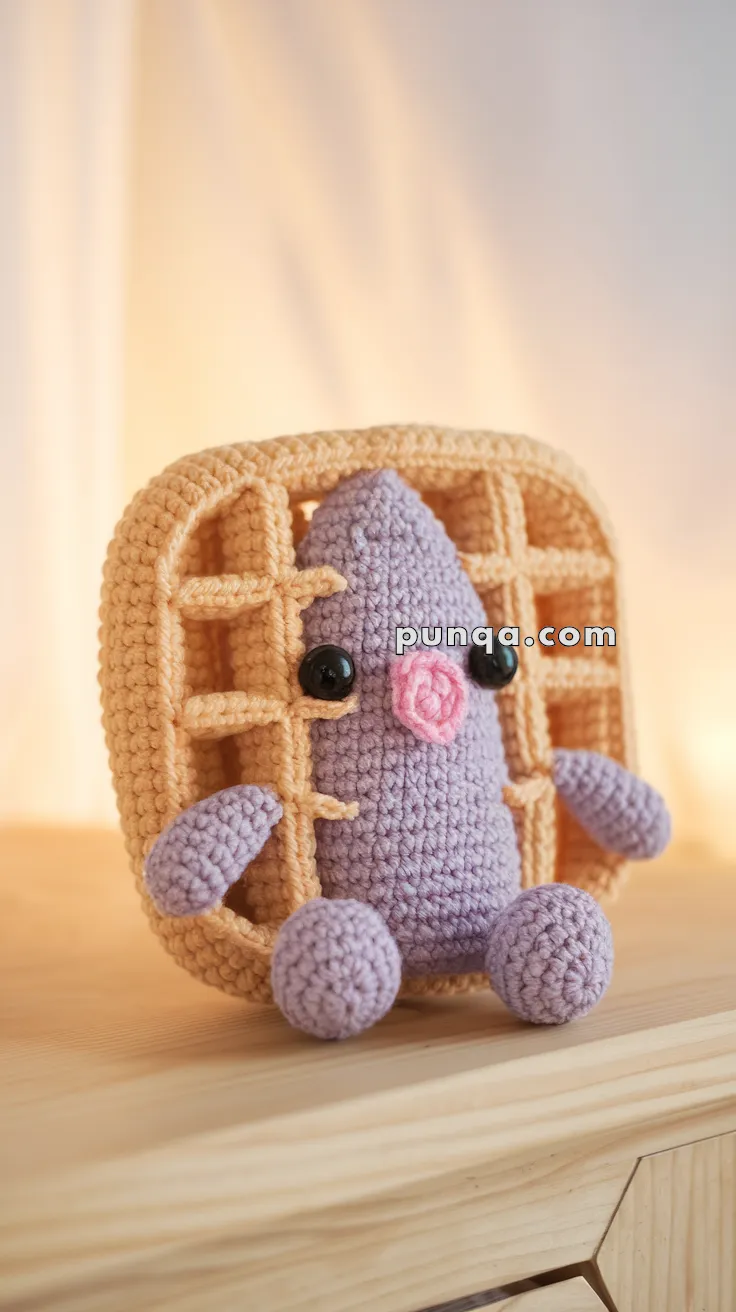
🧇 Amigurumi Waffle Buddy Crochet Pattern
Serve up some serious cuteness with this delightful Amigurumi Waffle Buddy! Featuring a buttery golden waffle base and a snuggly purple center character with a sweet pink nose and limbs, this is a cozy treat that will never go stale.
✨ Skill Level
Intermediate – Involves shaping, working in rows and rounds, basic seaming, and grid texture construction.
📏 Finished Size
Approx. 6–7 inches (15–18 cm) tall using worsted weight yarn and a 3.5 mm hook.
🧶 Materials
Yarn (Worsted weight):
-
Beige or Light Yellow (Waffle)
-
Purple (Body, Arms, Legs)
-
Pink (Snout/Nose)
-
Black (Safety Eyes or embroidery)
Other Supplies:
-
3.5 mm crochet hook
-
8–10 mm safety eyes
-
Tapestry needle
-
Stitch marker
-
Polyfill stuffing
-
Scissors
🧵 Abbreviations (US Terms)
MR – Magic Ring
sc – Single Crochet
inc – Increase (2 sc in same st)
dec – Decrease (sc 2 together)
sl st – Slip Stitch
ch – Chain
BLO – Back Loop Only
FO – Fasten Off
🍽 Waffle Base (Make 2 Panels – Beige)
Front and Back (worked flat in rows):
-
Ch 17
-
Row 1: sc in 2nd ch from hook, sc across (16)
-
Row 2–20: ch 1, turn, sc in each st (16)
FO, leave a long tail for sewing one panel.
🔳 Waffle Grid (Beige – Optional Texture Detail)
To make grid lines:
-
With waffle panel facing you, surface sl st vertical lines every 4 stitches across
-
Repeat horizontal lines every 4 rows down
– This should create a 4×5 waffle grid
FO and weave in all ends.
🟣 Waffle Body (Purple – Oval Shape)
-
MR, 6 sc
-
inc x6 (12)
-
(1 sc, inc) x6 (18)
-
(2 sc, inc) x6 (24)
5–12. sc around (24) -
(2 sc, dec) x6 (18)
-
sc around
-
(1 sc, dec) x6 (12)
Stuff -
dec x6 (6)
FO, weave in.
💜 Arms (Make 2 – Purple)
-
MR, 6 sc
-
(1 sc, inc) x3 (9)
3–5. sc around (9)
FO, stuff lightly, sew to sides of body.
💜 Legs (Make 2 – Purple)
-
MR, 6 sc
-
inc x6 (12)
3–4. sc around
FO, stuff and sew to bottom sides.
💖 Snout (Pink)
-
MR, 6 sc
-
inc x6 (12)
-
sc around
FO, lightly stuff and sew to center of face.
Optional: Embroider spiral or heart on snout.
👀 Eyes
Insert safety eyes on the head between rounds 6–7, spaced about 6 stitches apart.
🧵 Assembly
-
Sew the character securely to the front waffle panel, making sure it’s centered.
-
Align front and back waffle panels.
-
sc or whipstitch around the edges to join, stuffing lightly as you go to give it structure (optional).
-
Attach arms, legs, and snout securely.
✨ Finishing Touches
-
Add blush with pink yarn or felt
-
Embroider a sleepy or happy mouth
-
Add whipped cream or berry appliqué for extra fun
💡 Customization Ideas
-
Make chocolate chip or rainbow sprinkle versions
-
Add a tiny syrup bottle or fork as an accessory
-
Attach a loop to hang on a backpack or wall
Your waffle-loving friend is soft, silly, and the ultimate breakfast companion—without the crumbs! 🧇💜