Create a beautiful and heartfelt tribute with this Amigurumi Virgin Mary crochet pattern! Whether you’re crafting a meaningful keepsake, a special gift, or simply embracing the serenity of handmade devotion, this free pattern lets you bring a touch of peace and grace into your crochet collection. With delicate details like her flowing robes, gentle expression, and symbolic elements, this amigurumi captures the essence of love, faith, and comfort. Perfect for display, gifting, or personal reflection, she serves as a reminder of hope and devotion in every stitch.
This pattern is designed to be both accessible and customizable, allowing you to choose soft, traditional hues or bring your own personal touch with special embroidery and embellishments. Whether you add golden accents, a serene color palette, or intricate textures, your Virgin Mary amigurumi will be a unique and cherished piece. So, pick up your hook, gather your yarn, and let’s create something truly meaningful—one stitch at a time! ✨🙏🧶
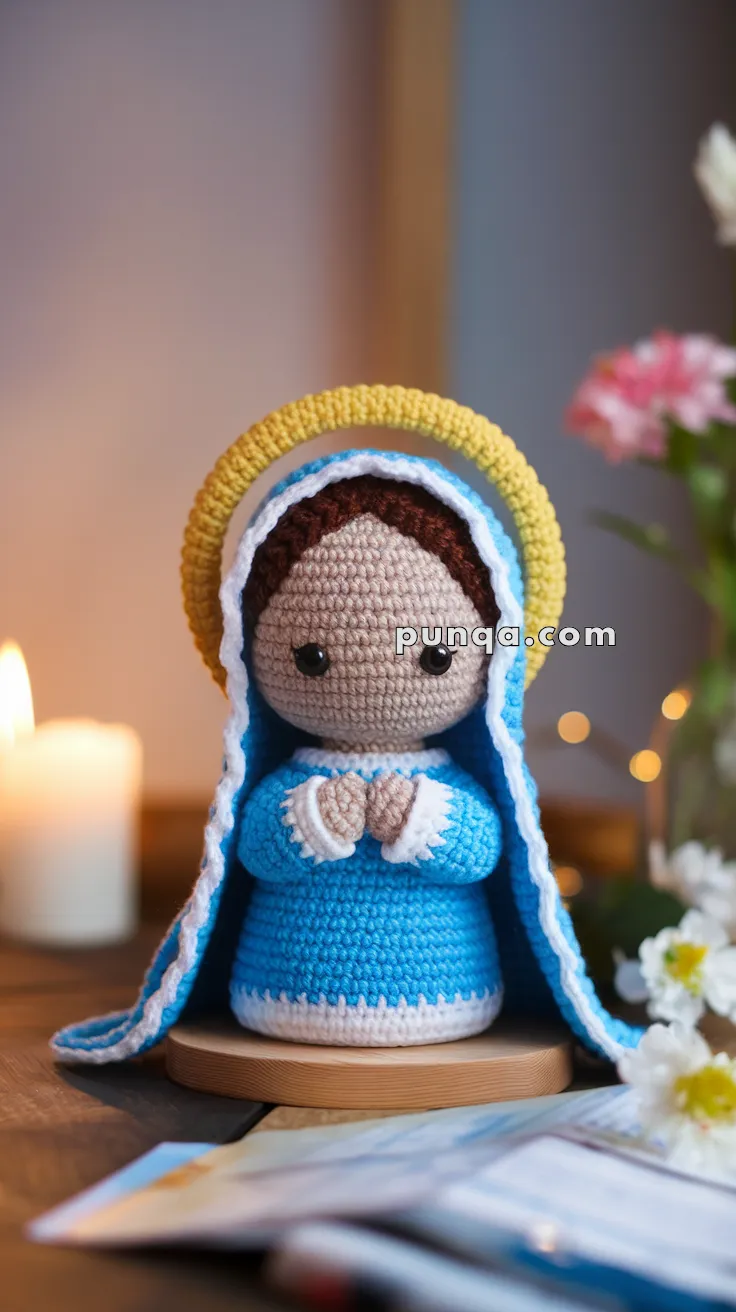
🙏 Amigurumi Virgin Mary Crochet Pattern
Celebrate faith and creativity with this beautiful amigurumi Virgin Mary figure. With her serene face, iconic blue cloak, and golden halo, she makes a meaningful gift for baptisms, communions, nativity sets, or spiritual decor throughout the year.
✨ Skill Level
Intermediate — includes shaping, trims, layered cloak, and an arched halo.
📏 Finished Size
Approx. 18–20 cm (7–8 inches) tall.
🧶 Materials
(Yarn amounts are approximate)
-
Beige (skin) — ~20 g
-
Brown (hair) — ~10 g
-
Sky Blue (robe & cloak) — ~30–40 g
-
White (cuffs, trim) — ~15–20 g
-
Light Blue (outer cloak accent trim) — ~5–8 g
-
Yellow (halo) — ~15 g
-
Crochet hook: 2.5–3.0 mm
-
Safety eyes: 9–10 mm
-
Polyfill stuffing
-
Tapestry needle
-
Stitch marker
🧵 Abbreviations (US Terms)
MR – Magic Ring
sc – Single Crochet
inc – Increase
dec – Decrease
sl st – Slip Stitch
ch – Chain
FLO / BLO – Front/Back Loop Only
FPsc – Front Post Single Crochet
FO – Fasten Off
👩 Head
Head (Beige)
-
MR, 6 sc
-
inc x6 → 12
-
(1 sc, inc) x6 → 18
-
(2 sc, inc) x6 → 24
-
(3 sc, inc) x6 → 30
-
Rounds 6–13: sc around (30)
-
Insert safety eyes between rounds 9–10, spaced 5 sts apart
-
(3 sc, dec) x6 → 24
-
(2 sc, dec) x6 → 18
Stuff firmly. -
(1 sc, dec) x6 → 12
-
dec x6 → 6
FO.
Hair Cap (Brown)
Matches the photo’s textured front wave look.
-
MR, 6
-
inc x6 → 12
-
(1 sc, inc) x6 → 18
-
(2 sc, inc) x6 → 24
-
(3 sc, inc) x6 → 30
-
1 round sc
-
Add subtle wave texture: FPsc, sc, sc around
FO and sew to head, covering crown with hairline slightly curved forward.
🧥 Body & Robe (One Piece)
Neck (Beige)
-
MR, 6
-
inc x6 → 12
-
(1 sc, inc) x6 → 18
-
sc around (18)
Robe (Sky Blue)
-
(2 sc, inc) x6 → 24
-
(3 sc, inc) x6 → 30
-
(4 sc, inc) x6 → 36
-
Rounds 8–20: sc around (36)
-
Round 21: BLO sc around (36) — creates natural lower robe shape
-
Rounds 22–24: sc around
Stuff body firmly.
FO.
Hem Trim (White)
To match the scalloped lower trim in the photo:
Attach white to the BLO round:
Repeat (sl st, ch 2, sl st next st) around for a gentle zig-zag lace edge.
🙌 Prayer Arms
Hands (Beige)
-
MR, 6 sc
-
rounds 2–3: sc around (6)
Sleeves (White → Blue)
Switch to white:
-
rounds 4–5: sc around (6)
Add scallop cuff: (sl st, ch 2, sl st next st) around
Switch to sky blue: -
rounds 6–10: sc around (6)
Flatten and FO.
Sew both hands together in prayer position and attach centered.
Optional: embroider tiny finger lines.
👗 Long Cloak (Blue with White + Light Blue Trim)
Cloak Panel (Sky Blue)
Worked as a long tapered drape exactly like the photo:
-
ch 3
-
Row 1: sc (1)
-
Row 2: inc (2)
-
Row 3: sc across
-
Row 4: inc, sc (3)
Continue increasing 1 stitch every 2 rows until panel reaches 27–29 stitches wide.
Work straight for 18–20 rows.
FO.
White Inner Trim
Attach white:
Work (sl st, ch 2, sl st next st) around the entire border for the gentle lace ripple.
Light Blue Border
Attach light blue and sc evenly around the full cloak edge.
Cloak Placement
Drape from the head downwards.
Shape naturally over shoulders and sew very lightly along upper chest & back.
Ends should reach the base, just like the photo.
☀️ Golden Halo (3D Arch)
Halo Strip (Yellow)
-
ch 21
-
Row 1: sc 20
-
Rows 2–10: sc across
FO.
Form into an arched semi-circle (not a flat ring).
Sew only the ends behind the head so the halo stands upward and curved, matching the photo’s lifted halo effect.
✂️ Final Assembly
-
Sew head to body securely.
-
Attach praying hands.
-
Add cloak softly draped.
-
Sew halo behind head in standing arch.
-
Add optional blush with soft pastel.
💙 Final Thoughts
Your finished Virgin Mary is a beautiful expression of peace and devotion. She looks serene on a mantle, comforting on a bedside, and magical in a nativity scene. May she bring calm and blessings to every space she touches. 🙏✨