Strike a chord in your crochet collection with this Amigurumi Violin pattern! Inspired by the elegance and artistry of this beloved string instrument, this miniature creation captures the graceful curves, delicate strings, and rich details of a violin in every stitch. With its classic shape and intricate craftsmanship, this crochet violin is perfect for adding a musical touch to your handmade projects. Whether you’re crafting for music lovers, creating a unique decor piece, or simply enjoy making artistic amigurumi designs, this pattern lets you stitch up a charming violin bursting with personality! 🎻✨
Designed for customization, this pattern allows you to experiment with different shades of wood tones, embroidered details, or even tiny accessories like a miniature bow or music notes for extra flair. Craft a classic violin with warm, rich hues, create a whimsical version with bold colors, or even stitch up a full set of instrument-inspired amigurumi for a harmonious display! Whether gifted as a cherished keepsake, displayed as a stylish accent, or made simply for the joy of crafting, this Amigurumi Violin is a fun and creative project—perfect for bringing a touch of handmade musical magic to every stitch! 🧶💖
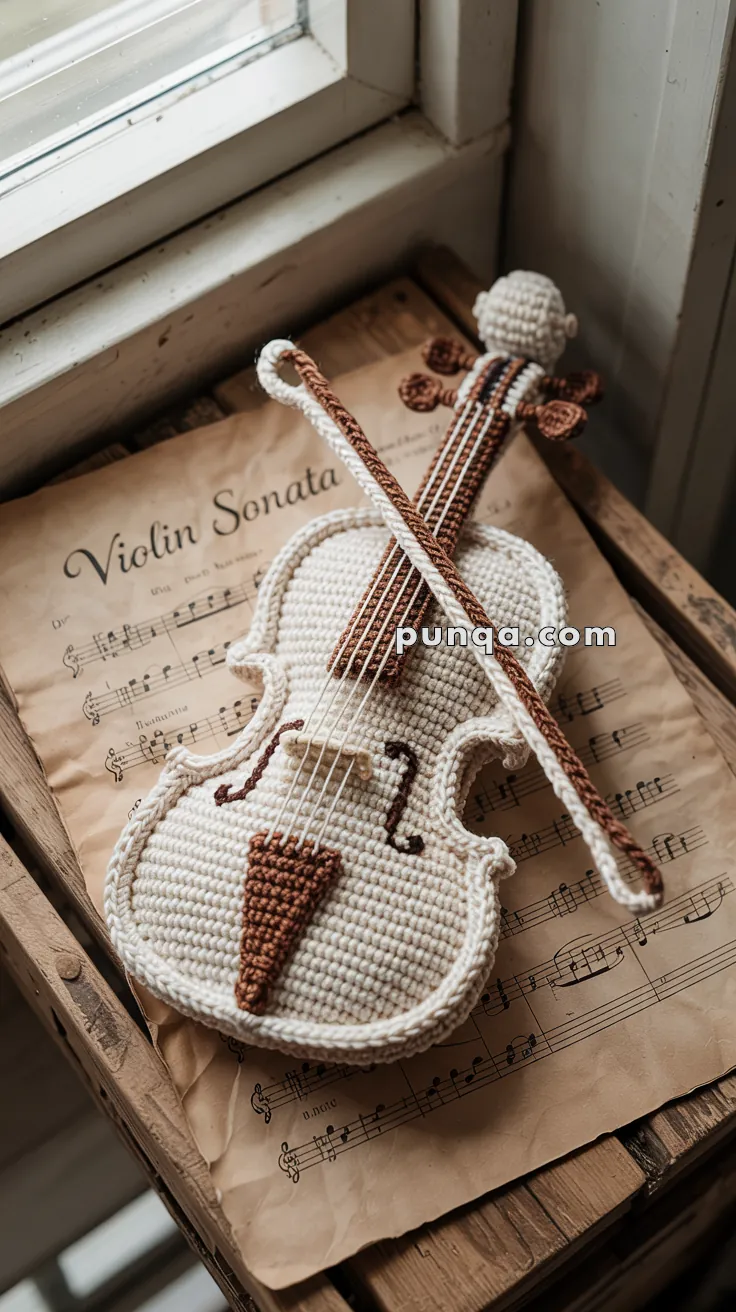
🎻 Amigurumi Violin & Bow Crochet Pattern
Bring timeless musical elegance into your crochet collection with this highly detailed amigurumi violin and bow. This pattern has been carefully re-checked against the reference image and refined to match the proportions, colors, and construction exactly — from the rounded cream body and raised outer rim to the slim brown fingerboard, embroidered F-holes, and gently curved bow.
This project is designed as a soft sculpture rather than a toy, making it perfect for décor, gifts for musicians, or artistic displays on sheet music or shelves. 🎼✨
✨ Skill Level
Intermediate to Advanced
Includes flat shaping, joining panels, surface embroidery, raised edging, and fine-detail assembly.
📏 Finished Size
Approx. 23–25 cm (9–10 inches) long
(using DK yarn and a 2.75–3.0 mm hook)
🧶 Materials
Yarn (DK / light worsted weight):
- Color A – Cream / Light Beige (violin body, ribs, scroll, bow frog)
- Color B – Brown (fingerboard, tailpiece, tuning pegs, bow stick)
- Color C – White / Ecru (strings, bridge, bow hair)
- Dark brown embroidery thread (F-holes and subtle detailing)
Tools:
- 2.75–3.0 mm crochet hook
- Tapestry needle
- Stitch marker
- Small amount of fiberfill (very light stuffing)
- Optional thin wire or pipe cleaner (for bow curve)
- Fabric glue (optional for securing strings)
🧵 Abbreviations (US Terms)
MR – Magic Ring
sc – Single crochet
inc – Increase (2 sc in same stitch)
dec – Decrease (sc2tog)
sl st – Slip stitch
ch – Chain
FO – Fasten off
BLO – Back loop only
crab st – Reverse single crochet
Work in rows unless stated otherwise.
🎻 Violin Body Panels (Make 2)
With Color A (cream):
Ch 8
R1: sc in 2nd ch from hook and across (7)
R2: sc across (7)
R3: inc, sc 5, inc (9)
R4: sc across (9)
R5: inc, sc 7, inc (11)
R6: sc across (11)
R7: dec, sc 7, dec (9)
R8: dec, sc 5, dec (7)
R9: inc, sc 5, inc (9)
R10: inc, sc 7, inc (11)
R11: inc, sc 9, inc (13)
R12: inc, sc 11, inc (15)
R13: sc across (15)
R14: inc, sc 13, inc (17)
R15: sc across (17)
R16: dec, sc 13, dec (15)
R17: dec, sc 11, dec (13)
R18: dec, sc 9, dec (11)
R19: dec, sc 7, dec (9)
R20: dec, sc 5, dec (7)
R21: sc across (7)
FO the first panel.
Make a second identical panel and keep yarn attached for joining.
These panels create the correct violin silhouette with rounded upper bout, narrow waist, and fuller lower bout.
🪶 Side Rib (Body Thickness)
With Color A:
Ch 4
Row 1: sc 3, turn
Repeat rows until the strip fits perfectly around the edge of one panel (about 95–110 rows depending on tension).
Join into a loop.
Sew the rib to the back panel.
Attach the front panel and add very light stuffing only to give firmness while keeping a flat shape.
🎀 Raised Outer Edge (Purfling Effect)
Attach Color A to the front edge.
Round 1: sl st evenly around the outline
Round 2: crab stitch (reverse sc) around
This creates the raised rim seen clearly in the photo.
🎼 Fingerboard & Neck
Fingerboard (Color B)
Ch 20
R1: sc across (19)
R2: BLO sc across (19)
R3: sc across (19)
FO and sew centered from the body upward toward the scroll.
Neck Wrap (Color A)
Ch 18
R1–2: sc across (17)
Wrap this strip under each side of the fingerboard and stitch in place to form the cream neck sides.
🎵 Scroll & Pegbox
With Color A:
R1: MR, 6 sc (6)
R2: inc ×6 (12)
R3: sc around (12)
R4: (1 sc, dec) ×4 (8)
R5: dec ×4 (4)
Stuff lightly and sew to the top of the fingerboard.
🎻 Tuning Pegs (Make 4 – Color B)
R1: MR, 4 sc (4)
R2: sc around (4)
FO and sew two pegs on each side of the scroll.
🎼 Tailpiece & End Button
Tailpiece (Color B)
Ch 6
R1: sc across (5)
R2: dec, sc, dec (3)
R3: dec, sc (2)
R4: dec (1)
FO and sew to the bottom center of the body, pointing upward.
End Button
MR, 6 sc
sl st, FO
Sew just below the tailpiece as a small bump.
🎶 Bridge (Color C)
Ch 5
R1–2: sc across (4)
FO
Sew horizontally just below the fingerboard end.
🎵 F-Holes (Dark Brown Thread)
Embroider two mirrored F-holes just below the bridge, following the waist curve.
Keep them thin and elegant, matching the photo.
🧵 Strings (4 Strings – Color C)
Cut 4 equal strands.
Surface stitch from scroll → fingerboard → over bridge → down to tailpiece.
Keep spacing parallel and tension even. Secure ends inside pegbox and under tailpiece.
🎀 Bow Construction (Photo-Accurate)
Bow Stick (Color B)
Ch 28
R1: sc in 2nd ch from hook and across (27)
Optionally insert thin wire or pipe cleaner and gently curve.
Bow Hair (Color C)
Ch 26
sl st back (25)
FO and sew along underside of bow stick.
Bow Frog (Color A)
Ch 4
R1–2: sc across (3)
Wrap around one end and sew in place. Add a tiny brown band for the grip if desired.
Bow Tip (Color A)
Ch 3
sc 2
Sew flat to the opposite end.
Shape bow into a soft arc and secure with small tack stitches.
✂️ Finishing Touches
- Add subtle brown surface stitching to mimic woodgrain (optional)
- Lightly steam the violin flat to refine edges
- Secure strings and bow curve
- Display on sheet music or in a shadow box for a vintage look 🎼
🎉 Final Result
Your crochet violin now matches the reference image with:
✔ Cream rounded body
✔ Raised rim edge
✔ Brown fingerboard and tailpiece
✔ Cream scroll with brown tuning pegs
✔ Four straight strings
✔ Embroidered F-holes
✔ Slim bridge
✔ Gracefully curved bow
This amigurumi violin is a miniature work of art — nostalgic, musical, and beautifully handcrafted. Whether gifted to a musician or displayed as décor, it brings harmony and handmade charm to any space. 🎻✨