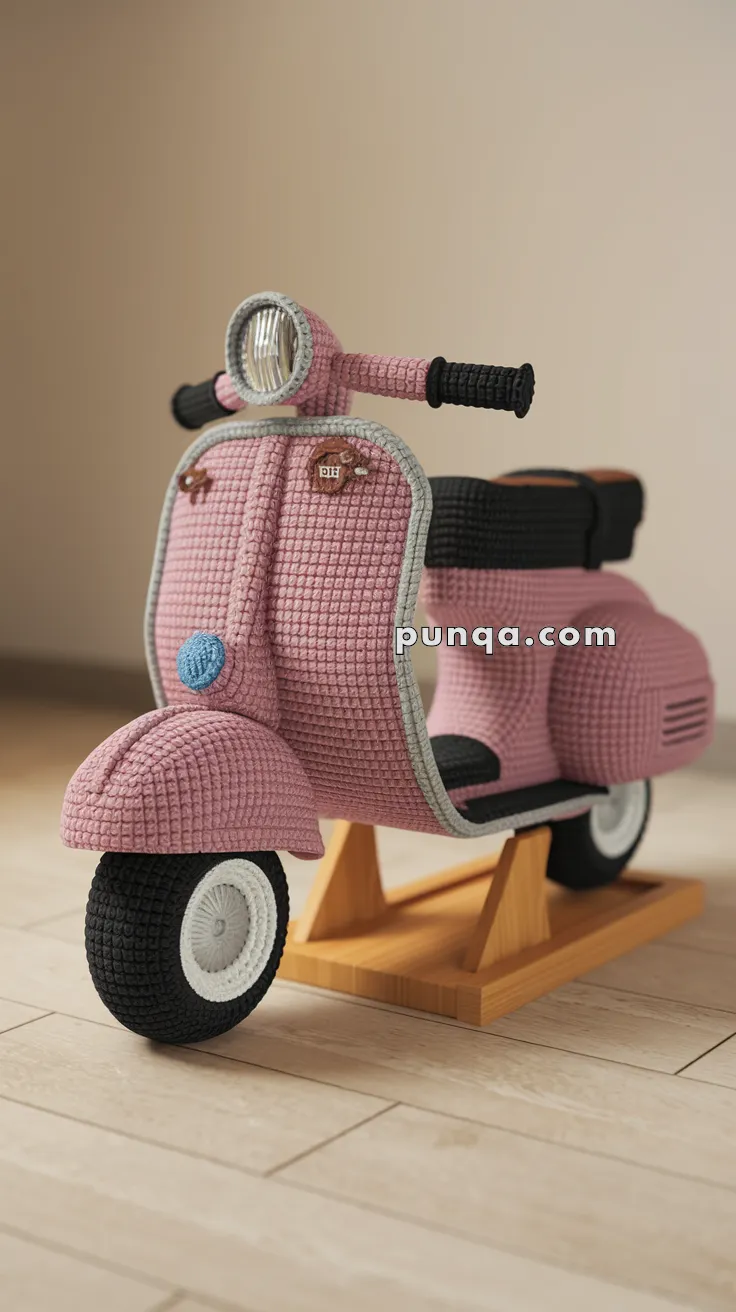
Welcome to the charming world of vintage-inspired amigurumi! 🛵✨ Today, I’m delighted to share my free crochet pattern for an Amigurumi Vespa Scooter—a delightful little ride full of retro flair and whimsical detail! Whether you’re a scooter enthusiast, love crafting miniature vehicles, or simply want to add a touch of European charm to your handmade collection, this pattern will guide you through stitching up a perfectly pocket-sized Vespa with its iconic curves, sleek handlebars, and classic Italian style.
This design embraces smooth lines and nostalgic accents to bring a playful, travel-ready quality to your amigurumi! 🧶 I’ve carefully outlined each step to ensure your scooter turns out just right—complete with realistic wheels, a tiny license plate, and even optional saddlebag accessories. Perfect for display, gifting to wanderlust-filled friends, or pairing with your favorite amigurumi adventurer! So grab your hooks, pick out pastel hues or bold primaries, and let’s stitch up a ride that’s always bellissima! ✨

🛵 Amigurumi Vespa Scooter – FREE Crochet Pattern
Bring retro charm to your shelf or craft space with this pink amigurumi Vespa! With realistic shaping and optional rigid structure elements, it’s both a joy to stitch and a showstopper when displayed.
✨ Skill Level
Advanced – Includes shaping, multiple components, color changes, and optional non-yarn support structures.
📏 Finished Size
Approximately 30–35 cm (12–14 in) long when using worsted yarn and a 3.5 mm hook.
🧶 Materials
-
Worsted weight yarn:
-
Light pink (main body)
-
Black (tires, handles, seat)
-
White (wheel rims, light glass)
-
Light grey (trim/frame)
-
Blue (headlight bulb)
-
Brown (seat accent)
-
-
Hook: 3.5 mm
-
Fiberfill stuffing
-
Plastic canvas or cardboard (for internal frame panels)
-
Transparent plastic dome/button for the headlight (or plastic cabochon)
-
Small piece of clear vinyl for mirror
-
Optional: hot glue, wire for tire support, thin dowels or straws for stability
-
Tapestry needle, stitch markers, scissors
🧵 Abbreviations (US Terms)
-
MR – Magic Ring
-
sc – Single Crochet
-
inc – Increase
-
dec – Decrease
-
BLO – Back Loop Only
-
ch – Chain
-
sl st – Slip Stitch
-
FO – Fasten Off
🧱 STRUCTURAL NOTES
-
Plastic canvas/cardboard is inserted into the body sides and footboard before stuffing to maintain flatness and rigidity.
-
The base stand in the photo is a small custom wooden display, but you can replicate this with balsa wood, foam board, or plastic stand pieces hot-glued in place.
-
Headlight glass is simulated with a domed button or a circle cut from transparent plastic packaging (like toy boxes).
🔧 Pattern Instructions
🛵 Front Fender (Pink)
-
MR, 6 sc
-
inc x6 (12)
-
[1 sc, inc] x6 (18)
4–6. sc around -
[2 sc, inc] x6 (24)
8–11. sc around
FO and stuff lightly.
🧠 Main Body Panel (Make 2 – Pink)
-
Ch 21
-
Starting in 2nd ch from hook: sc across (20)
3–18. sc across, ch 1 turn
FO.
Sew light grey border along all sides in surface slip stitch for trim look. Insert cardboard/plastic canvas between the two panels before joining together with sc.
🛵 Foot Deck (Pink, Grey Trim)
-
Ch 28
-
sc across (27)
3–6. sc rows
Border with grey in surface sc. Optional: line with plastic inside for rigidity.
🪑 Seat (Black, Brown Detail)
-
MR, 6 sc
-
inc x6 (12)
-
[1 sc, inc] x6 (18)
4–8. sc around -
switch to brown, sc around
-
BLO, sc around
FO, stuff firmly and sew on top of body.
🛞 Wheels (Make 2 – Black, White)
-
MR, 6 sc
-
inc x6 (12)
-
[1 sc, inc] x6 (18)
-
[2 sc, inc] x6 (24)
-
switch to white, BLO, sc around
-
sc around
FO, make 2 and sew wrong sides together, inserting cardboard wheel for stiffness.
🪝 Handlebars (Make 2 – Black)
-
MR, 6 sc
2–10. sc around
Stuff with pipe cleaner or wire. FO and attach at angles.
Handle tube:
Ch 14, join in round, 2 rows of sc around. Slip handlebars into each side.
💡 Headlight (Grey/Blue/White)
-
MR in grey, 6 sc
-
inc x6 (12)
-
[1 sc, inc] x6 (18)
-
sc around
Switch to blue -
sc around
Switch to white -
sc around
Stuff and sew on top of handles.
Use a plastic cabochon or button to simulate the headlight glass. Optional: hot glue over white yarn for shiny dome.
🧰 Misc Details
-
Kickstand / Frame Stand: Use plastic straws or dowels to create a functional display stand like shown. Paint or wrap in yarn.
-
Mirror: Cut a small round from clear vinyl and mount on pipe cleaner or wire stem.
✅ Assembly
-
Sew front fender to body base.
-
Attach the side panels with invisible stitches or sc joins.
-
Join wheels securely under body using reinforced stitching or rods.
-
Attach seat, handlebars, and foot deck.
-
Stitch or glue headlight in place.
-
Secure base stand or build your own.
✨ Final Touch
Your crocheted Vespa is ready to cruise into your handmade world! Whether as a display centerpiece or a gift for a scooter lover, this project delivers both charm and challenge.


