Get ready for a slow and steady adventure with this Amigurumi Turtle Riding a Snail crochet pattern! This whimsical duo brings double the charm with a tiny turtle perched proudly atop its snail companion, creating a delightful scene straight out of a storybook. Whether you’re crafting for animal lovers, adding a playful touch to your decor, or simply enjoy making imaginative amigurumi, this pattern lets you stitch up a dynamic pair full of personality! Perfect for sparking smiles and conversation, this crochet creation adds a touch of handmade magic to any space. 🐢🐌✨
Designed for customization, this pattern invites you to play with earthy tones, embroidered details, or even tiny accessories like a miniature leaf umbrella or a trail of flowers for extra flair. Craft a classic turtle and snail with natural hues, go bold with bright, cheerful colors, or even stitch up a full set of forest critters for a whimsical display! Whether gifted as a thoughtful keepsake, displayed as a charming accent, or made simply for the joy of crafting, this Amigurumi Turtle Riding a Snail is a fun and creative project—perfect for bringing a touch of handmade storytelling to every stitch! 🧶💖✨
🐢🐌 Amigurumi Turtle Riding a Snail Crochet Pattern
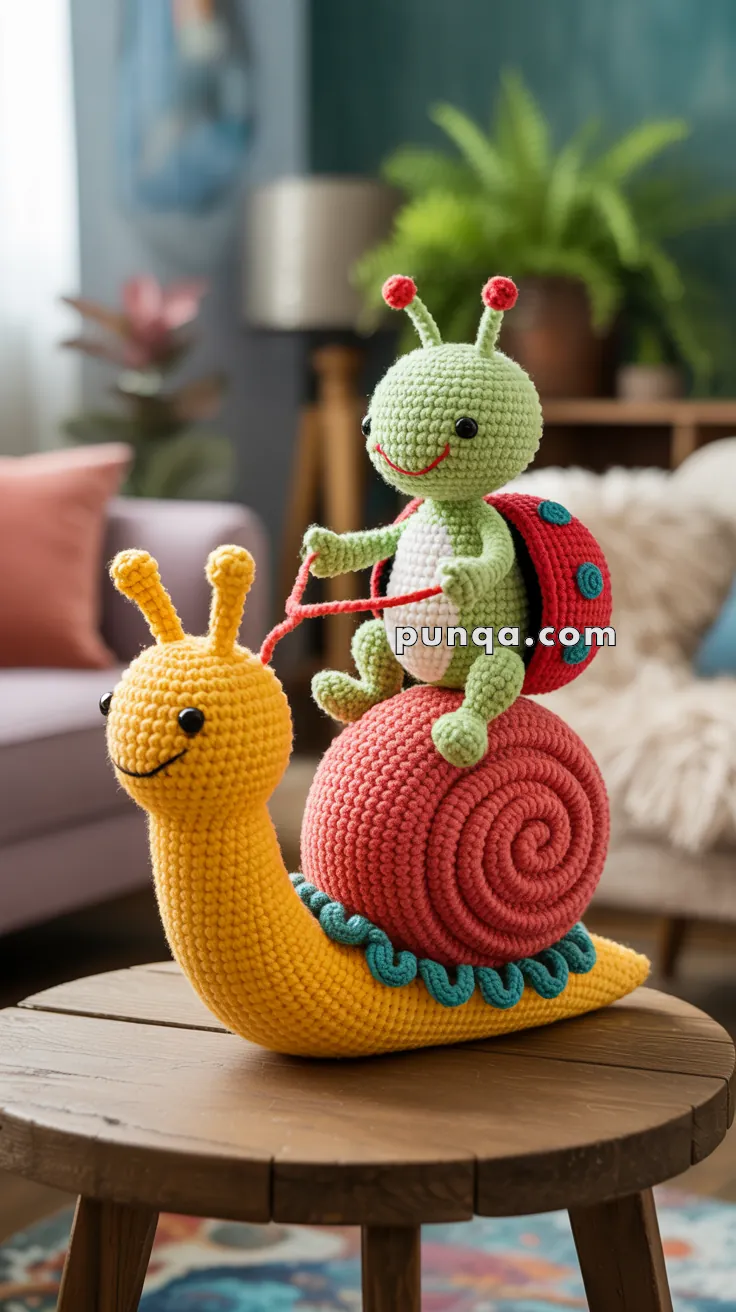
Meet the slowest — and cutest — travel duo in the crochet world! This Turtle Riding a Snail pattern captures a moment of gentle whimsy: a mint-green turtle perched happily atop a bright yellow snail with a coral spiral shell and teal ruffles. The finished piece makes a joyful handmade gift or a centerpiece that brings instant smiles.
✨ Skill Level
Intermediate – involves shaping, working in continuous rounds, coiling a stuffed strip for the snail shell, and layered assembly.
📏 Finished Size
- Height: approx. 25–30 cm (10–12 in)
- Length of snail: approx. 28–30 cm (11–12 in)
Made with DK/light worsted yarn and a 2.75–3 mm hook.
🧶 Materials
Yarn (DK / light worsted, smooth):
- Yellow – snail body and head (≈ 60 g)
- Coral / warm red – snail shell (≈ 50 g)
- Teal – shell/base loops and turtle shell dots (≈ 20 g)
- Mint green – turtle head, body, arms, legs, antennae (≈ 30 g)
- White – turtle belly patch (≈ 10 g)
- Red – turtle shell, antenna tips, reins, and turtle smile (≈ 15 g)
- Black – snail smile embroidery (a few meters)
Notions
- 2 pairs of safety eyes, 6–8 mm (all black)
- Crochet hook: 2.75–3.25 mm
- Polyester fiberfill
- Tapestry needle
- Stitch markers
🧵 Abbreviations (US Terms)
- MR – magic ring
- sc – single crochet
- inc – increase (2 sc in same stitch)
- dec – invisible decrease
- ch – chain
- sl st – slip stitch
- FO – fasten off
Work in continuous rounds unless otherwise stated; use a stitch marker to mark the first stitch of each round.
🐌 Snail
Snail Head
In yellow:
- R1: MR, 6 sc (6)
- R2: inc in each st (12)
- R3: (sc, inc) × 6 (18)
- R4: (2 sc, inc) × 6 (24)
- R5: (3 sc, inc) × 6 (30)
- R6–R11: sc around (30)
Place safety eyes between R7–R8 with about 5 stitches between them.
With black yarn, embroider a gentle curved smile a little below the eyes.
- R12: (3 sc, dec) × 6 (24)
Stuff the head firmly so it is nicely rounded.
Snail Neck & Body
Continue in yellow from the head’s open base:
- R13: (2 sc, dec) × 6 (18) – start narrowing into the neck
- R14–R21: sc around (18) – long curve of the neck
Begin stuffing lightly as you go, but keep the neck slightly softer so it can form the smooth S-curve.
Widen into the body:
- R22: (sc, inc) × 9 (27)
- R23: (2 sc, inc) × 9 (36)
- R24–R33: sc around (36) – this is the thick part underneath the shell
Start tapering gently toward the tail:
- R34: (4 sc, dec) × 6 (30)
- R35: (3 sc, dec) × 6 (24)
- R36: (2 sc, dec) × 6 (18)
Stuff the body firmly, paying attention to the belly (underside) so it rests flat on a table.
- R37: (sc, dec) × 6 (12)
- R38: dec × 6 (6)
FO and close.
Shape the whole body into a long, smooth curve like in the photo—the head upright, body arched, and tail resting on the surface.
Snail Antennae × 2
In yellow:
- R1: MR, 4 sc (4)
- R2–R7: sc around (4)
Stuff lightly. Sew both antennae symmetrically to the top of the head, angled slightly outward. The tips are the same yellow as the body—no extra color.
Snail Shell – Coral Spiral Rope
The shell is a thick spiral coil, not a flat appliqué.
In coral:
- R1: MR, 6 sc (6)
- R2: inc in each st (12)
- R3: (sc, inc) × 6 (18)
You now have the cross-section thickness of the “rope”. Continue straight to form a long tube:
- R4–R70: sc around (18)
Stuff as you go so it becomes a dense, evenly filled rope—firm but still bendable.
FO leaving a very long tail for sewing.
Coiling the shell:
- Starting from the MR end, coil the tube into a flat spiral lying on its side.
- As you coil, use the long tail and a yarn needle to stitch each new round of the spiral to the previous one from the back, anchoring through several stitches so the spiral is sturdy.
- Keep the spiral tight and perfectly round, just like in the photo.
Teal Loops Between Shell and Body
This teal detail sits at the seam where the shell meets the body and looks like small repeating loops.
With teal, join yarn to the underside edge of the spiral (outermost round) where it will sit on the snail’s back.
Repeat around:
- (ch 6, sl st in next 2 sts)
This makes open, rounded loops that peek out between the shell and the yellow body just like in the picture. Adjust the loop length (ch 5 or ch 7) if needed to match the look.
FO and weave in ends.
🐢 Turtle
Turtle Head
In mint green:
- R1: MR, 6 sc (6)
- R2: inc in each st (12)
- R3: (sc, inc) × 6 (18)
- R4: (2 sc, inc) × 6 (24)
- R5–R9: sc around (24)
Insert safety eyes between R6–R7, about 5 sts apart.
With red yarn, embroider the wide smiling mouth that curves up toward the eyes.
- R10: (2 sc, dec) × 6 (18)
- R11: (sc, dec) × 6 (12)
- R12: dec × 6 (6)
Stuff firmly and FO.
Turtle Antennae × 2 (Green Stalk, Red Ball Tip)
Start in mint green:
- R1: MR, 4 sc (4)
- R2–R5: sc around (4)
Switch to red:
- R6: inc in each st (8)
- R7: (sc, inc) × 4 (12)
- R8–R9: sc around (12)
- R10: (sc, dec) × 4 (8)
- R11: dec × 4 (4)
Stuff the red ball lightly; leave the green stalk mostly unstuffed so it can bend.
Sew each antenna to the top of the head, slightly angled outward, with the red balls sitting nicely on top like cherries.
Turtle Body
In mint green:
- R1: MR, 6 sc (6)
- R2: inc in each st (12)
- R3: (sc, inc) × 6 (18)
- R4: (2 sc, inc) × 6 (24)
- R5–R9: sc around (24)
- R10: (2 sc, dec) × 6 (18)
- R11: (sc, dec) × 6 (12)
Stuff firmly.
- R12: dec × 6 (6), FO and close.
This makes a slightly oval torso for sitting.
White Belly Patch
The belly in the photo is a vertical white oval sewn on, not color-worked.
In white:
- Ch 5
- Row 1: sc in 2nd ch from hook, sc 2, 3 sc in last ch; continue on other side of chain, sc 2, 2 sc in last (10)
- Row 2: inc, sc 2, inc, sc, inc, sc 2, inc, sc (14)
- Row 3: sc around (14)
FO leaving a tail.
Sew this oval centrally on the front of the body, with the longer axis vertical.
Turtle Arms × 2
In mint green:
- R1: MR, 6 sc (6)
- R2–R5: sc around (6)
Lightly stuff the very end (hand) only.
FO leaving a long tail for sewing.
Turtle Legs × 2
In mint green:
- R1: MR, 6 sc (6)
- R2–R7: sc around (6)
Again, lightly stuff toward the foot.
FO with a long tail.
These legs will bend at the midpoint so the turtle can sit on the shell with knees bent.
Turtle Shell (Red with Teal Dots)
In red:
- R1: MR, 6 sc (6)
- R2: inc in each st (12)
- R3: (sc, inc) × 6 (18)
- R4: (2 sc, inc) × 6 (24)
- R5: (3 sc, inc) × 6 (30)
- R6–R7: sc around (30)
- R8: (3 sc, dec) × 6 (24)
- R9: (2 sc, dec) × 6 (18)
Stuff well.
- R10: (sc, dec) × 6 (12)
- R11: dec × 6 (6), FO and close.
This gives a rounded, slightly flattened dome.
If you want the thin dark line you see at the base in the photo, you can surface-slip-stitch one round with black yarn around the bottom edge.
Teal Shell Dots
Make 3–4 dots (the photo shows three on the visible side; four total looks balanced):
- R1: MR, 6 sc, sl st to first sc
FO with long tail.
Place them evenly on the red shell and sew flat.
Turtle Reins
With red yarn, ch 55–60. FO.
You will attach them during assembly.
🧵 Assembly
Assemble the Snail
- Pin the coral shell to the wide middle of the yellow body so the spiral center faces sideways and the teal loops sit snugly between shell and body.
- Sew the shell firmly through several layers so it stands upright.
- Position the body so the head rises in a smooth curve, matching the photo.
Assemble the Turtle
- Sew the head to the top of the body, slightly tilted forward.
- Sew the white belly patch to the front of the torso.
- Attach the legs low on the sides of the body. Bend them so the turtle appears to be sitting, with feet resting on the coral shell.
- Sew the arms to the upper sides of the body so they can reach forward and hold the reins.
- Sew the red shell onto the turtle’s back, slightly tilted backward.
- Sew the teal dots onto the red shell.
- Attach the two red-tipped antennae on top of the head.
Mount Turtle on Snail
- Position the turtle on the upper front section of the coral shell, not right on top of the center—its body leans slightly forward as in the photo.
- Sew the turtle in place, stitching through the legs, body bottom, and several layers of the snail shell for stability.
- Place the red rein chain in the turtle’s hands and secure with a few stitches.
- Attach each end of the reins to the sides of the snail’s neck, slightly below the head and below the antenna bases, so the reins follow the same diagonal lines you see in the image.
Shape everything with your hands so the curves and poses match:
- Snail body smoothly arched
- Shell upright and round
- Turtle sitting securely, leaning forward with legs wrapped naturally around the shell.
💛 Final Thoughts
This pattern celebrates patience, playfulness, and imagination — a turtle and snail who prove that friendship moves at its own pace. The carefully shaped snail curve, the ruffled shell edge, and the bright coral-and-teal details bring this piece vividly to life. Whether you display it on a shelf or gift it to someone special, it’s a project full of charm, color, and heart. 🐢🐌💕