Bring a burst of color and nature-inspired charm to your crochet collection with this Amigurumi Tree with Colorful Birds pattern! This delightful design captures the beauty of a flourishing tree, complete with vibrant little birds perched among its branches. With its lush foliage, cheerful feathered friends, and whimsical details, this crochet creation brings a touch of the outdoors into your handmade world. Whether you’re crafting for nature lovers, adding a playful accent to your decor, or simply enjoy making unique amigurumi designs, this pattern lets you stitch up a miniature tree filled with personality! 🌳🐦✨
Designed for customization, this pattern allows you to experiment with different shades of green for the tree, bright hues for the birds, and embroidered details to enhance their charm. Craft a classic tree with earthy tones, create a pastel version for a dreamy aesthetic, or even stitch up a full set of nature-inspired amigurumi for a breathtaking display! Whether gifted as a cherished keepsake, displayed as a lively accent, or made simply for the joy of crafting, this Amigurumi Tree with Colorful Birds is a fun and creative project—perfect for bringing a touch of handmade enchantment to every stitch! 🧶💖
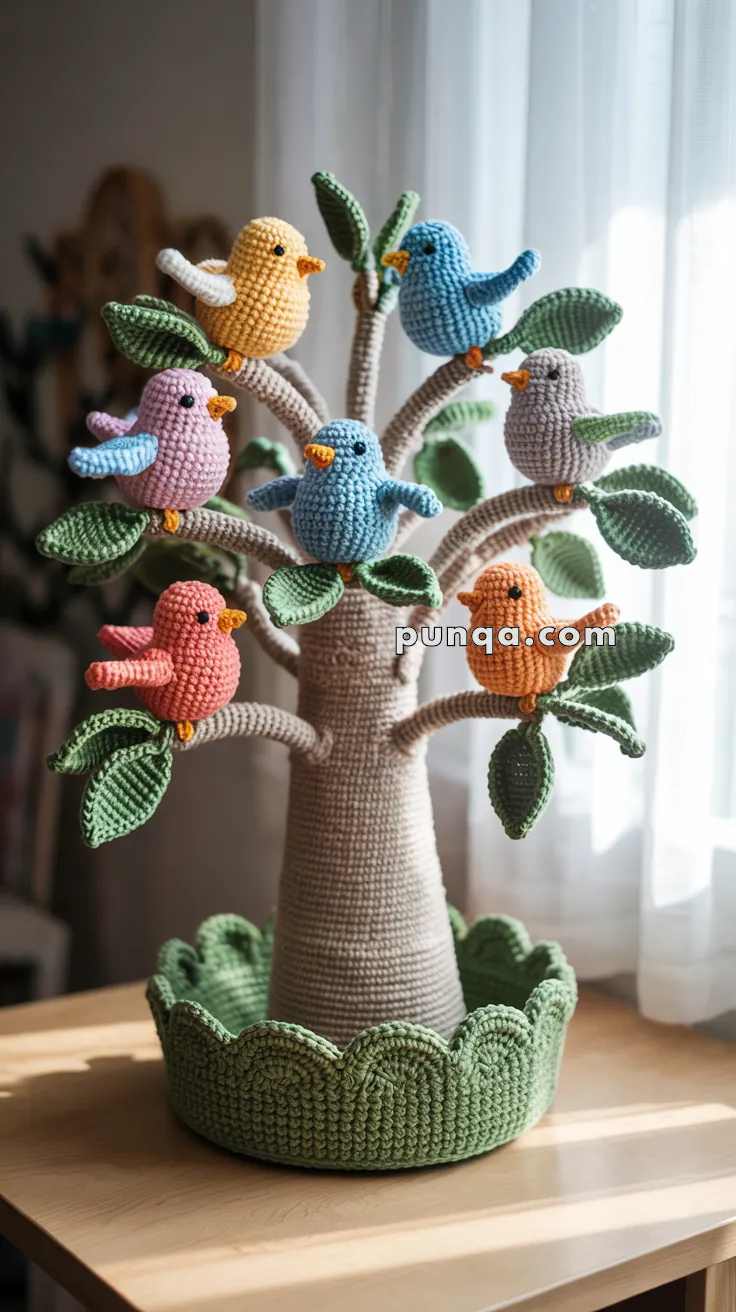
🌳 Amigurumi Bird Tree Crochet Pattern
Bring a joyful handmade touch to your space with this crocheted bird tree — complete with a textured trunk, soft bendable branches, lush leaves, and cheerful birds in bright pastel colors. This design combines structure and charm, making it a perfect statement piece for spring décor or a child’s room.
✨ Skill Level
Advanced – Includes wire-supported shaping, textural stitches, and multi-part assembly.
📏 Finished Size
Approx. 16–18 inches (40–45 cm) tall, with 7–8 birds perched on the branches.
🧶 Materials
- DK or worsted weight yarn:
- Beige/Tan – trunk & branches
- Green – leaves and base
- Bright colors – birds (blue, pink, yellow, lilac, orange, coral, etc.)
- White – wings and eye patches
- Black – eyes (if embroidered)
- Orange – beaks
- 3.0 mm crochet hook
- Polyfill stuffing
- Floral wire or thick pipe cleaners (for branches)
- Weighted pellets (optional, for base stability)
- Tapestry needle
- Scissors
- Stitch markers
🧵 Abbreviations (US Terms)
MR – Magic Ring
sc – Single Crochet
inc – Increase (2 sc in same stitch)
dec – Decrease (sc2tog)
sl st – Slip Stitch
ch – Chain
hdc – Half Double Crochet
dc – Double Crochet
FO – Fasten Off
🌲 Tree Trunk
With beige/tan yarn:
- MR, 6 sc (6)
- inc ×6 (12)
- (1 sc, inc) ×6 (18)
- (2 sc, inc) ×6 (24)
- (3 sc, inc) ×6 (30)
- (4 sc, inc) ×6 (36)
7–45. BLO sc around (36) – creates natural bark texture - (4 sc, dec) ×6 (30)
47–50. sc around (30) - (3 sc, dec) ×6 (24)
FO, leaving long tail. Stuff firmly, inserting a dowel or thick wire for structure.
Tip: The BLO rounds give the trunk realistic horizontal ridges.
🌿 Base
With green yarn:
- MR, 6 sc (6)
- inc ×6 (12)
- (1 sc, inc) ×6 (18)
- (2 sc, inc) ×6 (24)
- (3 sc, inc) ×6 (30)
- (4 sc, inc) ×6 (36)
- (5 sc, inc) ×6 (42)
- (6 sc, inc) ×6 (48)
Continue increasing to 6–7 inches diameter.
Walls:
1–3. BLO sc around (no increases)
4. (sc, skip 1, 5 dc in next, skip 1) repeat around for scalloped edge.
FO and weave in ends.
Stuff base lightly for a cushioned look, then sew trunk securely to its center.
🌿 Branches (Make 7–8 Total)
Each branch is crocheted directly around a wire for strength and shape.
With beige yarn:
- MR, 6 sc around wire (6)
- inc ×6 (12) – for thicker branches
3–30. sc around (12)
FO, leaving long tail for sewing.
Variation:
Make 5–6 long branches (R3–30), 2–3 shorter ones (R3–18), and 2–3 mini branches for the top cluster (R3–12).
Assembly Tip:
Attach branches between R30–45 on the trunk, spacing unevenly and angling outward about 30–45°. For a natural look, cluster the top branches close together.
🍃 Leaves (Make 20–25 Total)
With green yarn:
Small Leaf:
MR, (sc, hdc, dc, hdc, sc) ×2, sl st to close, FO.
Large Leaf:
ch 10, sc in 2nd ch, hdc 2, dc 4, hdc 2, sc;
Turn and work along underside: sc, hdc 2, dc 4, hdc 2, sc, sl st, FO.
To add definition, work a slip stitch line up the center to form a visible vein.
Attachment Pattern:
- Branch tips: 2–3 leaves angled outward
- Mid-branches: 1–2 leaves
- Near trunk (R35–40): 3–5 leaves clustered together
Curve or twist leaves slightly for a natural appearance.
🐦 Birds (Make 7–8 in mixed colors)
Body:
- MR, 6 sc (6)
- inc ×6 (12)
- (1 sc, inc) ×6 (18)
- (2 sc, inc) ×6 (24)
- (3 sc, inc) ×6 (30)
6–12. sc around (30) – for plump, round shape - (3 sc, dec) ×6 (24)
- (2 sc, dec) ×6 (18)
- (1 sc, dec) ×6 (12)
- dec ×6 (6), FO.
Stuff firmly.
Eyes:
Insert 6–8 mm black safety eyes between R6–7 for small, bright eyes.
Alternatively, embroider with black yarn.
Beak (Orange):
MR, 4 sc, sc 1 round, FO. Sew centered below eyes.
Wings (Make 2 per bird):
MR, 5 sc.
Row 1: ch 1, (sc, hdc, dc, hdc, sc), FO.
Sew at R8–10 height, angled slightly upward and backward.
Feet (Optional):
ch 3, sl st back to base ×3 times to create toes. Sew underneath.
Finishing Touch:
Lightly flatten the base of each bird before attaching.
🪡 Final Assembly
- Sew or hot glue branches securely into trunk.
- Attach leaves in clusters following the guide above.
- Arrange birds sitting on top of branches or nestled between leaves.
- Shape branches using gentle bends in the wire for a natural, lively posture.
- Add optional small pebbles or weighted beads into base for stability.
🌸 Optional Details
- Add a small crochet nest or eggs on one branch.
- Work a few tiny flowers or butterflies for decoration.
- Brush yarn gently to soften the leaves and birds for a plush look.
🌟 Result
This charming bird tree captures movement, color, and nature in yarn form. With its sturdy, textured trunk, full canopy of leaves, and a chorus of colorful birds, it’s a heartwarming handmade centerpiece perfect for any season.


On niin ihana malli, että pakko tehdä! Kiitos paljon ohjeesta