Oh, have you ever just stumbled upon a craft that makes your heart sing with joy? 🎶 That’s exactly how I feel whenever I delve into the delightful world of amigurumi! These adorable little crochet creations are more than just toys; they’re tiny bundles of joy that bring smiles to faces of all ages. The appeal of amigurumi lies in their playful, whimsical nature. Whether you’re crafting a cuddly creature or a charming character, the process is as gratifying as the end product. And the best part? Each creation is a blank canvas for our imagination, allowing us to infuse our personality into every stitch and loop.
Creating an amigurumi pattern, especially for something as fun as a tray design, is like embarking on a creative adventure. 🧶 You start with an idea, maybe inspired by a quirky image or a favorite object, and then it’s all about choosing the perfect yarn and hook. Each step, from drawing up a simple sketch to charting out the stitches, is filled with a sense of discovery. As you crochet, you can almost feel the personality of your amigurumi taking shape in your hands. The process is wonderfully satisfying, and seeing the final product, a cute and quirky tray, is nothing short of magic. Every time I finish a piece, I can’t help but feel a little giddy with pride and joy. 🎉
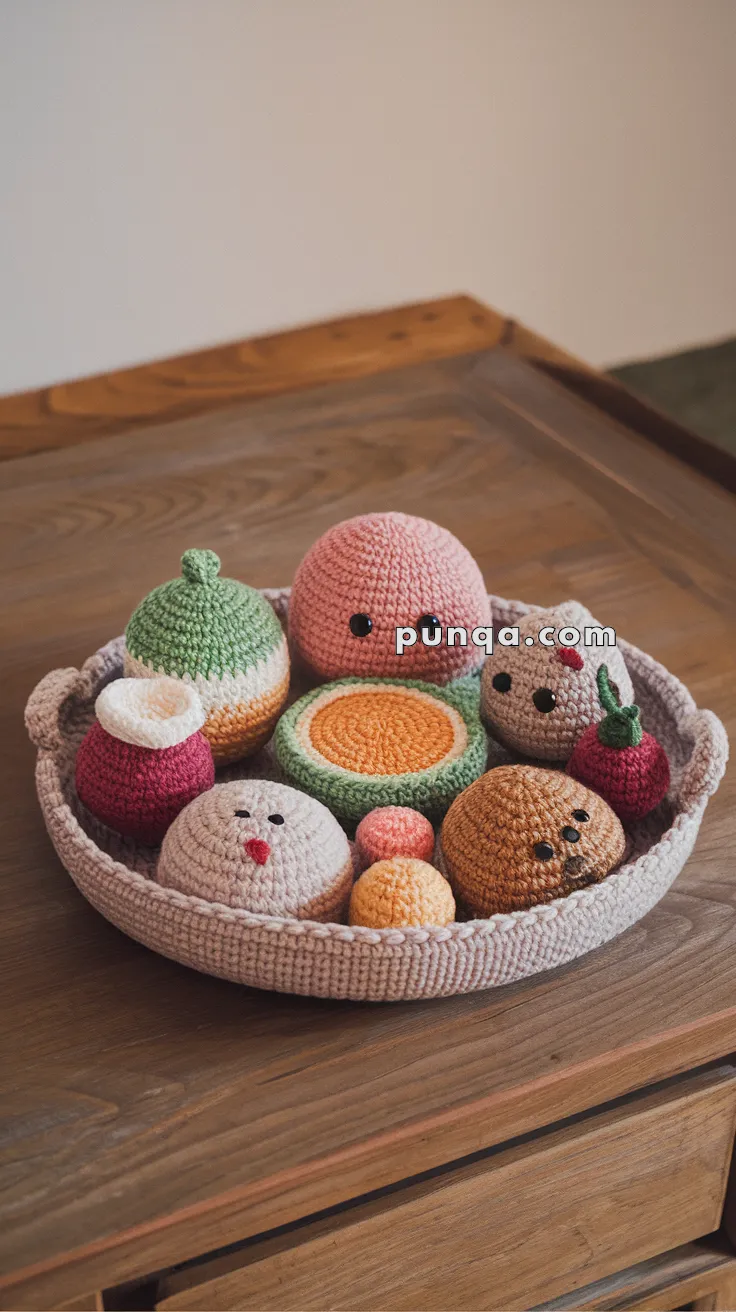
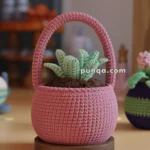
🧺 Crochet Tray – Free Amigurumi Pattern
Give your fruity friends a cozy home with this simple and sturdy crochet tray. It’s the perfect way to organize and display your amigurumi food toys or any small makes!
🧶 Skill Level: Easy
📏 Finished Size: ~8 in diameter, 2 in height
🧵 Materials
-
Worsted weight yarn in beige, cream, or a neutral tone
-
2.5 mm or 3.0 mm crochet hook
-
Yarn needle
-
Stitch marker (optional)
-
Optional: Thin cardboard or interfacing for extra stiffness
✨ Abbreviations (US Terms)
-
MR – Magic Ring
-
sc – Single Crochet
-
inc – Increase (2 sc in same stitch)
-
sl st – Slip Stitch
-
ch – Chain
-
BLO – Back Loop Only
🔄 Basket Base (Worked in continuous rounds)
-
MR, 6 sc
-
inc in each st around = 12
-
(1 sc, inc) x6 = 18
-
(2 sc, inc) x6 = 24
-
(3 sc, inc) x6 = 30
-
(4 sc, inc) x6 = 36
-
(5 sc, inc) x6 = 42
-
(6 sc, inc) x6 = 48
-
(7 sc, inc) x6 = 54
-
(8 sc, inc) x6 = 60
-
(9 sc, inc) x6 = 66
-
sc in each st around = 66
🧱 Basket Walls
Switch to BLO
Rounds 13–20: sc in BLO around = 66
Round 21: sl st around to create a neat edge
Fasten off and weave in ends.
🪢 Handles (Make 2)
-
Ch 10
-
Sk 1 ch, sc in each remaining ch = 9
-
Fasten off and sew ends to opposite sides of the basket’s rim
💡 Final Touches
-
For extra structure, insert a thin cardboard or plastic circle into the base before adding walls
-
Block your basket lightly with steam or shape it over a bowl for perfect form
-
Add a decorative border in a contrasting color if you’d like to customize it further
🍑 Amigurumi Fruit Trio: Peach, Melon & Apple – Free Crochet Pattern
Bring a splash of sweetness to your hooks with this cute amigurumi fruit trio! Perfect for play kitchens, displays, or gifts, these fruity friends are both adorable and beginner-friendly.
🧶 Skill Level: Beginner–Easy
📏 Finished Sizes:
-
Peach: ~3.5 in tall
-
Melon Slice: ~4 in across
-
Apple: ~3 in tall
🧵 Materials
-
Worsted weight yarn in:
-
Peach, Green, Red, White, Orange, Brown, Black
-
-
2.5 mm or 3.0 mm crochet hook
-
Fiberfill stuffing
-
6 mm or 8 mm safety eyes (optional)
-
Yarn needle
-
Stitch marker
✨ Abbreviations (US Terms)
MR – Magic Ring
sc – Single Crochet
inc – Increase (2 sc in 1 st)
dec – Decrease (sc 2 sts together)
sl st – Slip Stitch
ch – Chain
BLO/FLO – Back/Front Loop Only
🍑 Peach
Peach Yarn (Main), Black Yarn (Face)
-
MR, 6 sc
-
inc x6 = 12
-
(1 sc, inc) x6 = 18
-
(2 sc, inc) x6 = 24
-
(3 sc, inc) x6 = 30
6–10. sc around = 30 -
(3 sc, dec) x6 = 24
-
(2 sc, dec) x6 = 18
-
Add safety eyes between Rnds 7–8, ~6 sts apart
-
(1 sc, dec) x6 = 12
-
Stuff
-
dec x6 = 6, fasten off
-
Embroider smile and blush if desired
🍈 Melon Slice
Green (Rind), Orange (Flesh), White (Border)
-
With Orange, ch 2, 6 sc in 2nd ch
-
inc x6 = 12
-
(1 sc, inc) x6 = 18
-
(2 sc, inc) x6 = 24
-
(3 sc, inc) x6 = 30
6–7. sc around -
Switch to White, 2 rounds
-
Switch to Green, 3 more rounds
-
Flatten piece and sc around edge to seal
-
Add face on front with safety eyes & mouth embroidery
🍎 Apple
Red Yarn (Main), White Yarn (Face), Brown for Stem
-
MR, 6 sc
-
inc x6 = 12
-
(1 sc, inc) x6 = 18
-
(2 sc, inc) x6 = 24
5–10. sc around = 24 -
Add safety eyes & embroider mouth
-
(2 sc, dec) x6 = 18
-
(1 sc, dec) x6 = 12
-
Stuff
-
dec x6 = 6
-
Switch to Brown, ch 4, sl st back down for stem
-
Fasten off
🧵 Assembly
-
Sew any open bottoms closed
-
Stitch stem onto apple top
-
Optionally sew each fruit to a crochet basket base
💡 Tips for Fruity Perfection
-
Use blush or embroidery for added personality
-
Don’t overstuff—keep them lightly squishy for best shape
-
Embroider simple kawaii faces with a thin black yarn
-
Use contrasting yarn to create seeds or highlight lines