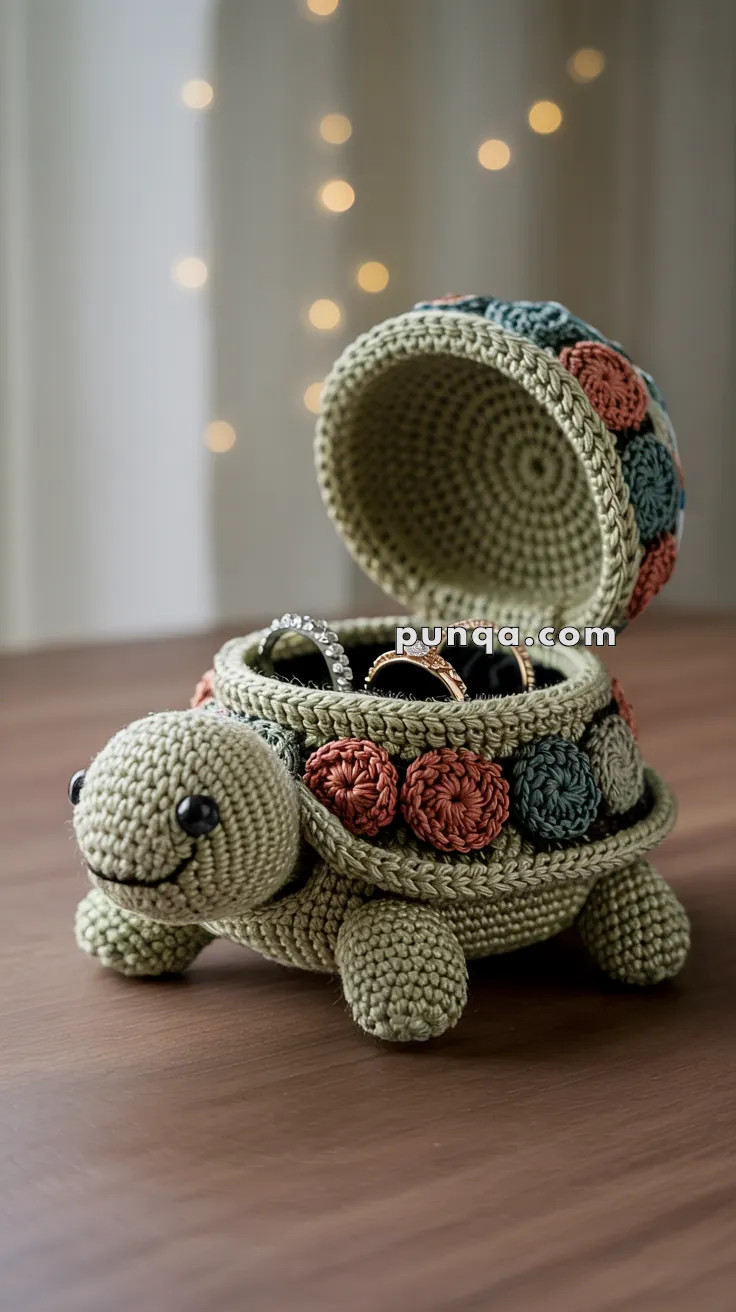
Add a touch of charm and functionality to your crochet collection with this Amigurumi Tortoise Jewelry Box pattern! Inspired by the slow and steady beauty of tortoises, this adorable design combines practicality with delightful craftsmanship. With its detailed shell, sweet expression, and hidden storage compartment, this crochet tortoise is perfect for keeping your favorite jewelry or small treasures safe. Whether you’re crafting for animal lovers, creating a unique handmade gift, or simply enjoy making creative amigurumi designs, this pattern lets you stitch up a lovable tortoise bursting with personality! 🐢✨
Designed for customization, this pattern allows you to experiment with different shades of green and brown, embroidered details, or even tiny accessories like a miniature bow or decorative flowers for extra charm. Craft a classic tortoise jewelry box with earthy tones, create a pastel version for a whimsical aesthetic, or even stitch up a full set of animal-inspired amigurumi for a fun collection! Whether gifted as a cherished keepsake, displayed as a stylish accent, or made simply for the joy of crafting, this Amigurumi Tortoise Jewelry Box is a creative and engaging project—perfect for bringing a touch of handmade charm to every stitch! 🧶💖
🐢 Amigurumi Tortoise Jewelry Box Crochet Pattern
Add a touch of handmade charm to your dresser with this delightful amigurumi tortoise jewelry box! 🐢💍
This functional yet whimsical piece doubles as a storage box — the shell opens on a sturdy hinge to reveal a cozy space for rings, earrings, or tiny treasures. The puffed rosettes and corded edges give it a detailed, professional finish worthy of display.
✨ Skill Level
Intermediate – Includes shaping, color changes, hinge assembly, and decorative details.
📏 Finished Size
Approximately 7 inches (18 cm) long and 4.5 inches (11 cm) tall when using worsted weight cotton yarn and a 3.0 mm crochet hook.
🧶 Materials
- Worsted weight cotton yarn:
- Olive green – 60 g (body and shell)
- Terracotta – 10 g (rosettes)
- Dark teal – 10 g (rosettes)
- Black – scrap (mouth)
- 3.0 mm crochet hook
- 10 mm safety eyes (x2)
- Tapestry needle
- Fiberfill stuffing
- Plastic or cardboard circle for shell base support
- Optional:
- 6–8 mm magnets or small button + loop for clasp
- Felt or fabric strip for hinge reinforcement
- Lining fabric for inside
🧵 Abbreviations (US Terms)
MR – Magic Ring
sc – Single Crochet
inc – Increase (2 sc in same stitch)
dec – Decrease (sc2tog)
sl st – Slip Stitch
crab st – Reverse Single Crochet
BLO – Back Loop Only
FLO – Front Loop Only
FO – Fasten Off
🐢 Head
With olive green:
R1: MR, 6 sc (6)
R2: inc ×6 (12)
R3: (1 sc, inc) ×6 (18)
R4: (2 sc, inc) ×6 (24)
R5–R8: sc around (24)
R9: (2 sc, dec) ×6 (18)
→ Insert safety eyes between R6–R7, 6 stitches apart.
Stuff firmly.
R10: (1 sc, dec) ×6 (12)
R11: dec ×6 (6)
FO, close hole, and leave a long tail for sewing.
Embroider a small curved smile with black yarn between R6–R7.
🐾 Legs ×4
With olive green:
R1: MR, 6 sc (6)
R2: inc ×6 (12)
R3–R6: sc around (12)
R7: (2 sc, dec) ×3 (9)
R8: sc around (9)
Stuff lightly and FO with a long tail for sewing.
🐢 Tail
With olive green:
R1: MR, 4 sc (4)
R2: (1 sc, inc) ×2 (6)
R3–R4: sc around (6)
FO, leave a tail for sewing.
🐚 Shell Base (Jewelry Compartment)
With olive green:
R1: MR, 6 sc (6)
R2: inc ×6 (12)
R3: (1 sc, inc) ×6 (18)
R4: (2 sc, inc) ×6 (24)
R5: (3 sc, inc) ×6 (30)
R6: (4 sc, inc) ×6 (36)
R7: (5 sc, inc) ×6 (42)
R8: (6 sc, inc) ×6 (48)
R9: BLO sc around (48) ← This creates the vertical wall.
R10–R17: sc around (48)
→ Insert the firm plastic or cardboard circle at the bottom before finishing the last round for structure.
R18: crab st around (48) ← Forms the outer corded rim.
FO and weave in ends neatly.
🧶 Inner Lip (for Lid Fit)
Attach yarn to FLO of Round 9 inside the shell base.
R1: sc around (48)
R2: crab st around (48)
FO.
This forms the raised inner ridge that keeps the lid snug and aligned.
🧵 Outer Decorative Cord
Attach olive yarn midway up the shell wall (around Round 12).
Work surface sl st all the way around to form a neat decorative ridge beneath the rosettes. FO and weave in.
🐢 Shell Lid
With olive green:
R1: MR, 6 sc (6)
R2: inc ×6 (12)
R3: (1 sc, inc) ×6 (18)
R4: (2 sc, inc) ×6 (24)
R5: (3 sc, inc) ×6 (30)
R6: (4 sc, inc) ×6 (36)
R7: (5 sc, inc) ×6 (42)
R8: (6 sc, inc) ×6 (48)
R9–R14: sc around (48) ← Adds height for the domed shape.
R15: crab st around (48) ← Creates the top corded edge.
FO, leaving a long tail for hinge attachment.
🌀 Rosette Decorations (Make 10)
Alternate terracotta and dark teal.
These are coiled puff rosettes that mimic shell segments.
Ch 20
In 2nd ch from hook, work 3 sc in each ch to the end (60).
FO with a long tail.
The strip will curl naturally — coil it into a spiral about 2.5–3 cm wide.
Sew through the layers to secure shape.
Sew five rosettes evenly spaced around the lid edge and five around the shell base — align them so they match when closed.
🧷 Assembly
1️⃣ Head – Sew to front center of shell base, slightly low so the rim remains visible.
2️⃣ Legs – Position two in front corners beside the head and two toward the rear for balance. Sew securely.
3️⃣ Tail – Attach at the back center beneath the rim.
4️⃣ Hinge – Align the lid to the base. Using the long tail from the lid, whipstitch about 6–8 stitches of the back edge of the lid to the shell base.
Optional: reinforce with a small felt strip or fabric hinge inside.
5️⃣ Closure – For a locking lid, sew in a small button + loop or embed a pair of tiny magnets at the front center.
6️⃣ Rosettes – Attach all rosettes evenly, alternating colors for contrast.
🪶 Finishing Touches
- Weave in all yarn ends securely.
- Steam-block gently if edges curl, shaping both rims to align perfectly.
- Optional: line the jewelry compartment with felt or cotton fabric for a soft interior.
- Insert rings or trinkets and close gently — the lid should rest neatly inside the inner lip.
🧼 Care Instructions
- Hand wash in cold water (≤30 °C) with mild soap.
- If magnets or wire are used, avoid full submersion; instead, wipe gently with a damp cloth.
- Press excess water out with a towel and air dry flat.
- Do not wring, tumble dry, or iron — it may distort the shape or edges.
🌿 Final Notes
This Tortoise Jewelry Box is both a craft and a keepsake — a delightful fusion of function and artistry.
The domed shell, braided rims, and soft rosettes bring life to this design, making it the perfect gift for anyone who loves handmade beauty.
Enjoy watching your tortoise slowly guard your favorite treasures with a smile. 🐢✨


Truely gorgeous, thank you for being so gracious with the pattern
Beautiful like it👍