Welcome to the mischievous and playful world of amigurumi! 🐱🐭✨ Today, I’m excited to share my free crochet pattern for an Amigurumi Tom & Jerry Duo—a delightful and nostalgic creation perfect for cartoon lovers, classic animation fans, or anyone who enjoys crafting expressive and dynamic plush designs! 🧶 Whether you love stitching up iconic characters, experimenting with textured details, or simply want to add a feisty Tom & Jerry duo to your handmade lineup, this pattern will guide you through crafting a beautifully sculpted plush with Tom’s sly grin, Jerry’s cheeky charm, and a touch of animated fun! 🎬
This design embraces soft grays, warm browns, and intricate shaping to bring a lively and humorous presence to your crochet projects! 🧶✨ I’ve carefully outlined each step to ensure your Amigurumi Tom & Jerry Duo turns out just right—ready to bring some classic cartoon magic to your collection or become a treasured handmade gift! 🎁 So grab your hooks, pick out playful hues, and let’s stitch up a fantastic Tom & Jerry duo! 🐱🐭
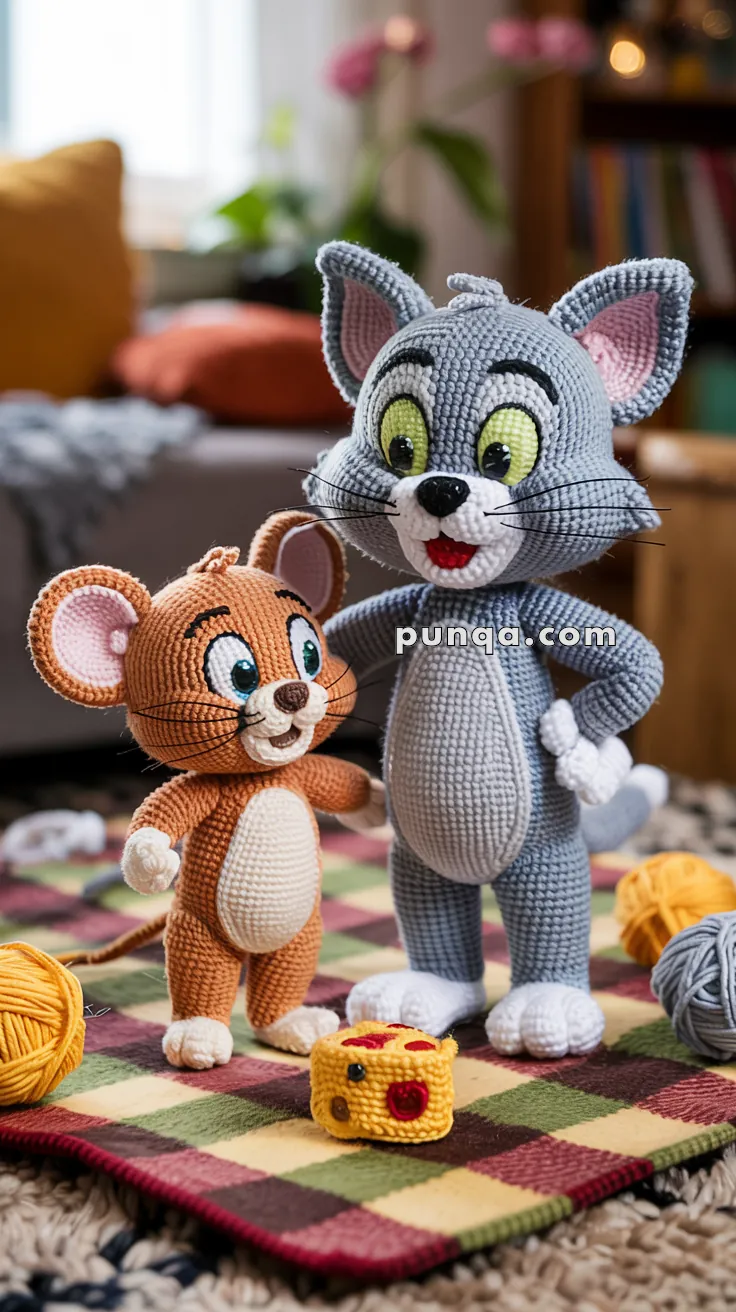
🐱🐭 Amigurumi Tom & Jerry Duo Crochet Pattern
Bring everyone’s favorite cartoon troublemakers to life with this detailed Tom & Jerry crochet duo! 😸🐭💛 Display them together for the perfect nostalgic handmade set! 🧀✨
✨ Skill Level
Intermediate → Advanced – Involves shaping, expressive detailing, and assembly.
📏 Finished Sizes (DK cotton + 2.5 mm hook)
- Tom: ~28–30 cm (11–12 in) standing
- Jerry: ~18 cm (7 in) standing or crouched
- Cheese: ~3–4 cm rounded cube
🧶 Yarn Amounts (Approximate)
Tom
- Grey – 70 g
- White – 45 g
- Pink – 6 g (inner ear, tongue)
- Lime Green – 6 g (iris)
- Black – 6 g (nose, details)
Jerry
- Brown – 60 g
- Cream – 40 g (belly, ears, snout, feet)
- Pink – small amount (tongue)
- Teal/Turquoise – 6 g (iris)
- Black – small amount (nose, whiskers)
Cheese
- Yellow – 12 g
- Red – scraps (holes)
🧵 Materials
- 2.5–2.75 mm crochet hook
- Fiberfill stuffing
- Safety eyes: 10 mm (Tom), 8 mm (Jerry)
- Black embroidery floss for whiskers
- Optional: thin wire or pipe cleaner for tail shaping
- Tapestry needle
- Stitch marker
🔤 Abbreviations (US Terms)
MR – Magic Ring
sc – Single Crochet
inc – Increase (2 sc in same stitch)
dec – Decrease
sl st – Slip Stitch
ch – Chain
BLO – Back Loop Only
FLO – Front Loop Only
FO – Fasten Off
🐱 Tom the Cat – Full Pattern
Head (Wide + Flat Shape)
Color: Grey
R1: MR, 6
R2: inc ×6 → 12
R3: (1 sc, inc) ×6 → 18
R4: (2 sc, inc) ×6 → 24
R5: (3 sc, inc) ×6 → 30
R6: (4 sc, inc) ×6 → 36
R7: (5 sc, inc) ×6 → 42
R8: (6 sc, inc) ×6 → 48
R9: (7 sc, inc) ×6 → 54
R10: (8 sc, inc) ×6 → 60
R11–R15: sc (60)
R16: (8 sc, dec) ×6 → 54
R17: (7 sc, dec) ×6 → 48
R18: (6 sc, dec) ×6 → 42
R19–R20: sc (42)
R21: (5 sc, dec) ×6 → 36
R22: (4 sc, dec) ×6 → 30
R23: (3 sc, dec) ×6 → 24
R24: (2 sc, dec) ×6 → 18
R25: (1 sc, dec) ×6 → 12
R26: dec ×6 → 6
FO.
Stuff firmly but keep the head wide and flat.
Face Patch (White – Flat Oval)
Ch 16
Row 1: sc 14
Row 2: ch 1, inc, sc 12, inc → 16
Row 3–8: sc (16)
Row 9: ch 1, dec, sc 12, dec → 14
Row 10: sc (14)
FO and sew flat over the lower two-thirds of the face.
Eyes (Large & Round)
White Base (Make 2)
R1: MR, 6
R2: inc ×6 → 12
R3: (1 sc, inc) ×6 → 18
R4: (2 sc, inc) ×6 → 24
R5: (3 sc, inc) ×6 → 30
Lime Iris (Make 2)
R1: MR, 6
R2: inc ×6 → 12
R3: (1 sc, inc) ×6 → 18
Black Pupil (Small)
R1: MR, 4
R2: inc ×4 → 8
Add embroidered white highlight.
Sew eyes close together, almost touching.
Eyelids:
Embroider thin grey curved lid lines across top third of the eyes.
Eyebrows:
Black inverted-V shapes placed high and expressive.
Nose & Mouth
- Stitch a small black triangle at top of white patch.
- Embroider wide curved smile.
- Add red tongue inside.
Ears (Triangular)
Outer (Grey)
R1: MR, 6
R2: (1 sc, inc) ×3 → 9
R3: (2 sc, inc) ×3 → 12
R4: (3 sc, inc) ×3 → 15
R5: (4 sc, inc) ×3 → 18
R6: sc (18)
Flatten into triangle.
Inner (Pink)
R1: MR, 6
R2: (1 sc, inc) ×3 → 9
R3: sc (9)
Sew inner to outer.
Attach high and wide, angled outwards.
Body (Stocky Shape)
R1: MR, 6
R2: inc ×6 → 12
R3: (1 sc, inc) ×6 → 18
R4: (2 sc, inc) ×6 → 24
R5: (3 sc, inc) ×6 → 30
R6: (4 sc, inc) ×6 → 36
R7–R11: sc (36)
R12: (4 sc, dec) ×6 → 30
R13: (3 sc, dec) ×6 → 24
R14: sc (24)
FO and stuff.
Belly Patch (White)
Same as Jerry’s belly patch (below).
Sew centered from chest to pelvis.
Arms
Grey → White (gloves)
R1: MR, 6
R2: inc ×6 → 12
R3–R6: sc (12)
R7: (1 sc, dec) ×4 → 8
R8–R10: sc (8)
Switch to white:
R11–R13: sc (8)
FO.
Attach right arm angled toward Jerry, left arm resting down the side.
Legs
Feet (White)
R1: MR, 6
R2: inc ×6 → 12
R3: (1 sc, inc) ×6 → 18
R4–R6: sc (18)
R7: (4 sc, dec) ×3 → 15
R8: (3 sc, dec) ×3 → 12
Legs (Grey)
R9–R26: sc (12)
FO.
Attach flattened tops under torso.
Add small claw embroidery lines.
Tail
Grey → white tip
R1: MR, 5
R2–R25: sc (5)
Switch to white for 5 rounds.
Insert wire or pipe cleaner.
Curve tail upward.
🐭 Jerry the Mouse – Full Pattern
Head (Large & Round)
R1: MR, 6
R2: inc ×6 → 12
R3: (1 sc, inc) ×6 → 18
R4: (2 sc, inc) ×6 → 24
R5: (3 sc, inc) ×6 → 30
R6–R8: sc (30)
R9: (3 sc, dec) ×6 → 24
R10: (2 sc, dec) ×6 → 18
R11: (1 sc, dec) ×6 → 12
R12: dec ×6 → 6
FO.
Stuff firmly for large round shape.
Snout (Cream)
R1: MR, 6
R2: inc ×6 → 12
R3: (1 sc, inc) ×6 → 18
R4–R5: sc (18)
R6: (1 sc, dec) ×6 → 12
FO.
Sew snout low on the face.
Add tiny brown nose, wide smile, and pink tongue.
Eyes (Large & Round)
White base: R1–R4 same as Tom but stop at 24 sts.
Iris: teal R1–R3 → 18 sts.
Pupil: MR 4 → 8 sts.
Attach close together with slight upward tilt.
Add brown eyelid lines above eyes.
Ears (Very Large)
Outer: MR6 → 12 → 18 → 24 → sc 2 rounds
Inner: MR6 → 12 → sc 1 round
Sew inner to outer.
Attach high and wide.
Body (Small & Compact)
R1: MR, 6
R2: inc ×6 → 12
R3: (1 sc, inc) ×6 → 18
R4: (2 sc, inc) ×6 → 24
R5–R7: sc (24)
R8: (2 sc, dec) ×6 → 18
R9: (1 sc, dec) ×6 → 12
FO and stuff.
Belly Patch (Cream)
R1: MR, 6
R2: inc ×6 → 12
R3: (1 sc, inc) ×6 → 18
R4–R6: sc (18)
Flatten and sew on front center.
Arms & Legs
Arms
Start cream → switch to brown
R1: MR, 6
R2: inc ×6 → 12
R3: sc (12)
R4–R10 (brown): sc (12)
FO.
Legs
Feet (cream):
MR6 → 12 → 18 → 18 → 18
Then brown legs:
R6–R15: sc (12)
FO.
Position legs slightly outward for natural stance.
Tail
R1: MR, 5
R2–R25: sc (5)
FO and curve.
🧀 Cheese Wedge
Triangle Panels (Make 2)
Ch 14
Row 1: sc 12
Row 2: ch 1, dec, sc 8, dec → 10
Row 3: ch 1, dec, sc 6, dec → 8
Row 4: ch 1, dec, sc 4, dec → 6
Row 5: ch 1, dec, sc 2, dec → 4
Row 6: ch 1, dec ×2 → 2
Side Panel (Rectangle)
Ch 13
Rows 1–10: sc 12
FO.
Bottom Panel
Repeat triangle panel.
Cheese Holes (Red Spots)
Make 6–8 circles:
R1: MR, 5 sc
FO.
Sew randomly.
🪡 Assembly & Display
- Add black whiskers to both characters using embroidery floss.
- Attach Tom’s head slightly forward with wide smiling expression.
- Place Tom’s right arm around Jerry, left arm relaxed.
- Sew Jerry slightly leaning forward for a playful pose.
- Position cheese wedge between them.
✅ FINAL CHECKLIST
- Tom’s tall frame with integrated legs ✔️
- Distinct belly patch ✔️
- Long, balanced limbs ✔️
- Jerry’s bigger head and crouched stance ✔️
- Smaller rounded cheese block ✔️
- Expressive eyes and ears for both ✔️
Your Tom & Jerry duo is complete — full of character, personality, and nostalgic charm! 🐱🐭💛
Display them proudly together with the cheese for a heartwarming touch of handmade animation magic. 🧀✨