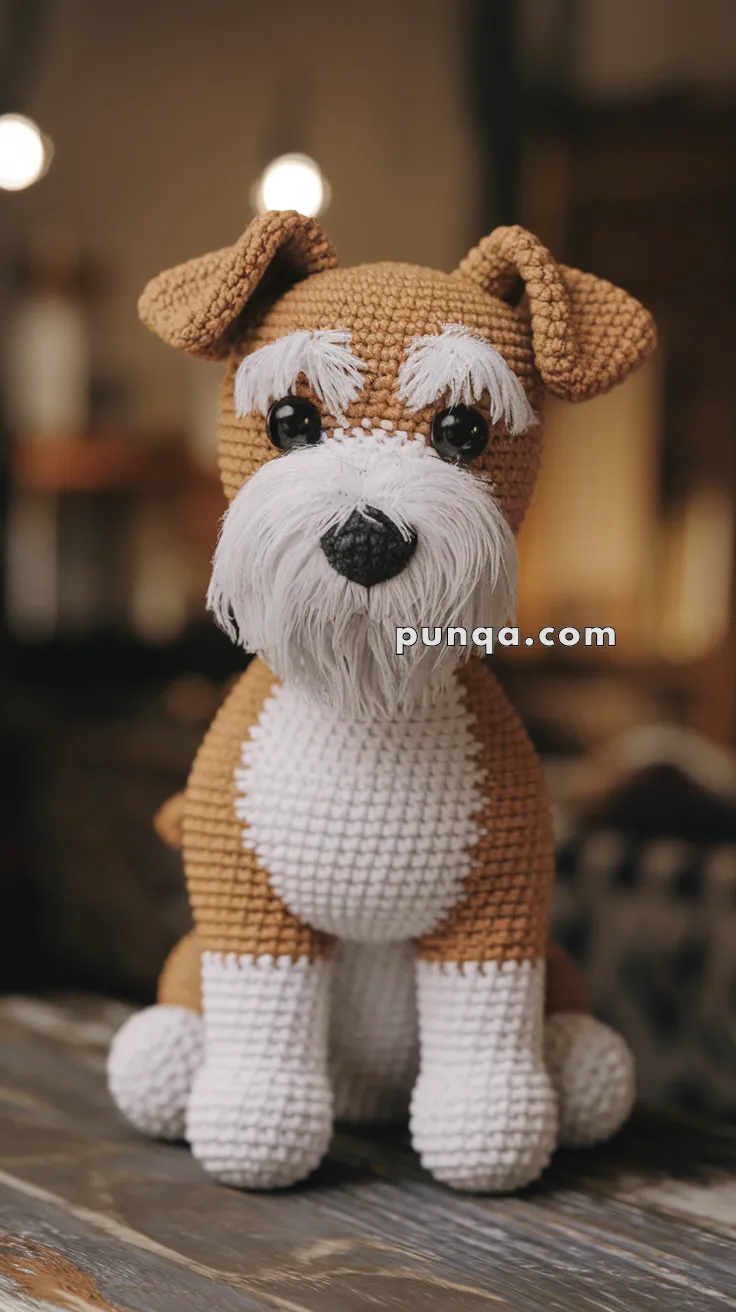
Say hello to the Amigurumi Terrier, a spunky little crochet pup full of personality and charm! 🐶🧶 With its perky ears, button nose, and playful stance, this tiny terrier is ready to become your next handmade best friend. Whether you’re crafting for a dog lover, decorating a nursery, or simply adding to your amigurumi collection, this pup brings tail-wagging joy to every stitch.
Perfect for crocheters who adore expressive animal designs, this pattern invites you to customize your terrier with different coat colors, a cute collar, or even a tiny bone accessory. You can make a whole pack with unique markings and poses, or stitch one up as a heartfelt gift for someone who loves their furry companion. The Amigurumi Terrier is a delightful way to stitch up loyalty, love, and a whole lot of cuteness—one cheerful loop at a time! 🧵💛
🐶 Amigurumi Terrier Crochet Pattern
This scruffy little terrier is bursting with charm — complete with bushy eyebrows, a textured snout, and sweet little paws. Perfect for dog lovers or anyone looking for a playful pup companion that doesn’t shed! Whether perched on a shelf or tucked in for cuddles, this handmade doggo is a loyal little friend.
✨ Skill Level
Intermediate – Involves shaping, color changes, fluffing yarn for the beard/eyebrows, and sewing multiple parts.
📏 Finished Size
Approx. 10–12 in (25–30 cm) tall using worsted yarn and a 3.0–3.5 mm hook.
🧶 Materials
-
Worsted or DK yarn in:
-
Light brown (main body, head, ears, tail)
-
White (paws, chest patch, eyebrows, snout, beard)
-
Black (nose embroidery or crochet nose)
-
-
Crochet hook: 3.0–3.5 mm
-
10–12 mm safety eyes
-
Polyester fiberfill stuffing
-
Tapestry needle & stitch markers
-
Pet slicker brush or wire brush (for beard fluffing)
-
Scissors
🧵 Abbreviations (US Terms)
-
MR – Magic Ring
-
sc – Single Crochet
-
inc – Increase (2 sc in same stitch)
-
dec – Decrease (sc2tog)
-
ch – Chain
-
sl st – Slip Stitch
-
FO – Fasten Off
-
BLO – Back Loop Only
🐾 Pattern Instructions
🧠 Head (Light Brown)
-
MR, 6 sc
-
inc x6 (12)
-
(1 sc, inc) x6 (18)
-
(2 sc, inc) x6 (24)
-
(3 sc, inc) x6 (30)
6–14. sc around (30) — extra rounds for oval head shape -
(3 sc, dec) x6 (24)
-
(2 sc, dec) x6 (18)
👉 Insert safety eyes between Rnds 9–10, ~7–8 sts apart.
👉 Add eyebrows placement above. -
(1 sc, dec) x6 (12)
-
dec x6 (6), FO, stuff firmly.
🐽 Snout & Beard (White)
Snout Base:
-
MR, 6 sc
-
inc x6 (12)
-
(1 sc, inc) x6 (18)
4–5. sc around (18)
👉 FO, lightly stuff, sew to lower half of face.
Beard:
-
Cut 25–30 strands of white yarn (2–3 in each).
-
Attach around lower snout using latch-hook method.
-
Brush with slicker brush to fluff, trim into a rounded triangular beard extending downwards.
Nose:
-
With black yarn, embroider triangle OR crochet:
-
MR, 4 sc, sc around for 2 rounds, FO.
-
👀 Eyebrows (White)
-
Cut 8–10 strands (1–1.5 in long).
-
Attach in pairs above each eye, angled downward toward eyes.
-
Fluff and trim to match scruffy terrier brows.
👂 Ears (Make 2 – Light Brown)
-
MR, 6 sc
-
inc x6 (12)
3–6. sc around (12)
👉 FO, flatten, fold slightly, and sew to sides of head.
🐕 Body (White → Brown)
-
With white: MR, 6 sc
-
inc x6 (12)
-
(1 sc, inc) x6 (18)
-
(2 sc, inc) x6 (24)
-
(3 sc, inc) x6 (30)
6–10. sc around (30)
👉 Switch to brown
11–16. sc around (30) -
(3 sc, dec) x6 (24)
-
(2 sc, dec) x6 (18)
-
(1 sc, dec) x6 (12)
-
dec x6 (6), FO, stuff firmly.
🐾 Legs (Make 4 – White → Brown)
Front Legs (slightly longer):
-
With white: MR, 6 sc
-
inc x6 (12)
3–6. sc around (12)
👉 Switch to brown
7–11. sc around (12), FO.
Back Legs:
Same as front legs, but stop at Rnd 9 instead of 11.
👉 Stuff lightly. Sew 2 legs forward-facing, 2 angled backward.
🐕 Tail (Light Brown)
-
MR, 5 sc
2–6. sc around (5)
👉 FO, sew to back top of body.
✂️ Assembly
-
Sew head firmly onto body.
-
Attach front legs slightly longer, positioned forward.
-
Attach back legs angled outward for sitting pose.
-
Sew ears, then add snout base and beard.
-
Insert eyebrows, fluff and trim.
-
Embroider or sew nose at snout tip.
🎀 Finishing Touches
-
Trim beard into neat rounded shape.
-
Angle eyebrows for expressive terrier look.
-
Optional: add a small collar or bow tie.
Your scruffy terrier is complete! 🐶💖 With its soulful eyes, fluffy beard, and mischievous eyebrows, this handmade pup is sure to bring smiles. Perfect for gifting to dog lovers, or keeping as a loyal handmade companion.
Happy crocheting — may your terrier always sit, stay, and snuggle by your side! 🧶✨