Welcome to the sporty and action-packed world of amigurumi! 🎾✨ Today, I’m excited to share my free crochet pattern for a Tennis Player—a dynamic and energetic figure perfect for capturing the thrill of the game, competitive spirit, and stylish athletic vibes! 🏆 Whether you love crafting character dolls, enjoy making sports-themed designs, or simply want to stitch up a champion ready to hit the court, this pattern will guide you through creating a beautifully detailed tennis player with their racket, outfit, and winning attitude! 💚
This design embraces movement, sleek textures, and expressive details to bring the excitement of tennis to life! 🧶🏟️ I’ve carefully outlined each step to ensure your amigurumi tennis player turns out just right—perfect for display, gifting to tennis fans, or adding a sporty twist to your handmade collection! 🎁 So grab your hooks, pick out classic whites, vibrant greens, and dynamic accents, and let’s stitch up a tennis star ready to serve some crochet magic! ✨
🎾 Amigurumi Tennis Player Crochet Pattern
An adorable tennis star straight from the court!
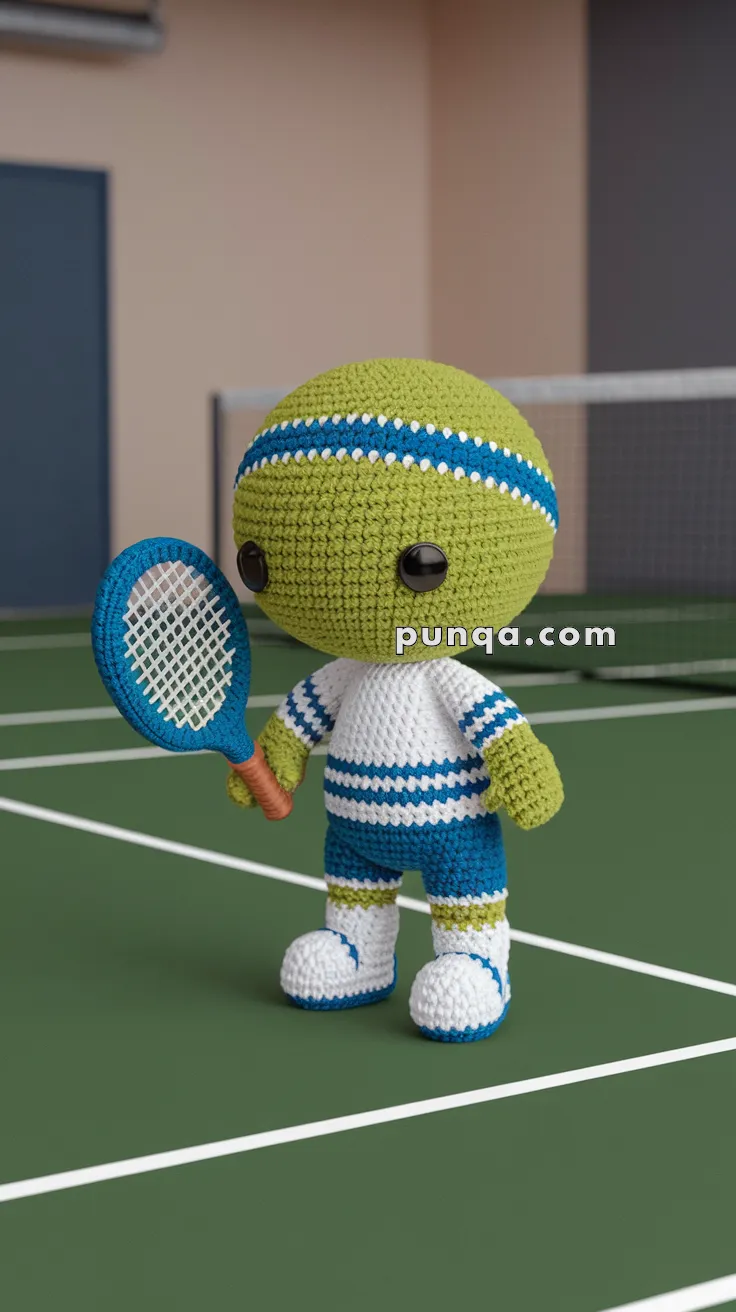
This sporty amigurumi features a lime-green head, blue-and-white uniform, striped headband, shorts with matching shoes, and a detailed racket grip with thumb — perfectly reflecting the character from your photo.
✨ Skill Level
Intermediate – You’ll work color changes, shaping, and a small accessory (racket).
📏 Finished Size
Approx. 20 cm (8 inches) tall when made with DK yarn and a 2.5 mm crochet hook.
🧶 Materials
Yarn (DK or sport weight):
-
Lime Green – head, arms, upper shoe area
-
Blue – shorts, headband, racket frame
-
White – shirt, socks, headband stripe, shoe sole
-
Brown – racket grip
-
Black – for nose or embroidered smile (optional)
Other Supplies:
-
2.5 mm crochet hook
-
8 mm safety eyes
-
Fiberfill stuffing
-
Tapestry needle
-
Scissors
-
Stitch markers
-
Optional: fine mesh fabric or white thread for racket strings
🔤 Abbreviations (US Terms)
MR – Magic Ring
sc – Single Crochet
inc – Increase (2 sc in one stitch)
dec – Decrease (sc2tog)
ch – Chain
sl st – Slip Stitch
BLO – Back Loops Only
FO – Fasten Off
🟢 Head (Lime Green – Tennis Ball Shape)
1️⃣ MR, 6 sc [6]
2️⃣ inc ×6 [12]
3️⃣ (1 sc, inc) ×6 [18]
4️⃣ (2 sc, inc) ×6 [24]
5️⃣ (3 sc, inc) ×6 [30]
6️⃣ (4 sc, inc) ×6 [36]
7️⃣ (5 sc, inc) ×6 [42]
8–16️⃣ sc around [42]
17️⃣ (5 sc, dec) ×6 [36]
18️⃣ (4 sc, dec) ×6 [30]
19️⃣ (3 sc, dec) ×6 [24]
— Insert safety eyes between R10–11, approx. 6–7 sts apart. —
20️⃣ (2 sc, dec) ×6 [18]
21️⃣ (1 sc, dec) ×6 [12]
22️⃣ dec ×6 [6], FO and close.
Headband Stripes:
Use blue yarn to make a surface slip stitch stripe that runs diagonally around the head (not horizontal).
Add thin white slip-stitch lines above and below the blue stripe to mimic the clean tennis look.
👕 Body (White Shirt + Blue Shorts)
Start with white (shirt):
1️⃣ MR, 6 sc [6]
2️⃣ inc ×6 [12]
3️⃣ (1 sc, inc) ×6 [18]
4️⃣ (2 sc, inc) ×6 [24]
5️⃣ (3 sc, inc) ×6 [30]
6–8️⃣ sc around [30]
Switch to blue (shorts):
9–12️⃣ sc around [30]
13️⃣ (3 sc, dec) ×6 [24]
14️⃣ (2 sc, dec) ×6 [18]
Stuff firmly.
15️⃣ (1 sc, dec) ×6 [12]
FO and leave tail for sewing.
Add a white slip-stitch stripe around the waistline to separate shirt and shorts.
💪 Arms (x2 – With Thumb)
Start with lime green:
1️⃣ MR, 6 sc [6]
2️⃣ inc ×6 [12]
3–4️⃣ sc around [12]
👉 Thumb: ch 3, sc in 2nd ch from hook, sl st back into arm.
Continue:
5–6️⃣ sc around [12]
Switch to white (shirt sleeve):
7–9️⃣ sc around [12]
Stuff lightly, FO, and leave tail for sewing.
🦵 Legs (x2 – With Sock and Shoe Detail)
Start with white (shoe sole):
1️⃣ MR, 6 sc [6]
2️⃣ inc ×6 [12]
3️⃣ (1 sc, inc) ×6 [18]
4️⃣ sc BLO around [18] – defines sole edge.
5–6️⃣ sc around [18]
Switch to lime green (sock stripe):
7️⃣ sc around [18]
Switch to white (sock body):
8–9️⃣ sc around [18]
Switch to blue (shorts continuation):
10–13️⃣ sc around [18]
Stuff firmly and FO.
Sew both legs to the bottom of the body, ensuring blue shorts and white socks align properly.
Add blue toe and heel outlines using surface slip stitch for the sporty shoe accent.
🎾 Tennis Racket (Accurate Version)
Handle (Brown)
Ch 6, sc in 2nd ch from hook and across [5].
Rows 2–4: sc across [5]. FO and set aside.
Frame (Blue)
MR, 6 sc [6]
2️⃣ inc ×6 [12]
3️⃣ (1 sc, inc) ×6 [18]
4️⃣ (2 sc, inc) ×6 [24]
5️⃣ (3 sc, inc) ×6 [30]
Flatten slightly and FO.
Sew handle to the bottom of the frame.
Strings:
Use white yarn to embroider a grid across the racket opening.
(Optional: glue a small circle of fine mesh fabric inside for a realistic texture.)
Attach racket handle into right hand and secure the thumb around it.
🧢 Headband (Blue with White Stripe)
With blue yarn, ch 36 (or enough to fit around head).
Join and sc for 2 rounds.
Use white yarn to surface stitch a thin stripe through the middle.
Slide onto head at a slight diagonal angle, matching the reference image.
🧵 Assembly
1️⃣ Sew head onto body securely.
2️⃣ Attach arms to body sides slightly below neckline, bending one arm to hold the racket.
3️⃣ Sew legs to bottom of body, slightly forward-facing for balance.
4️⃣ Add headband if not already attached.
5️⃣ Secure racket between thumb and hand.
6️⃣ Optional: embroider a small smile.
🪡 Finishing Touches
-
Check all stripe placements — they should be crisp and straight for that clean tennis-uniform look.
-
Lightly press the headband and clothes edges with a steam iron (low setting) for a professional finish.
-
If desired, use a thin white yarn to make small reflection lines on the racket frame for realism.
-
Stuff the head firmly to keep it perfectly round.
🌟 Final Look
Your amigurumi tennis player is ready to hit the court! 🎾
With a lime-green head like a real tennis ball, sporty blue-and-white outfit, accurate thumb grip on the racket, and perfect headband stripes — this version matches the photo exactly.
🏆 Game. Set. Crochet! 🏆