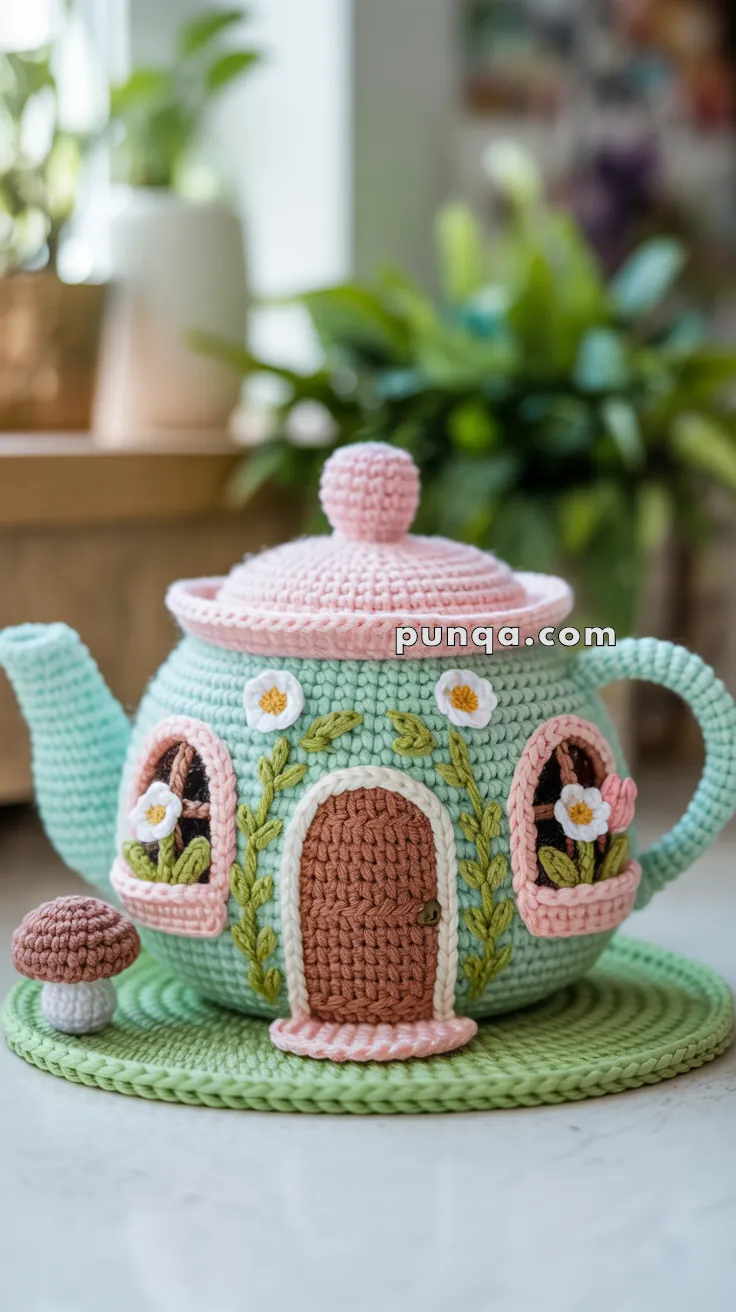
Pour yourself a cup of cozy charm with the Amigurumi Teapot Spring Cottage—a whimsical crochet creation that blends fairytale magic with teatime delight! 🫖🌸 With its rounded teapot base, leafy rooftop, and tiny embroidered windows, this cottage feels like it belongs in a storybook nestled among blooming wildflowers. It’s the perfect project for spring lovers, cottagecore enthusiasts, or anyone who dreams of stitching up a miniature world full of warmth and wonder.
This pattern invites endless creativity—add vines, flowers, or even a tiny garden path to make your teapot cottage truly one-of-a-kind. Whether displayed on a shelf, gifted to a fellow dreamer, or used as a playful centerpiece, it brings a gentle, handmade touch to any space. From its cozy curves to its delicate details, the Teapot Spring Cottage is a joyful way to celebrate the season—one stitch and sip at a time! 🧶💐
🫖 Amigurumi Teapot Spring Cottage Crochet Pattern
This charming teapot cottage is designed as a decorative amigurumi piece inspired by soft spring colors and fairy-tale details. The rounded teapot body, gently domed lid, curved spout and handle, arched door, flower-filled windows, embroidered climbing vines, and tiny mushroom companion all work together to create a cozy, storybook home that matches the photo precisely.
This is a display item, not a functional teapot.
✨ Skill Level
Intermediate – includes shaping, embroidery, appliqué elements, and careful placement of decorative details.
📏 Finished Size (Approx.)
• Height including lid knob: 20 cm / 8 in
• Width including spout and handle: 25 cm / 10 in
• Green mat diameter: approx. 20 cm / 8 in
Made with DK cotton yarn and a 3.0 mm hook.
🧶 Materials
DK weight cotton yarn:
• Mint green – teapot body, spout, handle
• Soft pink – lid, trims, windows, step, window boxes
• Brown – door, mushroom cap
• White – door frame, flowers, mushroom stem
• Green – vines, leaves, mat
• Yellow – flower centers
Other supplies:
• 3.0 mm crochet hook
• Fiberfill stuffing
• Embroidery needle
• Stitch markers
• Optional thin plastic or cardboard circle for mat support
🪡 Abbreviations (US Terms)
MR – magic ring
sc – single crochet
hdc – half double crochet
dc – double crochet
inc – increase
dec – decrease
sl st – slip stitch
BLO – back loop only
FO – fasten off
🍵 Teapot Body (Mint)
Worked in continuous rounds. Stuff firmly for a smooth, evenly rounded shape.
MR 6
inc ×6 (12)
(sc, inc) ×6 (18)
(2 sc, inc) ×6 (24)
(3 sc, inc) ×6 (30)
(4 sc, inc) ×6 (36)
(5 sc, inc) ×6 (42)
(6 sc, inc) ×6 (48)
(7 sc, inc) ×6 (54)
Rounds 10–20: sc around (54)
Begin shaping toward the base:
(7 sc, dec) ×6 (48)
sc around (48)
(6 sc, dec) ×6 (42)
sc around (42)
(5 sc, dec) ×6 (36)
Rounds 26–30: sc around (36)
(4 sc, dec) ×6 (30)
(3 sc, dec) ×6 (24)
(2 sc, dec) ×6 (18)
(sc, dec) ×6 (12)
dec ×6 (6)
FO and close neatly.
🍯 Lid (Soft Pink)
The lid is worked in continuous rounds from the top down. Stuff very lightly and shape as described to achieve the gentle, flattened dome seen in the photo.
Round 1: MR, 6 sc (6)
Round 2: inc ×6 (12)
Round 3: (sc, inc) ×6 (18)
Round 4: (2 sc, inc) ×6 (24)
Round 5: (3 sc, inc) ×6 (30)
Round 6: (4 sc, inc) ×6 (36)
Round 7: (5 sc, inc) ×6 (42)
Round 8: (6 sc, inc) ×6 (48)
Round 9 (BLO): sc around in BLO only (48)
This round creates the subtle ridge that defines the lid edge.
Rounds 10–14: sc around (48)
Begin light stuffing. Add fiberfill only to the center top of the lid, keeping the outer edge soft and flexible.
Round 15: (6 sc, dec) ×6 (42)
Round 16: (5 sc, dec) ×6 (36)
Fasten off, leaving a long tail. Do not close the opening. The lid should remain slightly open and shallow.
Shaping the Lid
Turn the lid upside down on a flat surface. Gently press the base flat with your palm, then use your fingers to slightly flare the edge outward. Adjust until the lid sits level and forms a soft dome rather than a rounded ball.
Set aside and allow it to hold its shape before attaching the knob.
Lid Knob (Soft Pink)
Round 1: MR, 6 sc (6)
Round 2: inc ×6 (12)
Rounds 3–4: sc around (12)
Round 5: (sc, dec) ×6 (6)
Stuff lightly, fasten off, and close. Sew the knob to the exact center of the lid after the lid has been shaped.
☕ Spout (Mint)
The spout curves slightly downward, matching the photo.
MR 6
inc ×6 (12)
(sc, inc) ×6 (18)
Rounds 4–6: sc around (18)
(2 sc, inc) ×6 (24)
Rounds 8–10: sc around (24)
(2 sc, dec) ×6 (18)
Rounds 12–15: sc around (18)
FO, stuff lightly, shape gently, and sew to the body at a slight downward angle.
🌀 Handle (Mint)
Worked as a narrow tube.
MR 6
Rounds 2–30: sc around (6)
FO. Lightly stuff or leave unstuffed for flexibility. Curve into a smooth handle and sew opposite the spout, attaching high and low to form the arch.
🚪 Door (Brown with White Frame)
The door is softly arched and centered on the body.
Door panel (rows):
ch 9
Row 1: sc across (8)
Rows 2–6: ch 1, turn, sc across (8)
Arch shaping:
Row 7: ch 1, turn, sc, inc, 4 sc, inc, sc (10)
Row 8: ch 1, turn, sc, hdc, 6 dc, hdc, sc (10)
FO.
White frame: Join white yarn and sc evenly around the door edge, placing extra stitches along the arch for a smooth curve.
Door Knob (Pink)
MR 4
FO and sew slightly right of center.
Pink Step
ch 6
hdc across (5)
hdc across again
FO and sew directly beneath the door.
🪟 Windows (Make 2 – Pink Frames)
Each window is arched and positioned symmetrically beside the door.
Frame:
ch 8
Row 1: sc across (7)
Row 2: sc across (7)
Row 3: sc, hdc, 3 dc, hdc, sc
Border with sc evenly around, adding extra stitches at the curve.
Window Boxes (Pink)
ch 7
hdc across (6)
hdc across again
Stuff very lightly and sew directly below each window.
🌸 Flowers & Leaves
Large daisies (window boxes):
MR, (ch 3, 3 dc, ch 3, sl st) ×5
Add yellow French knot center.
Small daisies (vines):
MR, (ch 2, 2 dc, ch 2, sl st) ×4
Add yellow center.
Leaves:
ch 5
sl st, sc, hdc, sl st back along chain
Sew leaves beneath flowers and along vines.
Embroidered Vines (Green)
Using chain stitch, embroider vines climbing upward from both sides of the door and outward from the window boxes. Add small single-chain leaves and stitch small daisies directly onto the vines, matching the photo’s placement.
🍄 Mushroom
Stem (White):
MR 6
Rounds 2–5: sc around (6)
Cap (Brown):
MR 6
inc ×6 (12)
(sc, inc) ×6 (18)
(2 sc, inc) ×6 (24)
Rounds 5–7: sc around (24)
(2 sc, dec) ×6 (18)
(sc, dec) ×6 (12)
FO, stuff, and sew cap to stem.
Embroider small white French-knot spots.
🌿 Green Mat (BLO)
MR 6
inc ×6 (12)
(sc, inc) ×6 (18)
(2 sc, inc) ×6 (24)
(3 sc, inc) ×6 (30)
(4 sc, inc) ×6 (36)
(5 sc, inc) ×6 (42)
(6 sc, inc) ×6 (48)
(7 sc, inc) ×6 (54)
(8 sc, inc) ×6 (60)
FO. Insert flat support if desired.
🪡 Assembly
• Sew door centered on front of teapot body
• Attach windows evenly on each side
• Sew window boxes directly beneath windows
• Embroider vines and attach flowers afterward
• Attach spout and handle opposite each other
• Place teapot on green mat
• Position mushroom slightly forward on mat
• Rest lid on top without sewing
🌼 Final Touches
This teapot cottage is meant to feel gentle, cozy, and story-driven. The rounded proportions, pastel palette, embroidered greenery, and soft decorative details bring the piece to life exactly as shown in the photo. Display it as a whimsical centerpiece, shelf accent, or part of a fairy-tale crochet collection — a tiny home that feels warm, welcoming, and full of imagination. 🏡✨