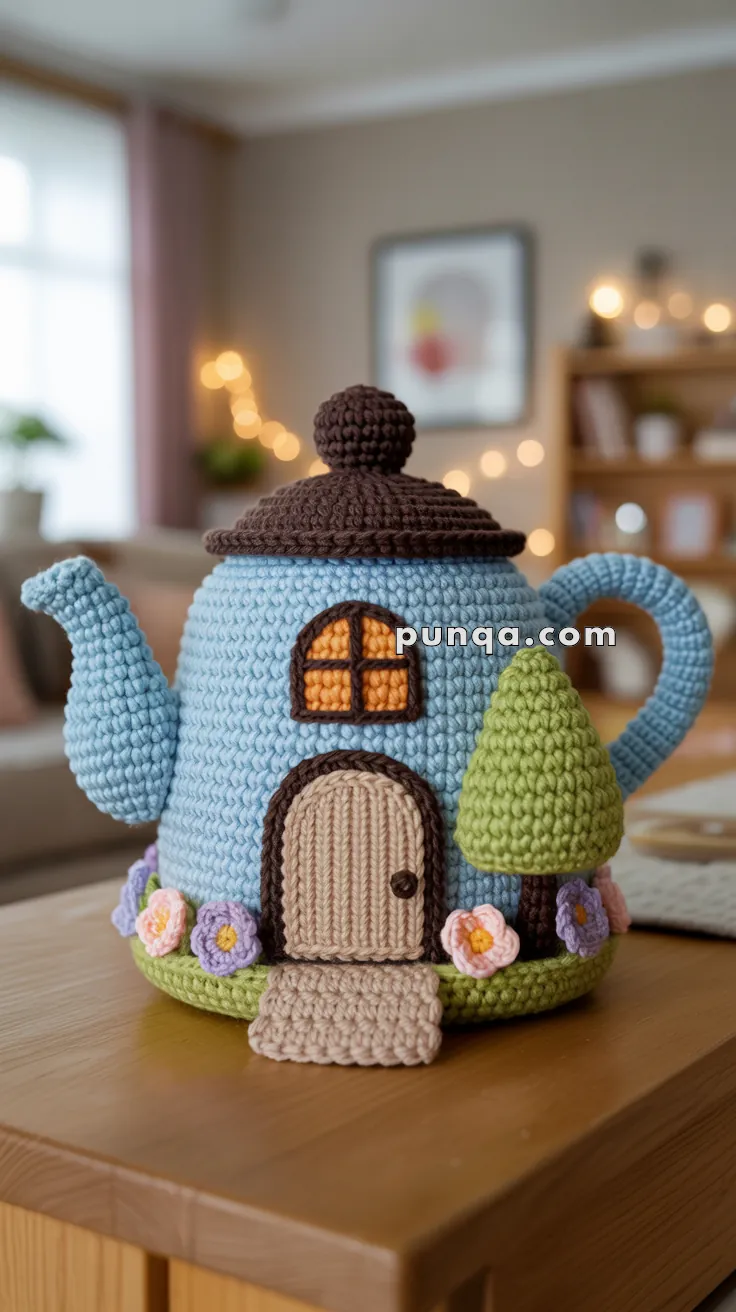
Pour yourself a cup of whimsy with the Amigurumi Teapot House—a fairy-tale inspired crochet project that’s steeped in charm! 🫖🏡 With its cozy curves, tiny windows, and storybook details, this delightful design transforms a humble teapot into a magical little home. Whether you imagine it nestled in a woodland village or perched on a shelf in your craft room, this project invites you to dream big in miniature stitches.
Perfect for customizing with pastel palettes, floral accents, or even a tiny garden path, the Teapot House is a joy to bring to life. Add embroidered vines, a chimney puff, or a friendly resident peeking out the door for extra enchantment. Whether you’re crafting a whimsical décor piece or building your own amigurumi neighborhood, this pattern is a sweet way to stir creativity—one loop at a time! 🧶✨

🫖 Crochet Teapot House Amigurumi Pattern
Transform your crochet into pure storybook charm with this Teapot House Amigurumi! With its cozy blue teapot body, dome lid, arched windows, flower garden, and little tree, it’s a whimsical cottage straight out of a fairytale.
✨ Skill Level
Intermediate – Requires knowledge of working in the round, shaping (increases/decreases), sewing multiple pieces together, simple embroidery, and light structural reinforcement.
⏳ Estimated Time to Complete
Approx. 12–14 hours depending on your speed.
🧶 Materials
- Blue yarn (teapot body, spout, handle)
- Brown yarn (lid, window frames, door frame, doorknob)
- Beige yarn (door, pathway)
- Green yarn (base, tree, leaves)
- Assorted colors (pink, purple, yellow, orange) for flowers & window light
- Crochet hook: 3.0 mm
- Yarn needle
- Scissors
- Stuffing (polyester fiberfill)
- Pipe cleaners or floral wire (optional, for handle & spout shaping)
- Stitch markers
Yarn Substitutions: Works well with cotton DK yarn for crisp stitches, acrylic worsted for a soft look, or velvet yarn for a plush fantasy-style house.
🪡 Abbreviations (US Terms)
MR = Magic Ring
ch = Chain
sc = Single Crochet
inc = Increase (2 sc in same st)
dec = Decrease (sc2tog)
sl st = Slip Stitch
st = Stitch
FLO = Front Loop Only
BLO = Back Loop Only
FO = Fasten Off
🧵 Pattern
🫖 Teapot Body (blue)
R1: MR 6 (6)
R2: inc ×6 (12)
R3: (sc, inc) ×6 (18)
R4: (2 sc, inc) ×6 (24)
R5: (3 sc, inc) ×6 (30)
R6: (4 sc, inc) ×6 (36)
R7: (5 sc, inc) ×6 (42)
R8: (6 sc, inc) ×6 (48)
R9–R20: sc around (48)
R21: (6 sc, dec) ×6 (42)
R22–R24: sc around (42)
R25: (5 sc, dec) ×6 (36)
R26–R27: sc around (36)
FO. Stuff firmly. Leave top open for lid.
✅ Correction: The taper (R21–R25) ensures the teapot narrows slightly toward the lid, as in the photo.
🟤 Lid (brown)
R1: MR 6 (6)
R2: inc ×6 (12)
R3: (sc, inc) ×6 (18)
R4: (2 sc, inc) ×6 (24)
R5: (3 sc, inc) ×6 (30)
R6: (4 sc, inc) ×6 (36)
R7: sc around (36)
R8: (4 sc, dec) ×6 (30)
R9: (3 sc, dec) ×6 (24)
R10: (2 sc, dec) ×6 (18)
FO.
Knob (brown):
R1: MR 6 (6)
R2: inc ×6 (12)
R3–R4: sc around (12)
R5: dec ×6 (6)
FO, stuff lightly, sew to lid.
☕ Spout (blue)
R1: MR 6 (6)
R2: (sc, inc) ×3 (9)
R3–R5: sc around (9)
R6: (2 sc, inc) ×3 (12)
R7–R10: sc around (12)
➡️ To create curve: On R11–R12, work only 8 sts, turn, sc back. Resume full round after. Repeat twice → spout bends naturally.
R13–R16: sc around (12)
FO. Stuff lightly. Insert pipe cleaner/wire if you want it to hold its curve permanently. Sew to side of body.
🌀 Handle (blue)
R1: MR 8 (8)
R2–R24: sc around (8) → ~14 cm tube
FO. Insert pipe cleaner/wire before attaching, bend into “C” shape, sew to opposite side of spout.
🚪 Door (beige + brown)
Base (beige):
Ch 9, sc across (8)
Rows 2–10: sc across (8)
Round top: Continue sc around edges, working inc at top corners, shaping into arch.
Texture: Work some rows in FLO sc to create vertical wood grain.
Frame (brown): Crochet sc border around door.
Doorknob: MR 4, FO, sew to side.
Pathway (tan):
Ch 8, sc rows until rectangle ~2 cm long. At bottom, add 1 inc at each edge to widen slightly. Use FLO sc to create plank texture. FO, sew under door.
🪟 Windows (orange + brown)
Glass (orange):
R1: MR 6 (6)
R2: inc ×6 (12)
R3: (sc, inc) ×6 (18)
FO. Flatten into half-circle (fold top edge down).
Frame (brown): Surface crochet around edge. Add vertical + horizontal cross bars to divide into 4 panes.
Make 2, sew to body.
🌳 Tree (green + brown)
Top (green, cone):
R1: MR 6 (6)
R2: sc around (6)
R3: (sc, inc) ×3 (9)
R4–R6: sc around (9)
R7: (2 sc, inc) ×3 (12)
R8–R10: sc around (12)
R11: (3 sc, inc) ×3 (15)
R12–R14: sc around (15)
FO, stuff.
Trunk (brown):
R1: MR 6 (6)
R2–R5: sc around (6)
FO, sew under cone top. Attach to base.
🌸 Flowers (multi-color)
Center (yellow): MR 5, sl st to join.
Petals (color): (ch 2, 2 dc, ch 2, sl st in next st) ×5.
FO. Make 6–8 in assorted colors, sew around base.
🍃 Base (green ground)
R1: MR 6 (6)
R2: inc ×6 (12)
R3: (sc, inc) ×6 (18)
R4: (2 sc, inc) ×6 (24)
R5: (3 sc, inc) ×6 (30)
R6: (4 sc, inc) ×6 (36)
R7: (5 sc, inc) ×6 (42)
FO. Attach under teapot body.
🧷 Assembly
- Attach teapot body to green base.
- Sew spout and handle opposite each other. Insert wire if needed for strength.
- Place lid with knob on top, secure.
- Sew door and pathway at front.
- Attach windows above door.
- Add tree on side.
- Decorate with flowers around base.
🎉 Finishing Tips
- Shaping: Insert pipe cleaners or floral wire inside spout and handle so they curve and stay in place.
- Stuffing: Stuff firmly to keep body round, but avoid overfilling so walls don’t bulge.
- Blocking: Steam block the door and pathway so they lay flat.
- Embroidery: Add extra lines on the door with brown yarn for a woodgrain effect.
- Detailing: Use a darker brown to outline the windows for extra definition.
✨ And there you have it – your very own Teapot House Amigurumi! With its curved spout, sturdy handle, flower garden, and cozy windows, it’s the perfect blend of whimsy and charm. Whether you display it on a shelf, gift it to a loved one, or use it as part of a fairy-tale play scene, this handmade project is sure to bring smiles.
🧵 Every stitch adds a little magic – so take your time, enjoy the process, and don’t forget to share your finished creations with friends and fellow makers.
💛 Happy crocheting, and may your teapot always stay warm and your imagination forever blooming! 🌸


