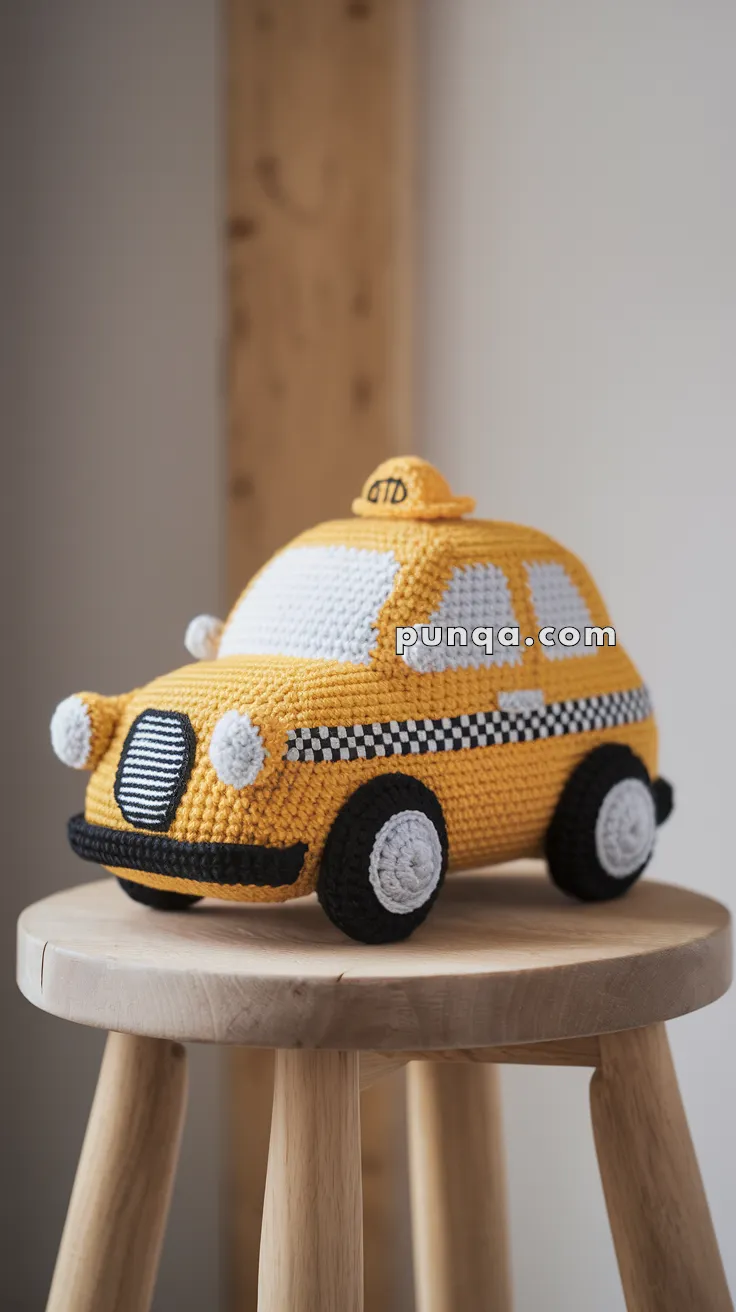
Bring the classic charm of a Taxi Cab to life with this Amigurumi Taxi Cab crochet pattern! 🚖✨ With its iconic yellow body, rooftop sign, and detailed wheels, this design captures the essence of a bustling city ride in yarn form. Whether you’re crafting for a transportation-themed décor piece, a heartfelt gift, or simply love vehicle-inspired amigurumi, this pattern is a fantastic addition to your collection.
Designed for crocheters who enjoy shaping intricate details, this pattern allows for customization in window designs, taxi markings, and even tiny accessories like embroidered headlights or a miniature city backdrop to enhance its personality. Choose classic yellow and black for an authentic look or experiment with vibrant hues for a creative twist! Whether displayed as part of an urban setup or gifted to a fellow crochet enthusiast, this amigurumi taxi cab is sure to impress.
Grab your hook, select your favorite yarn, and let’s bring this charming city cruiser to life—one stitch at a time! 🧶✨
🚕 Amigurumi Classic Taxi Crochet Pattern
Bring a little bit of city nostalgia into your craft room with this adorable crocheted taxi cab! Featuring smooth curves, oversized headlights, a checkered stripe, and a domed roof sign, this plush New-York-style cab is soft, sturdy, and irresistibly charming.
✨ Skill Level
Intermediate – Involves color changes, structured shaping, and surface embroidery details.
📏 Finished Size
Approx. 22 cm (8.5 in) long × 13 cm (5 in) tall when made with DK or light-worsted yarn and a 3 mm hook.
🧶 Materials
Yarn (DK / Light-Worsted Weight):
-
Yellow – Main body
-
White – Windows, headlights, hubcaps, checkered stripe
-
Black – Tires, bumpers, grille, stripe outline
-
Gray – Headlight borders and hubcap centers
Tools & Supplies:
-
3 mm crochet hook
-
Yarn needle
-
Stitch markers
-
Fiberfill stuffing
-
Optional: plastic canvas for base shaping
-
Black embroidery thread (for grille and roof text)
🧵 Abbreviations (US Terms)
MR – Magic Ring
sc – Single Crochet
inc – Increase (2 sc in same st)
dec – Decrease (sc 2 tog)
ch – Chain
sl st – Slip Stitch
FLO – Front Loop Only
BLO – Back Loop Only
FO – Fasten Off
🚗 Main Body (Yellow)
Work in joined rounds.
Base:
Ch 28
R1 – sc in 2nd ch from hook and next 25 ch, 3 sc in last ch; continue on opposite side and sc 25, inc in last (56)
R2 – (26 sc, inc ×2, 26 sc, inc ×2) (60)
R3–R15 – sc around (60)
Stuff lightly as you go.
This forms the long, rounded body rather than a sharp-edged rectangle.
🏙 Roof Section
R16 – (8 sc, dec, 40 sc, dec, 8 sc) (58)
R17 – sc around (58)
R18 – (8 sc, dec, 38 sc, dec, 8 sc) (56)
R19–R21 – sc around (56)
R22 – (7 sc, dec, 36 sc, dec, 7 sc) (52)
R23–R24 – sc around (52)
FO and close top flat.
🪟 Windows (White, Make 4)
Front & Back Windows:
Ch 11
Row 1 – sc 10
Rows 2–6 – ch 1, turn, sc 10
FO, leave tail.
Side Windows:
Ch 15
Row 1 – sc 14
Rows 2–6 – ch 1, turn, sc 14
FO, leave tail.
Sew front window angled slightly forward and rear window slanted back.
Attach side windows between them.
🔳 Checker Stripe
With black yarn, embroider a long line under the windows.
Using white, stitch alternating blocks (about 3 sts wide each) for the checkered pattern, stopping before the wheel arches.
🛞 Wheels (Make 4)
With gray (hubcap):
R1 – 6 sc in MR (6)
R2 – inc ×6 (12)
R3 – (1 sc, inc) ×6 (18)
Switch to black (tire):
R4 – sc around (18)
R5 – BLO sc around (18)
R6 – (2 sc, dec) ×4, sc 2 (14)
FO, stuff lightly, flatten slightly.
Sew two on each side beneath the checker line.
💡 Headlights (Make 2)
With white:
R1 – 6 sc in MR (6)
R2 – inc ×6 (12)
R3 – sc around (12)
Switch to gray, work 1 round FLO sc (12).
FO and stuff lightly.
Sew to front corners of the cab.
⚫ Bumpers (Front & Back)
With black:
Ch 22
Row 1 – sc 21
Rows 2–3 – ch 1, turn, sc 21
FO.
Sew one to the front bottom curve and one to the back.
🧱 Grille (Black & White)
With black:
Ch 10
Row 1 – sc 9
Rows 2–5 – ch 1, turn, sc 9
FO.
Embroider white horizontal lines evenly spaced to mimic the slatted grille.
Attach centrally between the headlights.
🪧 Roof Sign (“TAXI”)
With yellow:
R1 – 6 sc in MR (6)
R2 – (1 sc, inc) ×3 (9)
R3–R5 – sc around (9)
R6 – dec around to close slightly (6)
Stuff lightly and FO.
Sew on top of roof.
Use black thread to embroider “TAXI” or “NYC” neatly across the front.
🧩 Assembly Steps
-
Attach windows first, then checker stripe.
-
Sew on wheels and bumpers.
-
Add grille and headlights.
-
Mount the roof sign at center top.
-
Adjust stuffing to maintain a smooth, rounded hood and sloped rear.
Optional: Insert plastic canvas rectangles in the base for structure before closing.
✨ Finishing Touches
-
Add a thin black outline around windows for contrast.
-
Slightly press front and rear panels to flatten the silhouette.
-
Embroider a small license plate on the rear bumper if desired.
💬 Final Thoughts
Your Amigurumi Classic Taxi is ready to roll!
With its iconic bright-yellow body, checkered stripe, and cartoon-style lights, it’s a perfect piece for nurseries, city-themed décor, or playful photo props. Sturdy, soft, and endlessly cheerful — this little cab is always on call! 🚖✨