Add a graceful touch to your home with this Amigurumi Swan Tissue Box Cover crochet pattern! With its elegant neck curve, soft white feathers, and charming beak, this swan transforms an everyday tissue box into a whimsical piece of decor. Whether you’re sprucing up a bathroom, adding flair to a nursery, or gifting a handmade treasure to a fellow crochet lover, this project brings beauty and function together in the most delightful way. 🦢🧶✨
Designed for both charm and creativity, this pattern invites you to play with textured stitches, delicate shaping, and sweet extras like a tiny crown, floral accents, or even a blushing cheek. Customize your swan with pastel hues or classic white and gold for a regal look. Whether perched on a vanity or gliding across a shelf, this Swan Tissue Box Cover is a joyful and satisfying project—perfect for stitching up a little elegance, one tissue at a time! 💖🌸🧻
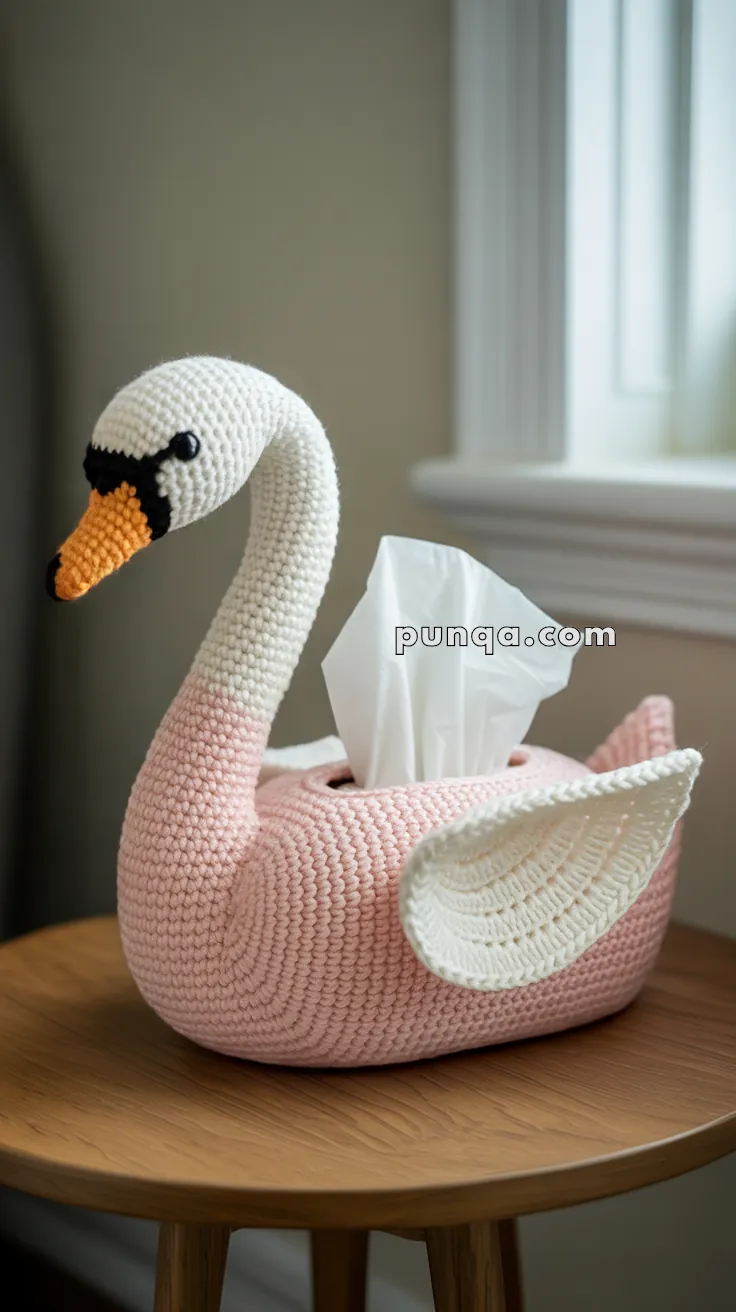
🦢 Crochet Swan Tissue Box Cover Pattern
Transform an ordinary tissue box into an elegant swan! This charming cover features a gracefully curved neck, dimensional wings, and a soft pink body that adds a touch of whimsy to any room. Perfect for nurseries, bedrooms, or as a thoughtful handmade gift.
✨ Skill Level
Intermediate – involves 3D shaping, sculptural elements, and assembly
📐 Finished Size
Fits a standard rectangular tissue box (approximately 9 × 5 × 4 inches / 23 × 13 × 10 cm)
🧶 Materials Needed
Yarn: Worsted weight (4) acrylic or cotton blend
- Soft Pink: 200g (approximately 400 yards)
- White: 150g (approximately 300 yards)
- Orange: 10g (approximately 20 yards)
- Black: 5g (approximately 10 yards)
Other Supplies:
- 4.0 mm (G) crochet hook
- Yarn needle for sewing
- Stitch markers
- Polyfill stuffing (approximately 100g)
- Optional: 18-gauge floral wire or pipe cleaner (12 inches for neck support)
- Optional: Thin cardboard for base reinforcement
- Scissors
📝 Abbreviations (US Terms)
- MR – Magic Ring
- ch – Chain
- sc – Single Crochet
- hdc – Half Double Crochet
- dc – Double Crochet
- inc – Increase (2 sc in same stitch)
- dec – Decrease (single crochet 2 together)
- sl st – Slip Stitch
- st(s) – Stitch(es)
- FO – Fasten Off
- BLO – Back Loop Only
- FLO – Front Loop Only
🌸 Swan Body Base
Using soft pink yarn
The base is worked in an oval shape to match the rectangular tissue box dimensions.
Foundation:
- Ch 26
Round 1: Starting in 2nd ch from hook: sc 24, 3 sc in last ch. Working on opposite side of foundation chain: sc 23, 2 sc in last st (52)
Round 2: inc, sc 23, inc x3, sc 23, inc x2 (58)
Round 3: sc, inc, sc 23, (sc, inc) x3, sc 23, (sc, inc) x2 (64)
Round 4: 2 sc, inc, sc 23, (2 sc, inc) x3, sc 23, (2 sc, inc) x2 (70)
Round 5: 3 sc, inc, sc 23, (3 sc, inc) x3, sc 23, (3 sc, inc) x2 (76)
Rounds 6-8: sc around (76)
Round 9: BLO sc around (76) (this creates a ridge for dimensional shaping)
Rounds 10-22: sc around (76)
Creating the tissue opening:
Round 23: sc 12, ch 20, skip 20 sts, sc 44 (76 sts total)
Round 24: sc 12, sc 20 in ch-space, sc 44 (76)
Rounds 25-28: sc around (76)
Round 29: (17 sc, dec) x4 (72)
Round 30: sc around (72)
FO and weave in ends.
Optional: Cut cardboard to fit inside base and insert for stability.
🦢 Swan Neck & Head
Using white yarn
The neck is worked as a tube with a tapered base that widens where it meets the body.
Head Section:
Round 1: MR, 6 sc (6)
Round 2: (sc, inc) x3 (9)
Round 3: (2 sc, inc) x3 (12)
Rounds 4-6: sc around (12)
Round 7: (2 sc, dec) x3 (9)
Stuff head firmly.
Neck Section:
Rounds 8-35: sc around (9) (28 rounds total for a longer, more graceful neck)
Stuff neck lightly as you go, leaving it flexible enough to curve.
Neck Base (where it connects to body):
Round 36: (sc, inc) x4, sc (13)
Round 37: (2 sc, inc) x4, sc (17)
Round 38: (3 sc, inc) x4, sc (21)
Round 39: (4 sc, inc) x4, sc (25)
Round 40: sc around (25)
FO, leaving a long tail for sewing.
Optional: Insert floral wire or pipe cleaner through neck before final stuffing to help it hold a curved shape.
🧡 Beak
Using orange yarn
Round 1: MR, 6 sc (6)
Round 2: (sc, inc) x3 (9)
Rounds 3-6: sc around (9)
Round 7: (sc, dec) x3 (6)
Round 8: dec x3 (3)
FO and close opening. Stuff lightly. Sew to front center of head, positioned horizontally with slight downward angle.
⚫ Eye Patches (Make 2)
Using black yarn
These create the distinctive curved marking around each eye.
Ch 9
Row 1: Starting in 2nd ch from hook, sc 8, turn (8)
Row 2: ch 1, skip 1 st, sc 6, turn (6)
Row 3: ch 1, skip 1 st, sc 4, turn (4)
Row 4: ch 1, skip 1 st, sc 2 (2)
FO, leaving long tail.
The shape will naturally curve into a teardrop/comma shape. Position on each side of head with the wider end toward the beak and curving up and back toward the crown. Sew in place.
👁️ Eyes (Make 2)
Using black yarn
MR, 8 sc, sl st to join
FO, leaving tail for sewing.
Sew eyes onto the white area of the head, positioned just above/in front of each black patch.
🪽 Dimensional Wings (Make 2)
Using white yarn
These wings are worked in joined rounds to create a 3D sculptural layered effect.
Base Layer:
Round 1: MR, 6 sc, sl st to join (6)
Round 2: ch 1, inc x6, sl st to join (12)
Round 3: ch 1, (sc, inc) x6, sl st to join (18)
Round 4: ch 1, (2 sc, inc) x6, sl st to join (24)
Round 5: ch 1, (3 sc, inc) x6, sl st to join (30)
Round 6: ch 1, (4 sc, inc) x6, sl st to join (36)
Rounds 7-10: ch 1, sc around, sl st to join (36)
Do not stuff yet. Continue to feathered edge.
Feathered Outer Edge:
Round 11: Working in FLO: ch 3, dc 2 in same st, ch 3, sl st in same st (petal made), sl st in next st – repeat around
FO and weave in ends.
Shaping the Wing:
Lightly stuff the wing, focusing on the center to create a puffy, dimensional dome. The outer edge should ruffle outward naturally from the feathered edging.
Creating the layered wing detail visible in photo:
Using white yarn and working on the back loops left from Round 11:
Join yarn in any BLO from Round 11.
Inner Feather Layer: ch 2, hdc in same st, ch 2, sl st in same st, sl st in next st – repeat around
FO.
This creates the multi-layered, textured wing appearance.
🎀 Assembly Instructions
Step 1: Prepare the neck
If using wire support, insert it now. Curve the neck into an elegant S-shape, with the head angled slightly forward and down.
Step 2: Attach neck to body
Position the neck base on one narrow end of the body. The wider base (25 sts) should sit flush against the body with the tissue opening at the opposite end. Sew securely all around using the long tail, ensuring it’s stable.
Step 3: Attach beak
Sew the orange beak horizontally to the front of the head, centered and angled slightly downward, positioned at the front tip of the head.
Step 4: Position eye patches and eyes
Sew the curved black patches on each side of the head. The wider part should be near the beak, curving up and back like a comma or teardrop shape. This creates the swan’s distinctive facial marking with black near the beak and eyes. Attach the black eyes just above and in front of each patch, on the white area of the head.
Step 5: Attach wings
Position wings symmetrically on each side of the body. The wings should be placed about 1-2 rounds down from where the neck meets the body.
The center (magic ring starting point) of each wing should be sewn directly to the side of the body. The dimensional stuffed shape will naturally make the wings curve outward and upward, creating realistic wing volume. The feathered edges should face outward.
Orient wings so they angle slightly back and up, mimicking how a swan holds its wings when resting.
Step 6: Final touches
Insert tissue box from the bottom. Adjust wing positions if needed to ensure they’re symmetrical. Shape the neck into your desired graceful curve, bending gently if wire was inserted.
💡 Customization Ideas
🌟 Color Variations:
- Classic all-white swan with white body
- Grey body for a cygnet (baby swan)
- Add metallic gold yarn for a regal touch
- Cream/ivory for vintage look
✨ Embellishments:
- Tiny crown crocheted or purchased
- Satin ribbon bow around neck
- Small pearl beads scattered on wings
- Gold safety eyes instead of black
🎨 Seasonal Versions:
- Winter: Add white “snow” texture along wings
- Spring: Add small crocheted flowers to body
- Nursery: Keep soft pastels as shown
- Elegant: Use all white with silver accents
📸 Display Suggestions
This elegant swan looks beautiful:
- On nursery changing tables
- Bedroom nightstands
- Coffee tables in living rooms
- Bathroom countertops
- Guest room dressers
- As a baby shower centerpiece
- On office desks for a whimsical touch
🧼 Care Instructions
- Spot clean with damp cloth
- Hand wash in cool water if needed
- Lay flat to dry
- Reshape while damp if necessary
- Remove tissue box before washing
- Fluff wings gently after washing
⏱️ Estimated Time
Approximately 10-14 hours depending on experience level
💭 Tips for Success
- Neck shaping: The wire insert is highly recommended for maintaining the elegant curve
- Wing attachment: Sew through multiple points on each wing for security
- Stuffing: Don’t overstuff the neck or it won’t curve gracefully
- Tissue opening: Test fit your tissue box and adjust the opening size in Round 23 if needed
- Blocking: Lightly steam or wet block the wings for crisp feather definition
This graceful swan brings elegance and charm to any space while keeping tissues beautifully accessible. The combination of soft colors and dimensional details creates a piece that’s both functional and decorative. Happy crocheting! 🦢✨
Your Swan pattern is beautiful. I can’t wait to try it. Thank you for sharing it freely.