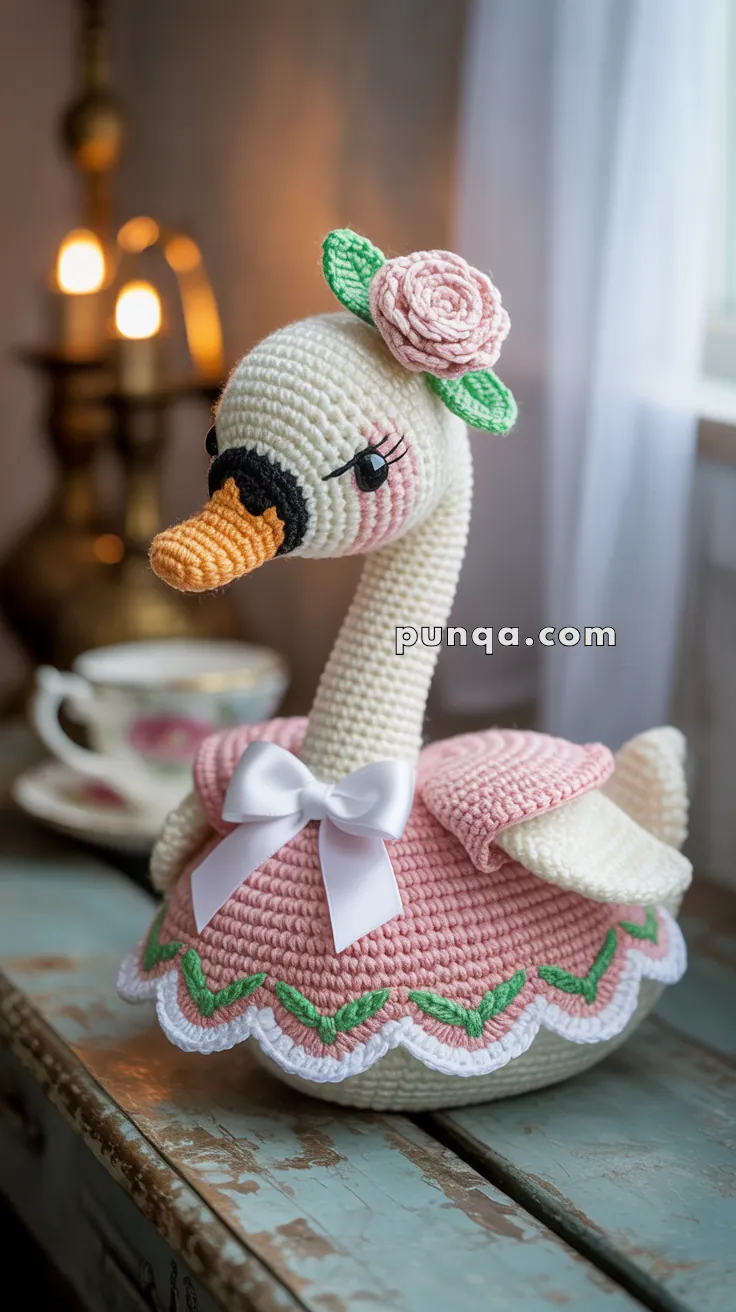
Grace takes center stage with this elegant Amigurumi Swan Lady crochet pattern! With her poised neck, delicate wings, and flowing feathered gown, she’s the perfect blend of beauty and whimsy. Whether you’re crafting a fairytale-inspired figure, a ballet-themed keepsake, or simply love bringing graceful characters to life in yarn, this swan lady is ready to glide into your handmade collection with charm and sophistication. 🧶🦢✨
Designed for softness and flair, this pattern invites you to explore sculpted shaping, gentle textures, and delightful extras like a tiara, pearl necklace, or even a tiny bouquet. Customize her look with pastel tones or go bold with shimmering yarns for a regal twist. Whether perched on a shelf, nestled in a gift basket, or starring in a handmade swan lake scene, this Swan Lady Amigurumi is a joyful and satisfying project—perfect for stitching up a little handmade elegance, one loop at a time! 💖🌸🩰
🦢 Amigurumi Swan Lady Crochet Pattern
Add an elegant and whimsical touch to your handmade collection with this graceful Amigurumi Swan Lady! Dressed in a delicate pastel pink dress with leafy trims, adorned with a white satin bow, and crowned with a crocheted rose and leaves, this charming swan is perfect as a nursery decor piece, a photo prop, or a heartfelt handmade gift. This pattern includes complete instructions for the swan, her outfit, sleeves, floral headpiece, and assembly tips for a beautiful finish.
✨ Skill Level
Intermediate to Advanced – Requires shaping, color changes, embroidery, and precise assembly
📏 Finished Size
Approximately 28 cm (11 inches) tall using recommended materials
🧵 Materials Needed
Yarn (DK/Light Worsted Weight)
- White: 80g (body, head, neck, wings)
- Coral/Peach: 15g (beak)
- Black: 10g (eye patch, beak tip)
- Baby Pink/Dusty Rose: 60g (dress, blush)
- Sage/Mint Green: 15g (leaves, embroidery)
- Light Pink/Rose: 10g (flower)
Other Supplies
- Hook: 2.5mm (C)
- Safety eyes: 8mm black (2)
- Fiberfill stuffing
- Tapestry needle
- Embroidery needle
- White satin ribbon: 40cm × 1.5cm wide
- Stitch markers
- Floral wire (optional, for neck support)
- Pins (for assembly)
- Scissors
🔤 Abbreviations (US Terms)
- MR = Magic Ring
- ch = chain
- sc = single crochet
- hdc = half double crochet
- dc = double crochet
- inc = increase (2 sc in same st)
- dec = decrease (sc2tog)
- sl st = slip stitch
- BLO = back loop only
- FLO = front loop only
- FO = fasten off
🪡 PATTERN INSTRUCTIONS
💭 HEAD (White)
Round 1: MR, 6 sc (6)
Round 2: inc × 6 (12)
Round 3: (sc, inc) × 6 (18)
Round 4: (2 sc, inc) × 6 (24)
Round 5: (3 sc, inc) × 6 (30)
Round 6: (4 sc, inc) × 6 (36)
Rounds 7–13: sc around (36)
Round 14: (4 sc, dec) × 6 (30)
Round 15: sc around (30)
Round 16: (3 sc, dec) × 6 (24)
Round 17: sc around (24)
👉 Insert safety eyes between rounds 10–11, approximately 8 stitches apart. We’ll cover them with the eye patch later.
Round 18: (2 sc, dec) × 6 (18)
👉 Stuff head firmly
FO, leave long tail for sewing
👁️ EYE PATCH (Black)
This creates the distinctive teardrop-shaped eye area on each side.
Make 2 patches:
Round 1: MR, 6 sc (6)
Round 2: inc × 6 (12)
Round 3: (sc, inc) × 6 (18)
Round 4: (2 sc, inc) × 6 (24)
Rounds 5–7: sc around (24)
Round 8: (2 sc, dec) × 6 (18)
Round 9: sc around (18)
FO, leave long tail
Placement:
- Position each patch so it covers one safety eye
- The patch should be positioned slightly to the side of the head (not front-facing)
- Bottom of patch should be near the beak attachment point
- Sew securely around all edges
Eyelashes:
Using black yarn, embroider 2–3 straight lines extending from the top edge of each eye patch:
- Each lash is 4–5 stitches long
- Angle them slightly upward and outward
- Keep them simple and delicate, not overly dramatic
💕 BLUSH (Pink)
Using baby pink yarn and tapestry needle:
- Create soft circular blush marks on each side of head
- Position below and slightly behind the eye patch
- Use satin stitch or duplicate stitch to fill a small circular area (about 6–8 stitches diameter)
- Keep color soft and subtle
🦆 BEAK (Coral/Peach)
Round 1: MR, 6 sc (6)
Round 2: (sc, inc) × 3 (9)
Round 3: sc around (9)
Round 4: (2 sc, inc) × 3 (12)
Rounds 5–6: sc around (12)
Round 7: (3 sc, inc) × 3 (15)
Rounds 8–10: sc around (15)
Round 11: (3 sc, dec) × 3 (12)
Round 12: sc around (12)
👉 Switch to black yarn
Round 13: (2 sc, dec) × 3 (9)
Round 14: (sc, dec) × 3 (6)
FO, stuff lightly
Attachment:
- Position beak at front center of head
- Bottom edge should align with bottom edge of eye patches
- Angle slightly downward
- Sew securely all around base
🦢 NECK (White)
The neck is worked continuing from the head or as a separate piece.
Round 1: MR, 6 sc (6)
Round 2: inc × 6 (12)
Round 3: (sc, inc) × 6 (18)
Rounds 4–50: sc around (18)
👉 These 47 rounds create the elegant long neck
Shaping the Curve:
Option 1 – Wire Support (Recommended):
- Cut floral wire to 20cm length
- Wrap wire with white yarn
- Insert wire into neck before attaching to body
- Bend into graceful S-curve
Option 2 – Stuffing Technique:
- Stuff bottom third firmly
- Stuff middle third medium-firm
- Stuff top third lightly
- As you stuff, gradually bend neck into S-curve
- Hold shape for a few minutes to set
FO, leave long tail for attaching to body
🎀 BODY (White)
Round 1: MR, 6 sc (6)
Round 2: inc × 6 (12)
Round 3: (sc, inc) × 6 (18)
Round 4: (2 sc, inc) × 6 (24)
Round 5: (3 sc, inc) × 6 (30)
Round 6: (4 sc, inc) × 6 (36)
Round 7: (5 sc, inc) × 6 (42)
Round 8: (6 sc, inc) × 6 (48)
Round 9: (7 sc, inc) × 6 (54)
Rounds 10–26: sc around (54)
Round 27: (7 sc, dec) × 6 (48)
Round 28: (6 sc, dec) × 6 (42)
Round 29: (5 sc, dec) × 6 (36)
👉 Stuff body firmly
Round 30: (4 sc, dec) × 6 (30)
Round 31: (3 sc, dec) × 6 (24)
Round 32: (2 sc, dec) × 6 (18)
Round 33: (sc, dec) × 6 (12)
FO, close opening, weave in end
Adding Pink Blush to Body:
Using baby pink yarn, create a soft blush area on the upper chest where neck will attach:
- Embroider a subtle circular or heart-shaped area
- This mimics the natural coloring of a swan’s body
- Keep it very soft and blended
🪶 WINGS (White – Make 2)
Round 1: MR, 6 sc (6)
Round 2: (sc, inc) × 3 (9)
Round 3: (2 sc, inc) × 3 (12)
Round 4: (3 sc, inc) × 3 (15)
Round 5: (4 sc, inc) × 3 (18)
Round 6: (5 sc, inc) × 3 (21)
Now work in rows for wing shape:
Row 7: ch 1, turn, sc 21 across (21)
Row 8: ch 1, turn, sc 21 across (21)
Row 9: ch 1, turn, dec, sc 17, dec (19)
Row 10: ch 1, turn, sc 19 across (19)
Row 11: ch 1, turn, dec, sc 15, dec (17)
Row 12: ch 1, turn, sc 17 across (17)
Row 13: ch 1, turn, dec, sc 13, dec (15)
Row 14: ch 1, turn, dec, sc 11, dec (13)
FO, leave long tail
Wing Shaping:
- Fold wing slightly to create dimensional curve
- Pinch the narrow end to create a pointed tip
- Don’t stuff wings
Attachment:
- Position wings on lower sides of body (around rounds 18–22 of body)
- Angle wings slightly upward and outward
- They should sit behind/under where the dress sleeves will be
- Sew securely with long tail
👗 DRESS
The dress is constructed from top down to create the fitted bodice.
BODICE (Baby Pink)
Round 1: ch 36, join with sl st to form ring, being careful not to twist (36)
Round 2: sc around (36)
Round 3: sc around (36)
Round 4: (5 sc, inc) × 6 (42)
Round 5: sc around (42)
Round 6: (6 sc, inc) × 6 (48)
Round 7: sc around (48)
SKIRT (Baby Pink continues)
Round 8: (7 sc, inc) × 6 (54)
Round 9: sc around (54)
Round 10: (8 sc, inc) × 6 (60)
Round 11: sc around (60)
Round 12: (9 sc, inc) × 6 (66)
Rounds 13–18: sc around (66)
Round 19: (10 sc, inc) × 6 (72)
Rounds 20–22: sc around (72)
👉 Do not fasten off – continue to scalloped border
🌸 SCALLOPED HEM WITH LEAF EMBROIDERY
Inner Scallop Edge (Pink)
Round 23: (sc, skip 1 st, 4 dc in next st, skip 1 st) repeat around, sl st to join
👉 Switch to white yarn
Outer Scallop Layer (White)
Round 24: (sc between pink scallops, skip 1 st, 5 dc in next st, skip 1 st) repeat around, sl st to join
FO, weave in ends
Green Leaf Embroidery:
Using sage green yarn and tapestry needle, embroider leaf/vine details between each white scallop:
Method 1 – Chain Stitch Vines:
- Bring needle up at center point between two white scallops
- Create small chain stitch vine curving downward (3–4 chain stitches)
- Add 2–3 small leaf stitches on each side using lazy daisy stitch
Method 2 – Surface Crochet Leaves:
- Insert hook from back to front between scallops
- Pull up loop of green yarn
- Insert hook 2 stitches over, pull through, yo, pull through both loops
- Repeat to create vine effect
- Add small picot loops (ch 3, sl st in base) for leaf shapes
Repeat embroidery between every white scallop around entire hem.
👚 SLEEVES (Baby Pink – Make 2)
Find the armhole openings on each side of bodice (rounds 2–7).
Round 1: Attach pink yarn to armhole, ch 1, work 18 sc evenly around armhole, sl st to join (18)
Round 2: inc in every 3rd st around (24)
Round 3: sc around (24)
Round 4: sc around (24)
Round 5: (2 sc, dec) × 6 (18)
👉 Switch to white yarn
Round 6: (sc, skip 1 st, 4 dc in next st, skip 1 st) repeat around to create scalloped edge matching hem
FO, weave in ends
🌹 HEADPIECE FLOWER (Light Pink/Rose)
This creates a full, dimensional rose.
Round 1: MR, 6 sc (6)
Round 2: inc × 6 (12)
Round 3: sc around (12)
Round 4: (sc, inc) × 6 (18)
Round 5: sc around (18)
FO, leaving long tail
Row 1 of Petals: ch 40
Starting in 2nd ch from hook: (sc, hdc, 3 dc, hdc, sc) in same ch, sl st in next ch repeat across
FO, leaving long tail
Assembly:
- Take the small circle (rounds 1-5) as your base
- Starting at center, coil the petal strip around the base
- As you coil, gradually loosen to create outer petals
- Sew through all layers at bottom to secure
- Arrange petals to create full, layered look
- Final rose should be approximately 4.5–5cm diameter
🍃 HEADPIECE LEAVES (Sage Green – Make 3)
Ch 9
Starting in 2nd ch from hook:
sc, hdc, dc, tr, dc, hdc, sc
Ch 1, rotate to work along opposite side of foundation:
sc, hdc, dc, tr, dc, hdc, sc
sl st to first sc
FO, leave long tail
Shaping:
- Pinch center of leaf to create crease
- Lightly steam to set shape
🎀 WHITE SATIN BOW
Cut white satin ribbon to desired length (30–40cm recommended):
- Create classic bow with two loops
- Secure center with needle and thread
- Trim ends at an angle
- Set aside for final assembly
🧵 ASSEMBLY
Step 1: Attach Neck to Body
- Position neck at center top of body
- Ensure pink blush area is at front
- Sew securely all the way around using mattress stitch
- Reinforce connection with several passes
Step 2: Attach Head to Neck
- Align head so beak faces forward
- Sew securely using mattress stitch
- Reinforce connection
Step 3: Position Wings
- Wings should be visible below sleeves when dress is on
- Angle upward and slightly back for elegant pose
Step 4: Dress the Swan
- Slide dress onto body from bottom
- Adjust bodice to sit properly at chest level
- Ensure wings peek out from under sleeves
- Arrange scalloped hem evenly
Step 5: Attach Bow
- Position bow at center front of bodice, just below neck
- Sew securely through ribbon and dress
- Arrange loops and tails attractively
Step 6: Create Headpiece
- Arrange 3 leaves in fan shape
- Position rose at center, slightly overlapping leaves
- Sew all pieces together at base
- Attach to top/side of head at a slight angle
- Ensure it sits securely and elegantly
✨ FINISHING TOUCHES
Final Adjustments:
- Check neck curve: Adjust S-shape if needed
- Fluff rose petals: Arrange for dimensional look
- Smooth dress: Ensure no twisting or bunching
- Symmetry check: Verify wings, eyes, and blush are even
- Secure all pieces: Double-check all attachments
Optional Enhancements:
- Add tiny pearl beads to dress bodice
- Light blush on wing tips
- Subtle highlight on beak with lighter coral
- Clear nail polish on ribbon ends to prevent fraying
💕 Your Elegant Swan Lady is Complete!
Display her proudly on a shelf, gift her to someone special, or add her to your amigurumi collection. With her graceful curved neck, romantic pink dress with embroidered details, and delicate rose crown, she embodies elegance and charm. Every stitch carries beauty and grace – just like a true swan! 🦢✨
📐 Approximate Measurements
- Total height: 28cm (11 inches)
- Head diameter: 6cm
- Neck length: 12–13cm
- Body height: 10cm
- Body width: 9cm
- Wing length: 6cm
- Dress length: 8cm
- Rose diameter: 4.5–5cm
🎨 Color Variation Ideas
Classic White Swan: All-white dress with silver ribbon
Lavender Dreams: Purple dress with cream flowers
Mint Elegance: Mint green dress with white/pink details
Vintage Rose: Dusty rose dress with cream lace-look hem
Adapt the pattern to match your style or nursery decor!


Spiegazione ottima la inizio subito. Sono una signora di 81 anni la mia passione é l’uncinetto grazie di tutto 🤗di cuore ❤️
HERMOSA EXPLICACION.GRACIAS POR COMPARTIR!!!!!!