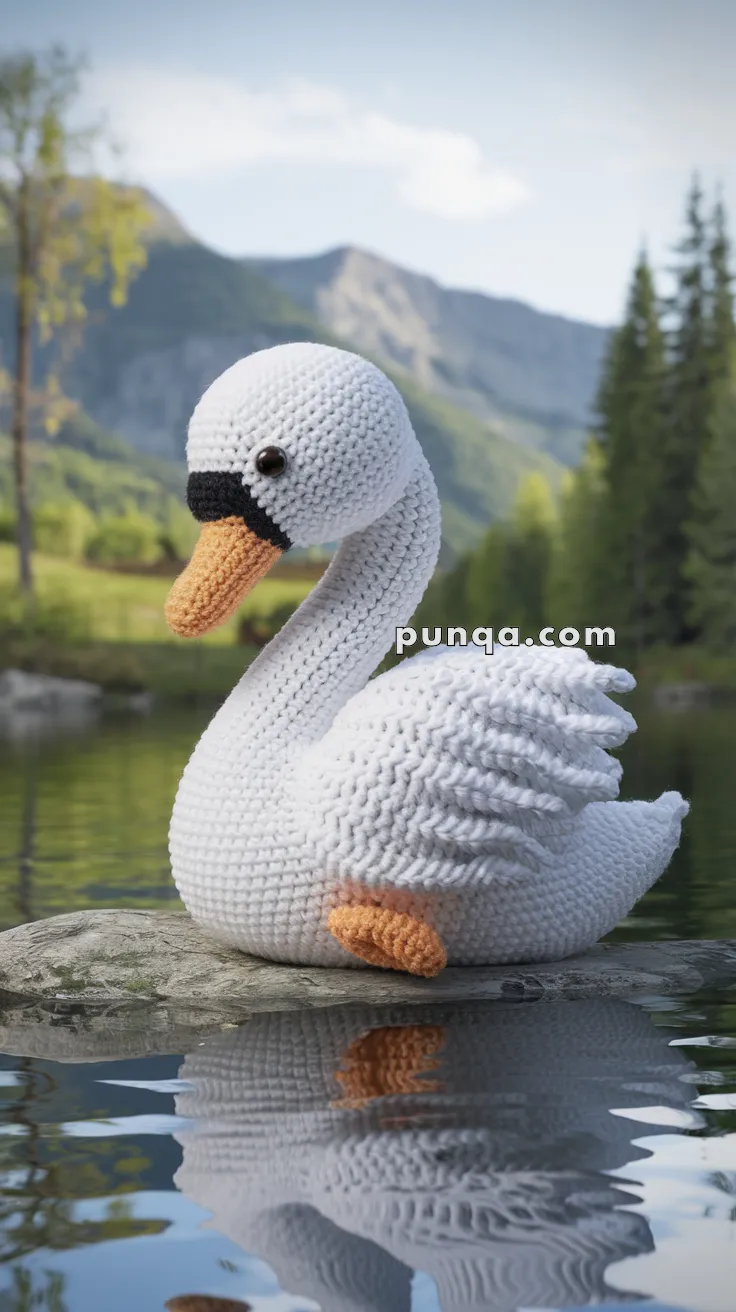
Bring elegance and charm to your crochet collection with the Amigurumi Swan, a project that’s as graceful as it is delightful! 🦢🧶 With its long neck, soft rounded body, and gentle proportions, this swan captures the beauty of the real bird in a cozy, handmade form. Its serene design makes it a perfect piece to display, gift, or add to your amigurumi menagerie.
Whether perched on a shelf, used as a whimsical décor accent, or given as a heartfelt handmade present, this swan radiates peace and sophistication. Fun to stitch and rewarding to showcase, the Amigurumi Swan is a joyful way to crochet elegance, creativity, and a sprinkle of handmade magic—one loop at a time! ✨🌿🧵
🦢 Amigurumi Swan Crochet Pattern
Bring elegance and calm to your crochet collection with this beautifully detailed amigurumi swan. Featuring a long curved neck, graceful layered wings, and a gentle color palette, this handmade design perfectly mirrors the beauty of the swan in nature. Ideal for home décor, nursery displays, or thoughtful handmade gifts.
✨ Skill Level
Intermediate
This pattern includes:
-
Continuous shaping for realistic anatomy
-
Separate sculpted neck and head
-
Layered wings with structured feather shaping
-
Multi-color beak with defined facial mask
-
Balanced construction for stable sitting posture
📏 Finished Size
Height: 20–23 cm (8–9 inches)
Body length: 18–21 cm (7–8.25 inches)
Using DK cotton yarn and a 3.0 mm hook.
🧶 Yarn Requirements
DK cotton yarn recommended for clean stitch definition and firm structure.
White yarn (body, neck, head, wings, tail): 85 g (255 m)
Orange yarn (beak and feet): 10 g (30 m)
Black yarn (facial mask detail): 3 g (9 m)
Additional supplies:
-
8 mm safety eyes
-
Polyester fiberfill stuffing
-
Crochet hook 3.0 mm
-
Yarn needle
-
Stitch marker
Optional:
-
Thin wire (for adjustable neck curve)
🧵 Abbreviations (US Terms)
MR – magic ring
sc – single crochet
inc – increase
dec – invisible decrease
sl st – slip stitch
ch – chain
FO – fasten off
🕊️ Body (Rounded Sitting Shape)
With white yarn:
Round 1: MR, 6 sc (6)
Round 2: inc x6 (12)
Round 3: (1 sc, inc) x6 (18)
Round 4: (2 sc, inc) x6 (24)
Round 5: (3 sc, inc) x6 (30)
Round 6: (4 sc, inc) x6 (36)
Round 7: (5 sc, inc) x6 (42)
Round 8: (6 sc, inc) x6 (48)
Rounds 9–18: sc around (48)
Round 19: (6 sc, dec) x6 (42)
Round 20: (5 sc, dec) x6 (36)
Round 21: (4 sc, dec) x6 (30)
Begin stuffing firmly. Shape into wide oval.
Round 22: (3 sc, dec) x6 (24)
Round 23: (2 sc, dec) x6 (18)
Stuff firmly, ensuring flat bottom.
Round 24: (1 sc, dec) x6 (12)
FO and close.
Shape body so chest is slightly fuller and rear gently rounded upward.
🪶 Tail
With white yarn:
Round 1: MR, 6 sc
Round 2: (1 sc, inc) x3 (9)
Round 3: sc around (9)
Round 4: (2 sc, inc) x3 (12)
FO.
Flatten lightly and sew to upper rear of body, angled slightly upward.
🦢 Neck
With white yarn:
Round 1: MR, 6 sc (6)
Round 2: (1 sc, inc) x3 (9)
Rounds 3–26: sc around (9)
Stuff lightly but evenly.
FO leaving long tail.
Do not close opening.
🕊️ Head
With white yarn:
Round 1: MR, 6 sc (6)
Round 2: inc x6 (12)
Round 3: (1 sc, inc) x6 (18)
Round 4: (2 sc, inc) x6 (24)
Round 5: (3 sc, inc) x6 (30)
Rounds 6–10: sc around (30)
Insert safety eyes between rounds 7–8 with 7 stitches between.
Round 11: (3 sc, dec) x6 (24)
Round 12: (2 sc, dec) x6 (18)
Stuff firmly.
Round 13: (1 sc, dec) x6 (12)
Round 14: dec x6 (6)
FO and close.
Sew head securely to neck.
🧡 Beak
Start with orange yarn:
Round 1: MR, 4 sc (4)
Round 2: inc x4 (8)
Round 3: sc around (8)
Round 4: sc around (8)
Switch to black yarn:
Round 5: sc around (8)
Round 6: dec x4 (4)
Stuff lightly.
FO leaving tail.
Sew to head, angled slightly downward.
🖤 Facial Mask Detail
Using black yarn:
Embroider a horizontal band across base of beak extending slightly toward each eye.
This creates the smooth facial mask transition.
🪽 Wings (Make 2 – Folded Style)
With white yarn:
Round 1: MR, 6 sc
Round 2: inc x6 (12)
Round 3: (1 sc, inc) x6 (18)
Round 4: (2 sc, inc) x6 (24)
Rounds 5–7: sc around (24)
Flatten piece.
Now shape feather layers:
Row 1: ch 1, sc across
Row 2: ch 2, hdc across
Row 3: ch 3, dc across
Row 4: sl st across
FO leaving long tail.
Lightly curve outer edge.
🦶 Feet (Make 2)
With orange yarn:
Round 1: MR, 6 sc
Round 2: (1 sc, inc) x3 (9)
Round 3: sc around (9)
FO leaving tail.
Flatten slightly.
🧵 Assembly
Sew neck to front-top of body, slightly forward of center.
Shape neck into gentle forward curve.
Attach wings to sides of body. Position them slightly angled upward and toward the tail.
Attach tail to upper rear of body.
Sew feet underneath rear body so they remain partially hidden.
Adjust stuffing and shaping for stable sitting posture.
✨ Final Shaping and Finishing
Gently shape:
-
Neck into smooth natural curve
-
Wings into soft folded resting position
-
Body into stable oval sitting form
-
Tail slightly upward
-
Feet tucked beneath body
Ensure symmetry and smooth contours.
🌟 Finished Swan
This elegant sitting swan amigurumi features balanced proportions, gentle curves, and realistic structure. Its serene resting pose and clean shaping create a timeless crochet sculpture that brings calm beauty to any display, nursery, or handmade collection.