Celebrate freedom and creativity with this Amigurumi Statue of Liberty crochet pattern! Whether you’re crafting for patriotic decor, history lovers, or simply enjoy making iconic figures, this free pattern lets you stitch up a charming Lady Liberty full of personality. With her flowing robe, delicate crown, and signature torch held high, this crochet creation captures the essence of one of the world’s most recognizable symbols. Perfect for gifting, displaying as a tribute to American heritage, or simply celebrating the joy of crochet, this amigurumi Statue of Liberty is a unique and meaningful project—one stitch at a time! 🗽✨
Designed for customization, this pattern allows you to experiment with different shades of green, embroidered details, or even tiny accessories like a miniature book or golden flame for extra charm. Craft a classic version with soft neutral tones, create a vibrant design for a playful aesthetic, or even stitch up multiple statues for a themed display! Whether gifted to a fellow crochet enthusiast, displayed as a cherished keepsake, or made simply for the joy of crafting, this Amigurumi Statue of Liberty is a thoughtful and inspiring project—perfect for bringing artistry and history to every stitch! 🧶💙
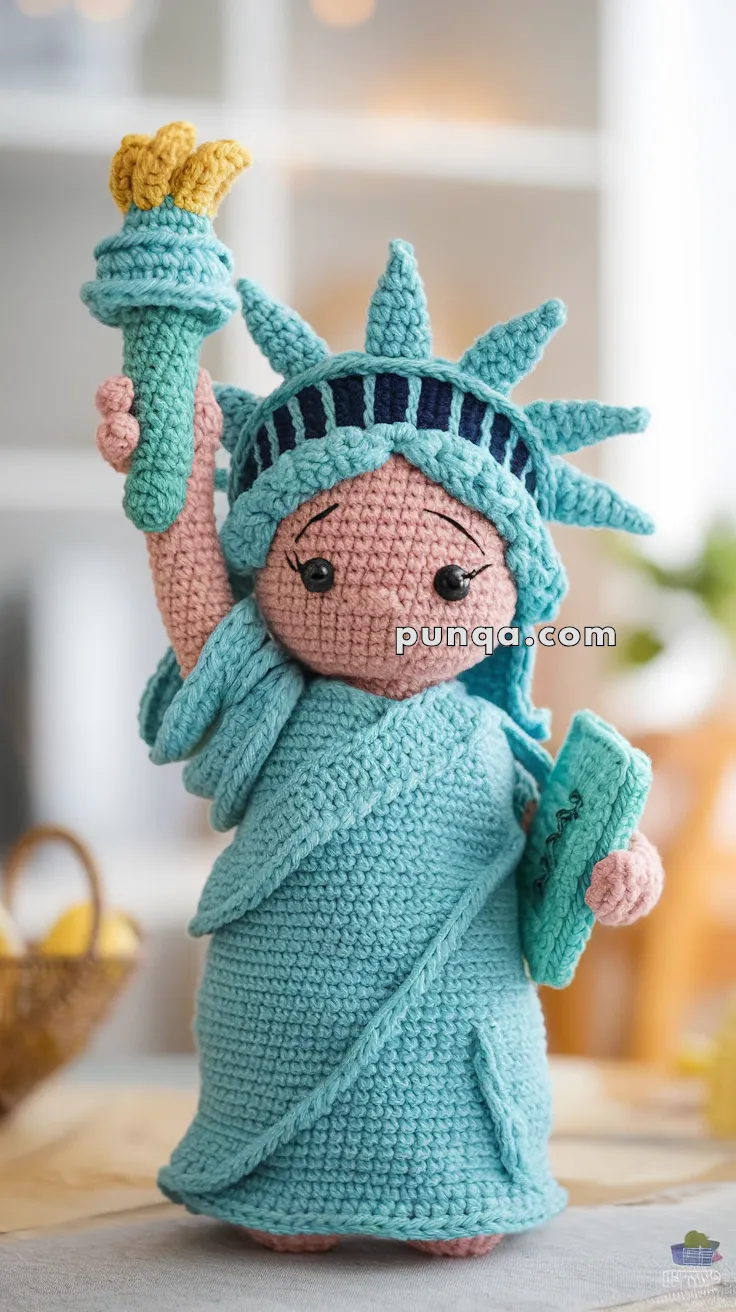
🗽 Amigurumi Statue of Liberty Crochet Pattern
Bring history and handmade charm together with this adorable Statue of Liberty doll! Standing proudly with her crown, torch, and tablet, she makes the perfect patriotic decoration or gift. This project features detailed robe folds, a textured torch, and expressive features, offering a fun challenge for intermediate crocheters.
✨ Skill Level
Intermediate – Includes shaping, color changes, accessory construction, and simple embroidery.
📏 Finished Size
Approximately 10 inches (25 cm) tall using DK or worsted weight yarn with a 2.5–3.5 mm hook.
🧶 Materials
-
Yarn (DK or Worsted weight):
-
Light Teal – robe, crown, torch handle, tablet
-
Skin tone – head, hands, feet
-
Navy – crown accents
-
Yellow – torch flame
-
-
Hook: 2.5–3.5 mm
-
6 mm safety eyes
-
Fiberfill stuffing
-
Tapestry needle
-
Stitch marker
-
Black or brown embroidery thread (for brows and lashes)
-
Green embroidery thread (for tablet detail)
🧵 Abbreviations (US Terms)
-
MR = Magic Ring
-
sc = single crochet
-
inc = increase (2 sc in same st)
-
dec = decrease (sc2tog)
-
ch = chain
-
sl st = slip stitch
-
BLO = back loop only
-
FO = fasten off
👣 Feet (Make 2 – Skin Tone)
-
MR, 6 sc (6)
-
inc x6 (12)
-
(1 sc, inc) x6 (18)
4–5. sc around (18)
FO first foot. Do not FO second foot—continue to body.
🧍 Body (Teal)
-
Join feet with 3 ch between. (42)
2–7. sc around (42) -
(5 sc, dec) x6 (36)
9–11. sc around (36) -
(4 sc, dec) x6 (30)
13–14. sc around (30) -
(3 sc, dec) x6 (24)
Neck shaping: -
(2 sc, dec) x6 (18) → gives a narrower neck. Stuff body.
😊 Head (Skin Tone)
-
inc x6 (12)
-
(1 sc, inc) x6 (18)
-
(2 sc, inc) x6 (24)
-
(3 sc, inc) x6 (30)
-
(4 sc, inc) x6 (36)
6–11. sc around (36)
Insert safety eyes between Rounds 7–8, 6 sts apart.
Embroider brows and lashes. -
(4 sc, dec) x6 (30)
-
(3 sc, dec) x6 (24)
Stuff head firmly. -
(2 sc, dec) x6 (18)
-
(1 sc, dec) x6 (12)
-
dec x6 (6), FO and close.
✋ Arms With Fingers (Make 2 – Skin Tone → Teal Sleeves)
-
MR, 6 sc (6)
-
inc x6 (12)
-
sc in next 4 sts (finger base)
Fingers:
-
Finger 1: sc 3, work 2 rounds, FO.
-
Finger 2: join to next 3 sts, sc 3, work 2 rounds, FO.
-
Finger 3: sc 3, work 2 rounds, FO.
-
Thumb: join yarn on side, sc 3, 1 round, FO.
Switch to teal for sleeve:
4. sc evenly around wrist (≈9 sc)
5–12. sc around
Flatten and FO with long tail for sewing. Stuff lightly.
👗 Robe (Teal)
-
Ch 26, turn.
-
Rows 1–20: sc across, ch 1, turn (25).
-
FO and sew around torso like a wrap.
-
For texture: work some rows in BLO to create folds.
-
Add an extra strip diagonally across the chest and secure in place.
👑 Crown (Teal + Navy)
Base Band (Teal):
-
Ch 40, join into ring.
2–3. sc around (40). FO.
Spikes (Make 7 – Teal):
-
Ch 5, work sc, hdc, dc, tr up chain. FO.
-
Sew spikes evenly spaced around band.
Navy Accents:
Use surface stitch or embroidery to make vertical lines on the band.
Optional Hair Cap:
-
MR, inc to 24 sts, 2–3 rounds sc.
-
Sew under crown to mimic teal folds under the helmet.
🔥 Torch
Handle (Teal):
-
MR, 6 sc (6)
-
inc x6 (12)
3–5. sc around (12) -
FLO: (sc, hdc) around → creates rim
-
(1 sc, dec) x4 (8), FO. Stuff lightly.
Flame (Yellow):
-
MR, 5 sc (5)
-
inc x5 (10)
3–4. sc around (10)
FO and sew to top of torch.
Attach torch to open hand with fingers curved around it.
📖 Tablet (Teal)
-
Ch 10, sc across
2–6. sc rows (10)
FO and embroider “JULY IV MDCCLXXVI” or simple lines.
Place in left hand and sew fingers around it.
✂️ Finishing Touches
-
Add optional pink blush under eyes.
-
Fold robe strips and tack them for draped effect.
-
Curve torch arm upward before sewing.
-
Insert a pipe cleaner in torch arm if you want extra stiffness.
💡 Bonus Ideas
-
Use sparkly teal yarn for a metallic crown effect.
-
Crochet a mini American flag for her to hold alongside the tablet.
-
Make a tiny version as a keychain using fingering yarn.
🎉 Final Notes
Your Statue of Liberty doll is complete! With her flowing robe, iconic crown, torch, and tablet, she’s ready to stand tall as a handmade tribute to freedom. This project makes a unique gift, a cultural keepsake, or a fun decorative piece for holidays and celebrations.
🗽✨ Handmade freedom has never looked so cute!