Oh, the delightful world of amigurumi! 🌟 There’s just something utterly charming about these little crocheted creatures. When I first stumbled upon the idea of making a Sonic the Hedgehog amigurumi, I was instantly hooked! Who wouldn’t want a pocket-sized version of everyone’s favorite speedy blue hedgehog? The process of creating your own Sonic amigurumi pattern is like embarking on a creative adventure. It’s a blend of imagination and skill, where you get to transform a simple ball of yarn into a beloved character that brings joy to those around you. Whether you’re a crochet newbie or a seasoned pro, crafting Sonic is a fun and rewarding journey.
Starting the process is as exciting as it is fulfilling. First, I gather all my materials: vibrant blue yarn for Sonic’s iconic look, some white and red for his shoes, and a bit of black for his eyes and nose. The choice of yarn is crucial because it determines the softness and appearance of the final creation. Then, I dive into the pattern, usually beginning with Sonic’s head. As I crochet each piece, a sense of anticipation builds. Slowly but surely, his spiky hair and cheeky grin start to take shape. 🧶 Stitch by stitch, Sonic comes alive in my hands! It’s an incredible feeling to see the character emerge from the yarn, and it’s even more delightful to know that this handmade creation will bring a smile to anyone who sees it.
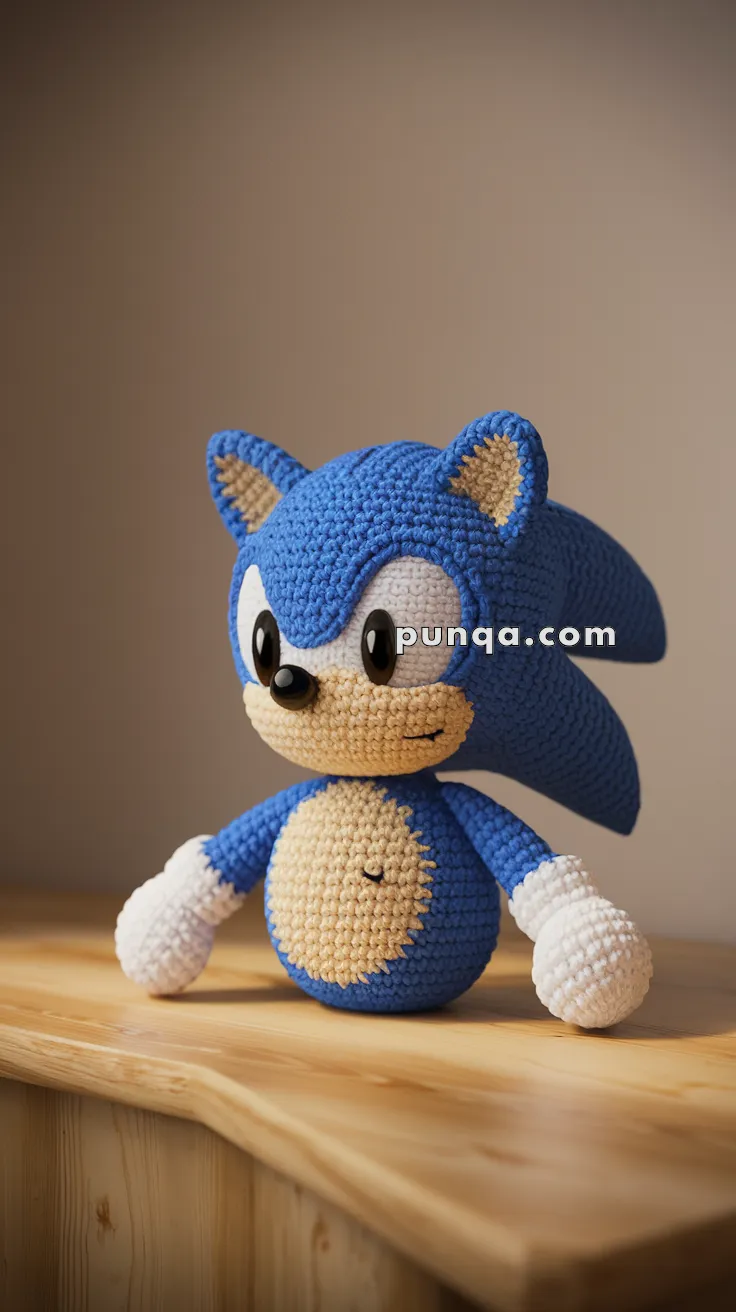
🌀 Blue Hedgehog Amigurumi Crochet Pattern
Meet this adorable blue hedgehog plush with a big personality and even bigger charm. Featuring expressive oval eyes, a soft rounded muzzle, tall head shape, simple spherical body, and the iconic layered side quills, this lovable character makes a perfect handmade companion or display plush. The friendly proportions and bold blue color bring a cheerful touch to any craft collection.
✨ Skill Level
Intermediate – includes shaping, separate face pieces, and sculpted quills.
📏 Finished Size
Approximately 22–25 cm (9–10 inches) tall when made with DK or worsted yarn and a 2.5–3.5 mm hook.
🧶 Materials
Yarn (DK or light worsted):
• Blue – head, body, arms, outer ears, quills
• Tan/Beige – muzzle, belly patch, inner ears
• White – eye patches, gloves
• Black – nose, mouth embroidery (if desired)
Tools:
• 2.5–3.5 mm crochet hook
• 16–20 mm oval safety eyes (black)
• Fiberfill stuffing
• Tapestry needle
• Stitch marker
• Scissors
🧵 Abbreviations (US Terms)
MR – Magic Ring
sc – Single crochet
inc – Increase (2 sc in one st)
dec – Decrease
sl st – Slip stitch
FO – Fasten off
🔵 HEAD (Tall Oval Shape)
Yarn: Blue
Work in continuous rounds.
Round 1: MR, 6 sc
Round 2: inc × 6 → 12
Round 3: (1 sc, inc) × 6 → 18
Round 4: (2 sc, inc) × 6 → 24
Round 5: (3 sc, inc) × 6 → 30
Round 6: (4 sc, inc) × 6 → 36
Round 7: (5 sc, inc) × 6 → 42
Rounds 8–18: sc around (42)
Round 19: (5 sc, dec) × 6 → 36
Round 20: (4 sc, dec) × 6 → 30
Round 21: (3 sc, dec) × 6 → 24
Round 22: (2 sc, dec) × 6 → 18
Stuff firmly to create a taller-than-wide oval.
FO, leave tail for sewing.
🤍 EYE PATCHES (Make 2)
Yarn: White
Each patch is a small oval that sits directly under each eye.
Round 1: MR, 6 sc
Round 2: (1 sc, inc) × 3 → 9
Round 3: sc around (9)
Flatten slightly into a small oval.
Attach one under each eye, leaving a narrow gap between them.
👁 SAFETY EYES
Insert large black oval eyes centered above each eye patch.
Tilt them slightly for expression.
🤎 MUZZLE (Wide Oval, Tan)
Round 1: MR, 6 sc
Round 2: inc × 6 → 12
Round 3: (1 sc, inc) × 6 → 18
Round 4: (2 sc, inc) × 6 → 24
Round 5: sc around (24)
Flatten gently into a wide oval.
Stitch centered under the eyes, slightly overlapping the bottom of the eye patches.
Nose
Use a small round black safety nose (or embroider a round black nose).
Mouth
Embroider a tiny curved smile on one side.
🔺 EARS (Blue Outer + Tan Inner)
Inner Ear (Make 2, Tan)
Ch 4
Row 1: sc 3
Row 2: dec, sc
Row 3: sc only
FO, leave tail.
Outer Ear (Make 2, Blue)
Ch 4
Row 1: sc 3
Row 2: inc, sc, inc → 5
Row 3: sc across (5)
Place tan inner ears on blue outer ears and sew together.
Attach ears to the back-top sides of the head at a slight outward angle.
🔵 BODY (Short Sphere)
Yarn: Blue
Round 1: MR, 6 sc
Round 2: inc × 6 → 12
Round 3: (1 sc, inc) × 6 → 18
Round 4: (2 sc, inc) × 6 → 24
Round 5: (3 sc, inc) × 6 → 30
Rounds 6–10: sc around (30)
Round 11: (3 sc, dec) × 6 → 24
Round 12: (2 sc, dec) × 6 → 18
Round 13: sc around (18)
Stuff firmly but keep the bottom slightly flattened for sitting stability.
FO.
🤎 BELLY PATCH (Tall Oval, Tan)
Round 1: MR, 6 sc
Round 2: inc × 6 → 12
Round 3: (1 sc, inc) × 6 → 18
Round 4: (2 sc, inc) × 6 → 24
Round 5: (3 sc, inc) × 6 → 30
Flatten into a tall oval (stretch vertically when sewing).
Attach centered onto the body.
🌀 BACK QUILLS (Make 3, Flat Triangles)
Each quill is a flat tapered wedge, not stuffed.
Quill 1 (Center Back – Largest)
Ch 18
Row 1: sc 17
Row 2: dec, sc 13, dec → 15
Row 3: sc across
Row 4: dec, sc 11, dec → 13
Row 5: sc across
Row 6: dec, sc 9, dec → 11
Continue decreasing every other row until 5 sts remain.
FO.
Quills 2 & 3 (Side Quills – Slightly Smaller)
Ch 16
Repeat shaping as above until 5 sts remain.
Sew the largest quill down the center back of the head.
Attach the two smaller quills symmetrically on each side, angled backward.
🔵 ARMS (Short)
Upper Arm (Blue)
Round 1: MR, 6 sc
Rounds 2–5: sc around (6)
Switch to white.
Gloves (White)
Round 6: (1 sc, inc) × 3 → 9
Rounds 7–10: sc around (9)
Round 11: (1 sc, dec) × 3 → 6
Stuff lightly.
FO and close.
Attach arms low on the body sides.
🧷 ASSEMBLY
-
Position eye patches and insert eyes.
-
Stitch muzzle to face; attach nose and mouth.
-
Add ears to upper sides of the head.
-
Sew head onto body.
-
Attach belly patch.
-
Sew quills to the back in a smooth layered arc.
-
Add arms.
Adjust shaping with a bit of gentle steam if desired.
🌟 Finished Result
Your charming little blue hedgehog plush is complete!
With its expressive face, soft rounded shape, and adorable stylized quills, it’s a delightful addition to any handmade collection. If you’d like matching friends or accessories, I’d be happy to create more patterns!