Let the holiday cheer begin with this delightful Amigurumi Snowman Trio Ornaments crochet pattern! These frosty friends come in a charming set of three, each with their own personality—think cozy scarves, tiny hats, and carrot noses that bring a smile to any winter scene. Whether you’re decorating your tree, crafting heartfelt gifts, or simply adding a sprinkle of seasonal magic to your home, this snowman trio is ready to warm hearts (even in the coldest weather). ☃️🧶🎄
Designed for festive fun and quick stitching, this pattern invites you to play with color, texture, and adorable extras like buttons, mittens, or even a tiny broom. Customize each snowman with your favorite holiday hues or mix and match accessories for a playful twist. Whether hanging from branches, tucked into stockings, or starring in a handmade winter wonderland, these Snowman Trio Ornaments are a joyful and satisfying project—perfect for stitching up a little handmade merriment, one loop at a time! 💖✨⛄
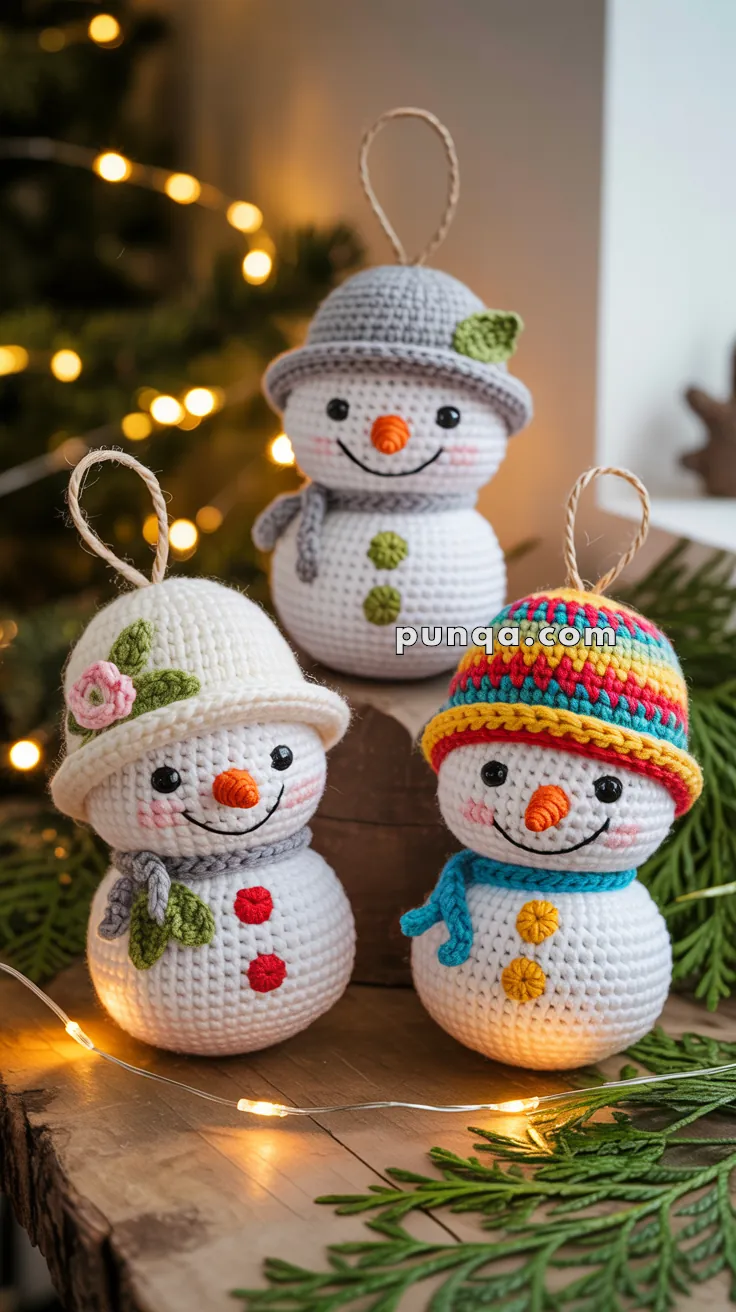
☃️ Amigurumi Snowman Trio Ornaments Crochet Pattern
Add handmade charm to your holiday decor with these adorable snowman ornaments! Each snowman features a unique hat style, delicate scarf, carrot nose, and cheerful buttons. Perfect for your Christmas tree or as heartfelt gifts!
✨ Skill Level
Beginner to Intermediate – involves basic amigurumi shaping, color changes, and simple embroidery.
📏 Finished Size
Approximately 4.5 to 5 inches tall (excluding hanging loop)
🧶 Materials
Yarn
Sport or DK weight cotton yarn (50g = approx. 130-140 yards)
For all three snowmen you’ll need:
- White: 100g (main color for bodies and heads)
- Orange: 5g (noses)
- Black: 5g (eyes and smiles)
- Pink: 5g (cheeks)
For Individual Snowmen:
Snowman #1 (Left – Cream Bucket Hat with Pink Flower):
- Cream/Ivory: 20g (hat)
- Gray: 10g (scarf)
- Pink: 5g (flower)
- Yellow: 3g (flower center)
- Green: 5g (leaves)
- Red: 5g (buttons – 2 buttons)
- Green: 5g (button – 1 button)
Snowman #2 (Center – Gray Ribbed Beanie):
- Gray: 30g (hat and scarf)
- Green: 5g (hat accent and buttons – 3 buttons)
Snowman #3 (Right – Rainbow Striped Beanie):
- Red: 5g (hat)
- Orange: 5g (hat)
- Yellow: 15g (hat and buttons – 3 buttons)
- Green: 5g (hat)
- Turquoise/Blue: 15g (hat and scarf)
- Purple: 5g (hat)
- Turquoise/Teal: 10g (scarf)
Other Supplies
- Crochet hook: 2.5 mm
- Polyester stuffing
- Yarn needle
- Stitch marker
- 6mm black safety eyes (6 total) OR black yarn for embroidered eyes
- Natural twine or cream yarn for hanging loops
- Pink blush or crayon for cheeks (optional)
🌀 Abbreviations (US Terms)
- MR: Magic Ring
- sc: single crochet
- hdc: half double crochet
- dc: double crochet
- inc: increase (2 sc in one stitch)
- dec: decrease (sc 2 together)
- sl st: slip stitch
- ch: chain
- BLO: back loops only
- FLO: front loops only
- st(s): stitch(es)
🧵 Base Pattern (Same for All Three Snowmen)
🔹 Head (White Yarn)
R1: MR, 6 sc in ring (6)
R2: inc x6 (12)
R3: (sc, inc) x6 (18)
R4: (2 sc, inc) x6 (24)
R5: (3 sc, inc) x6 (30)
R6-12: sc in each st (30) — 7 rounds
R13: (3 sc, dec) x6 (24)
R14: (2 sc, dec) x6 (18)
👁️ Insert safety eyes between rounds 9-10, approximately 6-7 stitches apart
R15: (sc, dec) x6 (12)
Stuff head very firmly, shaping into a smooth, round ball
R16: dec x6 (6)
Fasten off, leaving a 12-inch tail. Weave through remaining 6 sts and pull tight to close. Do not cut tail – use it to sew head to body later.
🔸 Body (White Yarn)
R1: MR, 6 sc (6)
R2: inc x6 (12)
R3: (sc, inc) x6 (18)
R4: (2 sc, inc) x6 (24)
R5: (3 sc, inc) x6 (30)
R6: (4 sc, inc) x6 (36)
R7-11: sc around (36) — 5 rounds
R12: (4 sc, dec) x6 (30)
R13: (3 sc, dec) x6 (24)
R14: (2 sc, dec) x6 (18)
Stuff very firmly, continuing to add stuffing as you close. Shape into a round ball slightly larger than head
R15: (sc, dec) x6 (12)
Add final bits of stuffing
R16: dec x6 (6)
Fasten off, leaving a long tail. Weave through remaining stitches and pull tight to close.
Position head onto body, tilting slightly forward (not centered directly on top). Sew all the way around the joining seam using whip stitch for security.
🧡 Carrot Nose (Orange Yarn)
R1: MR, 4 sc (4)
R2: (sc, inc) x2 (6)
R3-4: sc around (6) — 2 rounds
Fasten off, leaving a 6-inch tail for sewing. Stuff very lightly with a tiny pinch of stuffing.
Sew nose to center of face between eyes, slightly below eye level. Use the tail to weave through the base of the nose and through the head fabric multiple times to secure it firmly.
🎨 Face Details
Eyes:
- Use 6mm black safety eyes inserted between rounds 9-10, 6-7 stitches apart
- OR embroider with black yarn: make small circles using satin stitch (wrap yarn 4-5 times in the same spot)
Smile:
Using black yarn and backstitch:
- Start approximately 2 stitches to the left of center, below the nose
- Create a gentle curved smile approximately 5-6 stitches wide
- Each stitch should be about 1-2 rows below the nose
Cheeks:
Using pink yarn and satin stitch:
- Embroider small circles (about 3-4 wraps) on each side of the face
- Position them slightly below and to the outside of the eyes
- OR apply pink blush/crayon and blend gently with fingertip
👒 Snowman #1: Cream Bucket Hat with Pink Flower
Hat (Cream/Ivory Yarn)
R1: MR, 6 sc (6)
R2: inc x6 (12)
R3: (sc, inc) x6 (18)
R4: (2 sc, inc) x6 (24)
R5-6: sc in each st (24) — 2 rounds
R7: BLO: sc in each st (24) This creates the crown/brim division
R8: Working in both loops: (3 sc, inc) x6 (30)
R9: sc in each st (30)
R10: (4 sc, inc) x6 (36)
Fasten off, leaving a 6-inch tail. Weave in end.
The BLO round creates a natural fold line separating the fitted crown from the wide brim. Gently shape the brim to flare outward.
🌸 Pink Flower Decoration
Flower (Pink Yarn):
R1: MR, ch 1
Make 5 petals: (sc, ch 3, dc, ch 3, sc) all in ring, sl st into ring — repeat 4 more times for 5 petals total
Sl st to join, fasten off, leaving tail for sewing.
Center (Yellow Yarn):
With yellow yarn, embroider a small French knot in the center of the flower OR crochet:
MR, 4 sc, sl st to join. Fasten off and sew to center of pink flower.
🍃 Small Leaves (Green Yarn) – Make 2
Ch 5
Working back along the chain: sl st in 2nd ch from hook, sc in next ch, hdc in next ch, sc in last ch, sl st back into base of chain.
Fasten off, leaving a 4-inch tail for sewing.
Assembly:
Position flower on the left or right side of hat (your choice). Sew flower securely to hat. Arrange the 2 leaves on either side of or beneath the flower. Sew in place.
🧣 Scarf (Gray Yarn)
Ch 4
Row 1: sc in 2nd ch from hook, sc across (3 sc)
Rows 2-26: ch 1, turn, sc across (3 sc) — approximately 26 rows or 6-7 inches long
Fasten off, leaving a 4-inch tail. Weave in ends.
Wrap scarf around snowman’s neck where head meets body. Tie in a simple single knot to one side. Trim ends if needed. Tack down with a stitch or two if desired.
🔘 Buttons – Make 3
Make 2 Red buttons:
With red yarn: MR, 6 sc, sl st to join. Fasten off, leaving a 6-inch tail for sewing.
Make 1 Green button:
With green yarn: MR, 6 sc, sl st to join. Fasten off, leaving a 6-inch tail for sewing.
Sew buttons vertically down center of body:
- Top button: Red (just below scarf)
- Middle button: Green (center of body)
- Bottom button: Red (lower body)
Space evenly, approximately 4-5 rounds apart.
🪢 Hanging Loop
Cut 8-10 inches of natural twine or cream yarn. Fold in half to create a loop. Using needle, thread both ends through the top center of the hat from inside to outside. Knot the ends together on the outside. Trim excess.
🎩 Snowman #2: Gray Ribbed Beanie
Hat (Gray Yarn) – Worked in Rows to Create Ribbing
Ch 26
Row 1: sc in 2nd ch from hook, sc across (25 sc)
Rows 2-18: ch 1, turn, working in BLO only: sc across (25 sc) — creates vertical ribbing texture when turned sideways
Fasten off, leaving an 18-inch tail for seaming.
Assembly:
- Fold the rectangle so the first row meets the last row (short ends together)
- Using the long tail and whip stitch, seam the short ends together to form a tube
- Turn the tube right-side out so the ribbing texture runs vertically (up and down)
- Thread your needle with the yarn tail through one open circular edge
- Pull tightly to cinch the top of the hat closed
- Knot securely and weave in the end inside the hat
- The other open edge is the bottom brim – leave it open to fit on head
🍀 Small Green Accent
Option 1 – Crocheted Circle:
With green yarn: MR, 6 sc, sl st to join. Fasten off, leaving a 4-inch tail.
Sew to side of hat near the brim.
Option 2 – Mini Pompom (shown in photo):
- Wrap green yarn around 2 fingers 20-25 times
- Slide loops off fingers
- Tie tightly in the center with a separate piece of yarn
- Cut all the loops
- Trim into a small round ball shape
- Sew to side of hat using the center tie
🧣 Scarf (Gray Yarn)
Ch 4
Row 1: sc in 2nd ch from hook, sc across (3 sc)
Rows 2-24: ch 1, turn, sc across (3 sc) — approximately 24 rows or 6 inches long
Fasten off, leaving a 4-inch tail. Weave in ends.
Wrap scarf around neck in a cross-over style: one end crosses over the other in front. Tack in place with a few small stitches to secure.
🔘 Buttons (Green Yarn) – Make 3
With green yarn: MR, 6 sc, sl st to join. Fasten off, leaving a 6-inch tail for sewing.
Repeat to make 3 total green buttons.
Sew buttons vertically down center of body:
- Top button (just below scarf)
- Middle button (center of body)
- Bottom button (lower body)
Space evenly, approximately 4-5 rounds apart.
🪢 Hanging Loop
Cut 8-10 inches of natural twine or cream yarn. Fold in half to create a loop. Using needle, thread both ends through the top center of the hat from inside to outside. Knot the ends together on the outside. Trim excess.
🌈 Snowman #3: Rainbow Striped Beanie with Yellow Band
Hat – Horizontal Rainbow Stripes
Work in continuous rounds. Change colors frequently to create thin rainbow stripes. Carry yarn up the inside if desired, or cut and rejoin.
R1: With red yarn, MR, 6 sc (6)
R2: Still red, inc x6 (12)
R3: Change to orange, (sc, inc) x6 (18)
R4: Change to yellow, (2 sc, inc) x6 (24)
R5: Change to green, (3 sc, inc) x6 (30)
R6: Change to turquoise/blue, sc in each st (30)
R7: Change to purple or darker blue, sc in each st (30)
R8: Change to yellow yarn, sc in each st (30)
R9: Still yellow, sc in each st (30) — this creates the wide yellow band visible in photo
R10: BLO: still in yellow, sc in each st (30) Creates the brim fold line
Fasten off, leaving a 4-inch tail. Weave in all color-change ends neatly inside the hat.
The BLO round creates a natural fold at the bottom brim.
🧣 Scarf (Turquoise/Teal Yarn)
Ch 4
Row 1: sc in 2nd ch from hook, sc across (3 sc)
Rows 2-28: ch 1, turn, sc across (3 sc) — approximately 28 rows or 7-8 inches long
Fasten off, leaving a 4-inch tail. Weave in ends.
Wrap scarf around neck and tie in a loose simple knot. Position knot to the front or side. Allow both ends to hang naturally.
🔘 Buttons (Yellow Yarn) – Make 3
With yellow yarn: MR, 6 sc, sl st to join. Fasten off, leaving a 6-inch tail for sewing.
Repeat to make 3 total yellow buttons.
Sew buttons vertically down center of body:
- Top button (just below scarf)
- Middle button (center of body)
- Bottom button (lower body)
Space evenly, approximately 4-5 rounds apart.
🪢 Hanging Loop
Cut 8-10 inches of natural twine or cream yarn. Fold in half to create a loop. Using needle, thread both ends through the top center of the hat from inside to outside. Knot the ends together on the outside. Trim excess.
🎁 Assembly Order & Tips
Order of Assembly:
- Crochet head – stuff firmly
- Crochet body – stuff firmly
- Attach head to body – sew securely all around
- Add face details – eyes, nose, smile, cheeks
- Crochet and attach hat – position at slight angle if desired
- Add hanging loop to hat
- Crochet scarf – wrap and tie around neck
- Make buttons – sew down center of body
- Add decorative elements – flowers, leaves, pompoms
Important Tips:
Tension:
Work with tight, consistent tension throughout. The stitches should be close together with no gaps showing stuffing through.
Stuffing:
- Stuff VERY firmly – the snowmen should feel solid, not squishy
- Add stuffing gradually as you decrease
- Shape into round balls, not ovals
- Body should be slightly larger/fuller than head
Head Positioning:
Position head tilted slightly forward on the body (not centered directly on top). This creates the classic snowman silhouette and ensures stability.
Sewing Heads:
Use whip stitch all the way around the joining seam between head and body. Go around 2-3 times for extra security.
Face Embroidery:
Complete all face embroidery BEFORE attaching the hat. This gives you better access and visibility.
Hat Fit:
Hats should sit snugly on the head. If too loose, add a few tack stitches around the inside brim to secure hat to head.
Scarf Width:
Keep scarves thin (only 3 sc wide) for the delicate, dainty look shown in the photo.
Blocking Hats:
Lightly steam block hats to help them hold their shape and sit properly. Hold a steamer or iron (on steam setting) 2-3 inches away from the hat – don’t touch the iron directly to the yarn.
Button Placement:
Use pins to position buttons before sewing to ensure even spacing. Sew through the button and into the body multiple times for security.
💡 Customization Ideas
✨ Use different color combinations for each snowman
✨ Add tiny fringe to scarf ends by pulling out individual yarn strands
✨ Create mini mittens or earmuffs as additional accessories
✨ Embroider small snowflakes on hats using white yarn
✨ Add small jingle bells to hanging loops for sound
✨ Make matching family sets with different sizes (adjust starting rounds)
✨ Personalize with embroidered names on scarves or hats
✨ Add small twigs for arms (insert into sides of body)
✨ Create a scarf with contrasting color stripes
✨ Make different facial expressions for personality
🎄 Display Suggestions
🎄 Hang on Christmas tree branches
🎁 String together as a festive garland across a mantel
📦 Attach to wrapped gift packages as gift toppers
🌿 Display on a winter wreath
🕯️ Arrange on a mantelpiece with pine branches and candles
💝 Give as handmade ornaments to loved ones
📅 Create an advent calendar with 24 mini snowmen
🪟 Hang in windows for passersby to enjoy
🎀 Tie onto wine bottles as hostess gifts
🌟 Use as place card holders for holiday dinner
🔧 Troubleshooting
Hat won’t stay on head?
Sew a few small tack stitches around the inner brim to attach it to the head permanently.
Snowman leans or tips over when standing?
Make sure body is stuffed MORE firmly than head, with slightly more weight at the bottom. The body should be very solid.
Stitches look uneven or loose?
Maintain consistent tension throughout. Consider going down to a 2.0mm hook for tighter stitches if needed.
Face details hard to see?
Use embroidery floss or double your yarn for more prominent features. Make eyes slightly larger.
Stuffing shows through stitches?
You’re working too loosely. Use a smaller hook and/or tighter tension. Pull each stitch snug.
Body and head aren’t round?
Shape as you stuff. Pinch and mold the pieces into ball shapes. Add more stuffing to any flat areas.
Scarf won’t stay in place?
Use a few small invisible stitches to tack the scarf to the neck area so it doesn’t shift.
Nose looks droopy?
Stuff it more firmly and sew it very securely to the face using multiple passes through the base of the nose.
Hat brim won’t fold correctly?
The BLO round creates a natural fold. Gently press the fold with your fingers or lightly steam to set it.
Colors of rainbow hat look muddled?
Use high-contrast colors and change colors every 1-2 rounds maximum for distinct stripes.
📝 Notes
- Yarn substitutions: Any sport or DK weight cotton, cotton blend, or acrylic yarn will work. Avoid fuzzy yarns as details won’t show well.
- Safety considerations: If making for small children, embroider eyes instead of using safety eyes, and ensure all pieces are very securely attached.
- Washing: Hand wash gently in cool water if needed. Lay flat to dry and reshape.
- Storage: Store in a cool, dry place. Can be wrapped in tissue paper to prevent dust.
Your charming snowman trio is ready to bring warmth and whimsy to your holiday season! Each little snowman has its own personality and charm. Enjoy creating these delightful ornaments! ⛄❤️✨☃️


Beautiful