Warm up your winter crafting with the Amigurumi Snowman Mug, a frosty little friend who’s ready to serve up smiles and cozy vibes! ☕⛄ With his cheerful embroidered face, carrot nose, and snug mug-shaped body, this snowman is the perfect blend of festive charm and cuddly cuteness. Whether he’s perched on your desk, nestled in a holiday gift basket, or adding whimsy to your cocoa station, he’s sure to bring a flurry of joy to your seasonal décor.
This pattern is a delightful treat for crocheters who love playful shapes and expressive details. You can personalize your snowman with a colorful scarf, rosy cheeks, or even a sprinkle of sparkle for that fresh-snow glow. Whether you’re crafting for fun, gifting a handmade hug, or decorating with personality, the Snowman Mug is a heartwarming way to celebrate winter—one cozy stitch at a time! ❄️🧶
⛄ Amigurumi Snowman Mug Crochet Pattern
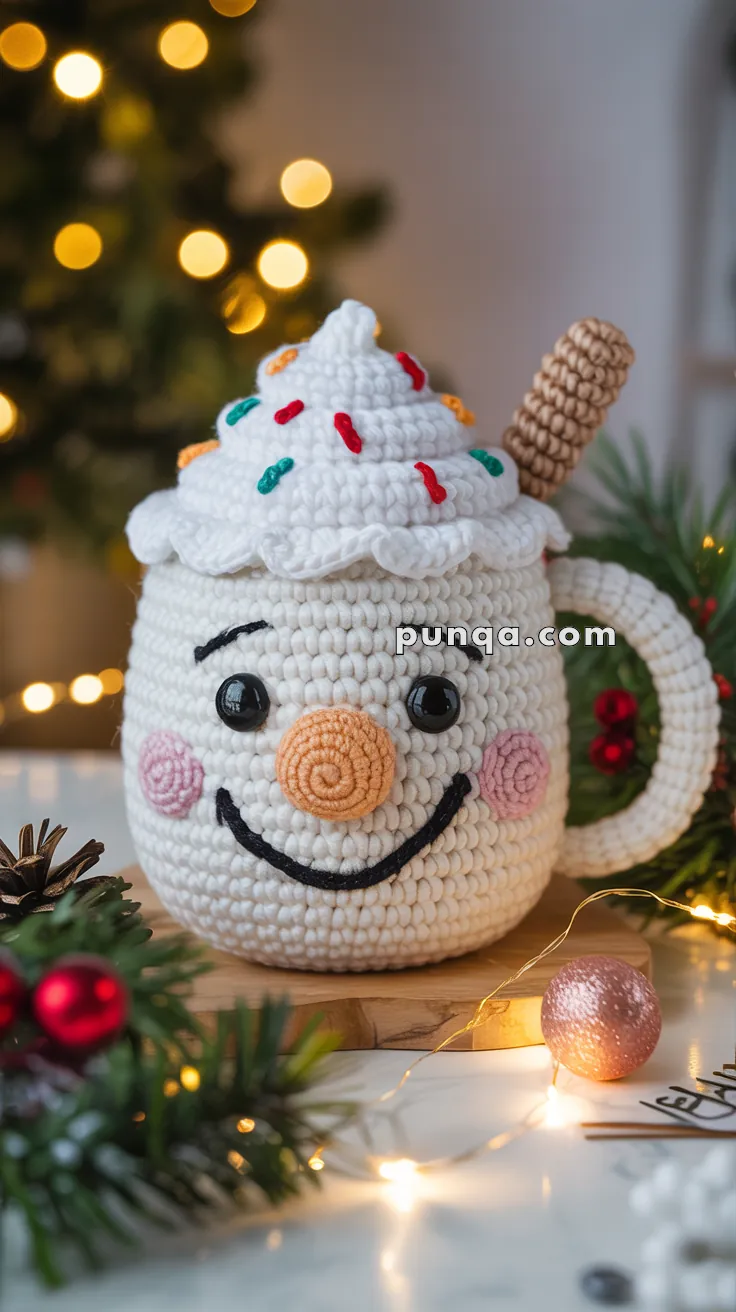
This cozy Snowman Mug Amigurumi brings delightful winter charm to your holiday décor. With its plump mug body, scalloped snowy rim, whipped-cream swirl, colorful sprinkles, rosy cheeks, carrot nose, and wafer cookie, it looks like a cheerful Christmas treat come to life. This design is perfect as a festive tabletop decoration, a gift, or part of a holiday scene.
✨ Skill Level
Intermediate — includes shaping, spiral detailing, plush-yarn tension, and embroidery.
📏 Finished Size
Approximately 7–8 inches (18–20 cm) tall when made using plush/chenille yarn and a 3.5–4 mm hook.
🧶 Materials
Yarn (plush/chenille or bulky weight):
- White or cream – mug body, scalloped rim, whipped cream
- Orange – carrot nose
- Pink – spiral cheeks
- Black – smile, eyebrows
- Light brown – wafer stick base
- Dark brown – wafer stick stripes
- Red, green, orange – sprinkles
Notions:
- 14–16 mm black safety eyes
- 3.5–4 mm crochet hook
- Polyester stuffing
- Yarn needle & scissors
- Pins (for accurate face positioning)
🧵 Abbreviations (US Terms)
MR – Magic ring
sc – single crochet
inc – increase
dec – decrease
hdc – half double crochet
dc – double crochet
sl st – slip stitch
ch – chain
FO – fasten off
☕ Mug Body (White/Cream)
R1: MR 6
R2: inc × 6 (12)
R3: (1 sc, inc) × 6 (18)
R4: (2 sc, inc) × 6 (24)
R5: (3 sc, inc) × 6 (30)
R6: (4 sc, inc) × 6 (36)
R7: (5 sc, inc) × 6 (42)
R8–R26: 42 sc
(This gives the tall, rounded mug shape.)
R27: BLO 42 sc
(This ridge forms the base for the scalloped trim.)
R28–R30: 42 sc
FO and firmly stuff.
☕ Handle (Thick, Plush White)
R1: MR 7
R2–R30: 7 sc
FO and lightly stuff.
Curve into a smooth C-shape and sew both ends evenly onto the side of the mug.
🥕 Carrot Nose (Short & Rounded, Orange)
The nose sits slightly closer to the eyes, matching the photo.
R1: MR 5
R2: 5 sc
R3: (1 sc, inc) × 2 + 1 sc (7)
R4: 7 sc
FO, lightly stuff, sew snugly just under the eye line.
🌸 Spiral Cheeks (Make 2, Pink)
The cheeks in the photo are tightly coiled spirals.
Ch 18
Work sl st tightly across the chain.
It will naturally curl into a spiral.
FO and sew below and slightly outward from each eye.
😊 Face Placement (Photo-Matched)
- Insert safety eyes between Rounds 13–14, spaced 5–6 stitches apart.
- Sew nose directly beneath the eyes (close distance).
- Add spiral cheeks.
- Embroider a wide curved smile with black yarn.
- Add short, slightly arched black eyebrows above each eye.
🍦 Whipped Cream Swirl (Tall, White)
R1: MR 6
R2: inc × 6 (12)
R3: (1 sc, inc) × 6 (18)
R4: (2 sc, inc) × 6 (24)
R5: (3 sc, inc) × 6 (30)
R6: (4 sc, inc) × 6 (36)
R7–R11: 36 sc
(This height matches the tall swirl in the photo.)
R12: (5 sc, inc) × 6 (42)
R13–R15: 42 sc
R16: (5 sc, dec) × 6 (36)
R17: (4 sc, dec) × 6 (30)
R18: (3 sc, dec) × 6 (24)
R19: (2 sc, dec) × 6 (18)
R20: (1 sc, dec) × 6 (12)
R21: dec × 6 (6)
FO, lightly stuff, sew on top of mug.
❄️ Scalloped Rim (White)
Work into the BLO ridge at Round 27:
(sc, hdc, dc, hdc, sc) in same st, sl st next st
Repeat around.
This produces the soft wavy trim seen beneath the whipped cream.
✨ Sprinkles (Red, Green, Orange)
Photo shows moderate density — not too sparse, not overly crowded.
Use doubled yarn for thickness.
Work small straight embroidered bars, 1–1.2 cm long, randomly across the whipped cream:
- Add more near the sides
- Leave the very top slightly less dense
- Use all three colors for variety
🍪 Wafer Stick (Striped)
The photo wafer is thick and shorter, about 8–9 cm rather than 10–11.
R1: With light brown, MR 8 (8)
R2: 8 sc
Switch dark brown:
R3: 8 sc
Switch light brown:
R4: 8 sc
Repeat alternating every 1 round to create tight diagonal-looking ribs.
Continue until stick measures 8–9 cm.
Lightly stuff.
Sew into whipped cream at a slight angle.
🪡 Assembly
- Sew whipped cream securely on top of mug.
- Add scalloped rim around its base.
- Attach wafer stick into swirl.
- Sew nose, cheeks, and embroider facial features.
- Attach handle firmly.
- Adjust stuffing to keep mug standing flat and rounded.
🎀 Finished Look
Your Snowman Mug Amigurumi is complete — cheerful, plump, and perfectly detailed with its spiral cheeks, carrot nose, whipped cream swirl, scalloped trim, colorful sprinkles, and wafer stick. A wonderfully festive piece for winter decorating or gift giving.