Welcome winter with a warm smile and a flurry of handmade charm—the Amigurumi Snowman Christmas Wreath is here to brighten your door and your day! ⛄🎄 Featuring a cheerful snowman nestled in a festive wreath, this crochet project blends cozy textures with playful holiday spirit. From his carrot nose to his snug little scarf, every detail adds a touch of joy to your seasonal décor, making it perfect for gifting, decorating, or simply celebrating the magic of the holidays.
This pattern is a delight for crocheters who love mixing whimsy with tradition. Customize your snowman with colorful accessories, add twinkling accents to the wreath, or even stitch up a few snowball friends to join the fun. Whether hung on your front door, displayed above the mantel, or used as a centerpiece for your winter gatherings, the Snowman Christmas Wreath is a heartwarming way to stitch up holiday cheer—one loop at a time! 🧶✨
🎄 Amigurumi Christmas Wreath with Snowman Crochet Pattern
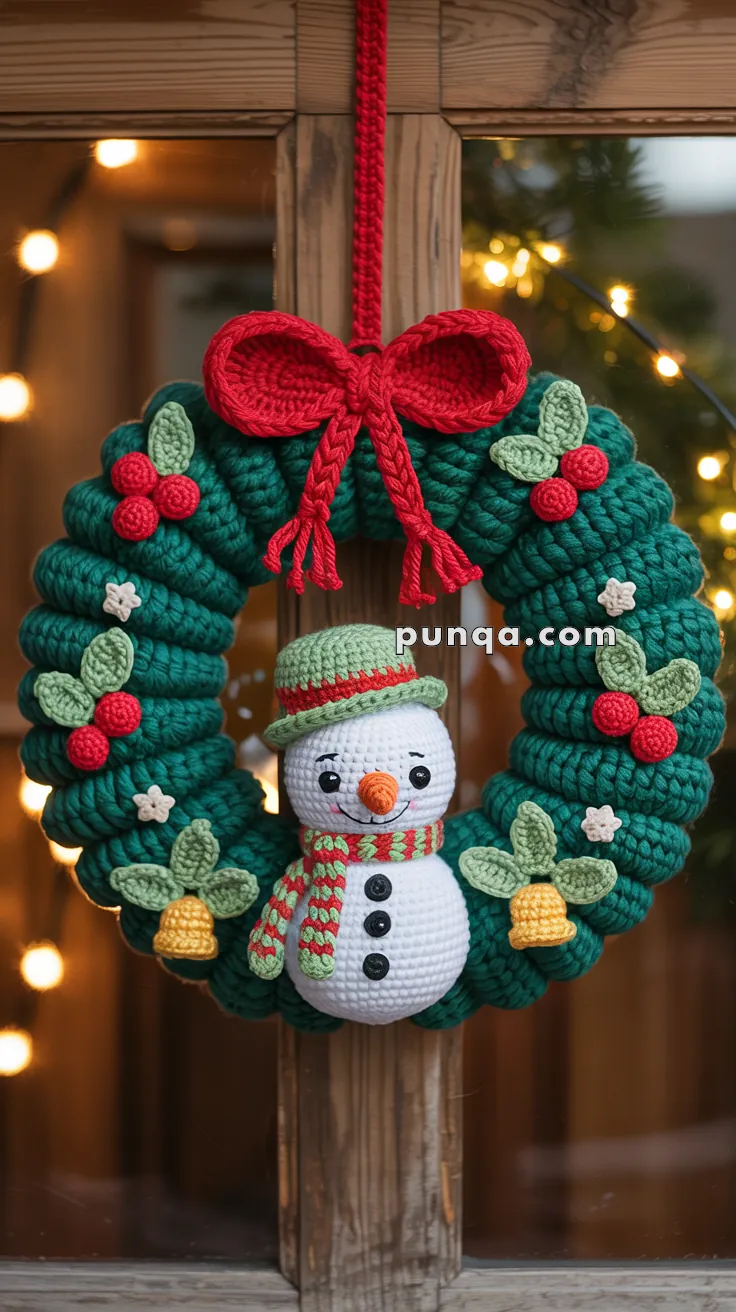
Bring festive charm to your holiday season with this handmade crochet Christmas wreath! With its thick green base, bright red bow, holly leaves with berries, golden bells, twinkling stars, and a cheerful snowman sporting a carrot nose and cozy scarf — this is a true statement piece for your home.
✨ Skill Level
Intermediate – works best for crocheters with some amigurumi and assembly experience.
📏 Finished Size
Approx. 28–32 cm (11–13 in) in diameter when made with bulky yarn and 5–6 mm hook.
🧶 Materials
- Yarn:
- Green (bulky, for wreath base)
- Red (bow, berries, scarf stripes)
- White (snowman body and head, stars)
- Black (eyes, buttons, mouth)
- Orange (carrot nose)
- Yellow (bells)
- Light green (holly leaves)
- Crochet hooks: 2.5–3.0 mm (amigurumi parts), 5–6 mm (wreath base)
- Fiberfill stuffing
- Foam/styrofoam wreath ring (25–30 cm) OR extra stuffing
- Craft wire or pipe cleaners (optional, for bow and leaf shaping)
- Yarn needle, scissors, stitch markers
🔤 Abbreviations (US terms)
MR – magic ring
sc – single crochet
inc – increase (2 sc in same st)
dec – decrease (invisible preferred)
sl st – slip stitch
ch – chain
hdc – half double crochet
dc – double crochet
FO – fasten off
🧩 Pattern Instructions
🌲 Plump Wreath Base (Green)
How to make it plump: Instead of a single flat strip, crochet a long stuffed cord and wrap it tightly around a foam ring. This gives the chunky rope-like effect seen in the photo.
R1: MR 6 (6)
R2: inc x6 (12)
R3–End: sc around until tube measures ~200 cm (enough to wrap foam ring). FO.
👉 As you crochet, stuff lightly but firmly so it stays plump. Wrap tube evenly around wreath base and stitch ends together at back.
🎀 Big Red Bow
Bow Loops (Make 2):
Ch 50.
Row1–4: hdc across. FO.
Fold into loops.
Bow Tails (Make 2):
Ch 25.
Row1–3: hdc across. FO.
Center Band:
Ch 12, sc across 3 rows. Wrap around loops/tails and stitch to hold.
Sew bow to top of wreath.
🍃 Holly Leaves (Light Green, Make 8–10)
Ch 12.
Row1: sc, hdc, dc x8, hdc, sc. Turn, work around other side of chain: sc, hdc, dc x8, hdc, sc.
Row2 (for vein tips): (sl st, ch 2, sl st in same st) repeat at each point for jagged edges. FO.
👉 Add a line of slip stitches down center for vein detail.
🔴 Holly Berries (Red, Make 10–12)
R1: MR 6 (6)
R2: inc x6 (12)
R3: sc around (12)
R4: dec x6 (6) FO. Stuff lightly.
Sew in clusters of 3 with holly leaves.
⭐ Mini Stars (White, Make 4–5)
R1: MR, (ch 3, sl st into ring) x5 for star points. Tighten, FO.
🔔 Bells (Yellow, Make 2)
R1: MR 6 (6)
R2: inc x6 (12)
R3: (sc, inc) x6 (18)
R4: (2sc, inc) x6 (24)
R5–6: sc around (24)
R7: (2sc, dec) x6 (18)
R8: sc around (18) FO.
👉 This extra flare at the base makes them look like real bells. Sew to bottom sides with holly leaves.
☃️ Snowman
Head (White)
R1: MR 6 (6)
R2: inc x6 (12)
R3: (sc, inc) x6 (18)
R4: (2sc, inc) x6 (24)
R5: (3sc, inc) x6 (30)
R6–12: sc around (30)
R13: (3sc, dec) x6 (24)
R14: (2sc, dec) x6 (18) FO. Stuff firmly.
Body (White)
R1: MR 6 (6)
R2: inc x6 (12)
R3: (sc, inc) x6 (18)
R4: (2sc, inc) x6 (24)
R5–10: sc around (24)
R11: (2sc, dec) x6 (18) FO. Stuff firmly.
Sew body to head.
Nose (Orange Carrot Shape)
👉 To match the photo, make it long, conical, and slightly upward-pointing.
R1: MR 4 (4)
R2: sc around (4)
R3: (sc, inc) (6)
R4–8: sc around (6) FO.
Lightly stuff, bend gently upward before sewing.
Eyes & Buttons (Black)
Make small circles:
R1: MR 6, sl st closed. FO.
- Eyes: sew 2 to head.
- Buttons: sew 2 only to body (as in photo).
Hat (Green with Red Trim)
Brim:
R1: MR 6 (6)
R2: inc x6 (12)
R3: (sc, inc) x6 (18)
R4: (2sc, inc) x6 (24)
R5: (3sc, inc) x6 (30) FO.
Top:
R1: MR 6 (6)
R2: inc x6 (12)
R3: (sc, inc) x6 (18)
R4–6: sc around (18) FO.
Sew to brim.
Trim:
Ch 25, sc across. Wrap around base of hat.
Scarf (Red & Green Stripes)
Ch 45.
Row1: sc across in alternating colors (switch every 3–4 rows). FO.
Wrap around snowman’s neck.
🧵 Assembly
- Wrap and sew wreath base into plump circle.
- Attach bow at top center.
- Arrange holly leaves and berries around wreath evenly.
- Add bells with leaves to bottom corners.
- Sew stars randomly around for sparkle.
- Attach snowman body to inner bottom of wreath.
- Add hat, scarf, carrot nose, eyes, mouth, and buttons.
- Attach a long hanging loop of red yarn at the top.
🌟 Finishing Tips
- Plumpness: Stuff wreath tube consistently and wrap tightly around foam ring for even thickness.
- Nose: Slightly stuff carrot nose and bend before sewing to give it the realistic curved look.
- Placement: Keep decorations symmetrical for balance, but vary stars and berries slightly for a natural look.
🎉 Result
Your Amigurumi Christmas Wreath with Snowman is complete! With its plump, rope-like wreath base, bold red bow, festive greenery, golden bells, and the cutest snowman with a carrot nose and cozy scarf, this handmade wreath will bring joy to every holiday season.