Step into a gentle woodland wonderland with this Amigurumi Snowdrop Fairy Scene crochet pattern! Inspired by the first delicate blooms of spring, this enchanting design features a sweet little fairy nestled among snowdrop flowers, bringing a sense of renewal and magic to your crochet collection. Whether you’re crafting a whimsical display, decorating a nursery, or simply love storytelling through stitches, this pattern lets you create a peaceful scene that feels like it’s straight out of a fairytale. 🧚♀️❄️🌱
Designed for imaginative detail, this pattern invites you to play with soft whites, fresh greens, and dainty embellishments like wings, petals, and tiny woodland friends. Add a mossy base, a sparkling bead for a dewdrop, or even a miniature lantern to complete the scene. Whether you’re gifting it to a dreamer or keeping it as a handmade treasure, this Amigurumi Snowdrop Fairy Scene is a joyful and heartwarming project—perfect for bringing a touch of handmade enchantment to every stitch! 🧶💖🌸
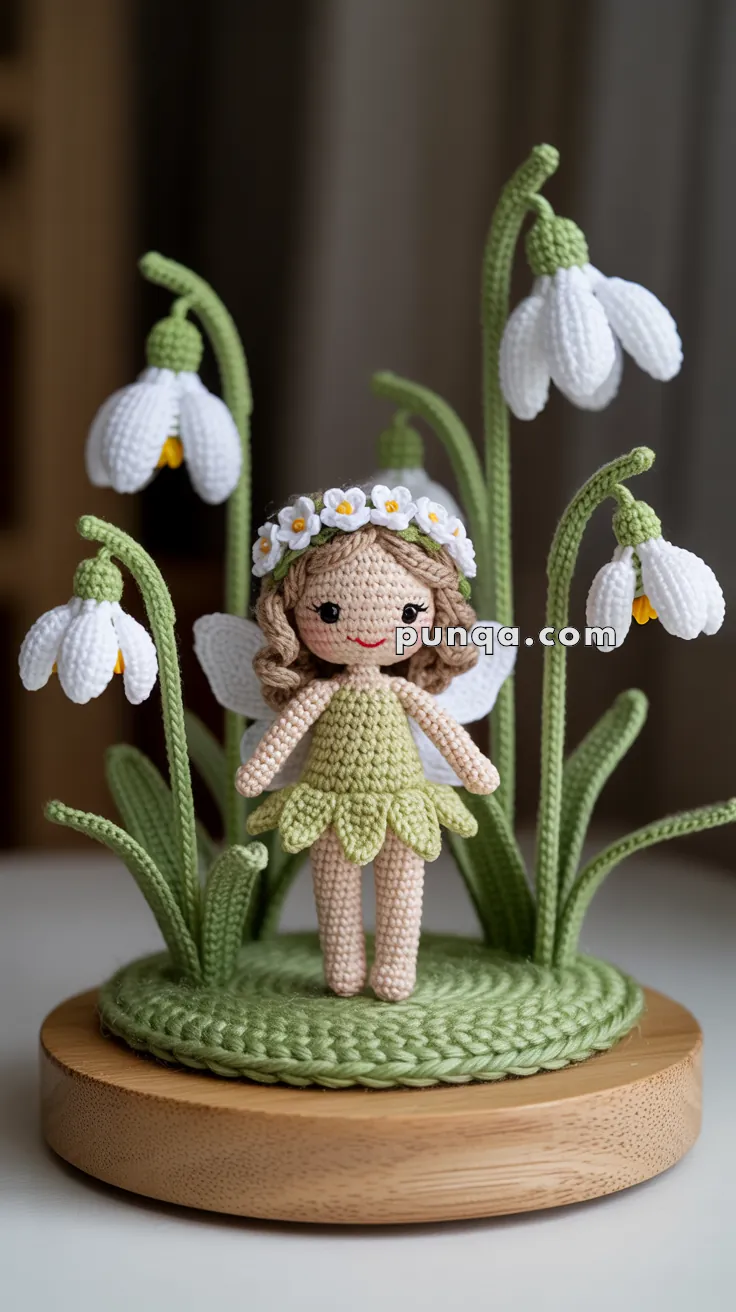
🌸 Amigurumi Snowdrop Fairy Scene Crochet Pattern
Create a magical spring woodland scene with this adorable amigurumi snowdrop fairy surrounded by elegant crocheted flowers and perched on a charming display base. Perfect as a whimsical gift or display piece, this enchanting fairy brings blooming joy to your crochet collection!
✨ Skill Level
Intermediate – sculpted amigurumi construction, shaping, wire-reinforced stems, floral details, and clean assembly.
📏 Finished Size
- Fairy: ~15 cm (6 in) tall
- Full scene (flowers + base): ~20 cm (8 in) tall
🧶 Materials
- Cotton DK yarn:
- Light beige – skin
- Light green – dress, leaves, stems, base
- White – flower petals, wings
- Yellow – snowdrop pollen
- Brown – hair
- Tiny scraps: black (eyes), pink (cheeks), red (smile)
- Hook: 2.25–2.75 mm
- Polyester fiberfill
- Craft wire (thin but strong)
- Wire cutters + pliers
- Tapestry needle
- Wooden display base (~10–12 cm)
- Stitch markers
🧵 Abbreviations (US Terms)
MR – magic ring
sc – single crochet
inc – 2 sc in one st
dec – invisible decrease
sl st – slip stitch
ch – chain
hdc – half double crochet
dc – double crochet
FO – fasten off
🧚 Fairy Doll
Note: Head and body are continuous. Legs are joined with hips and attached to torso afterward.
Head & Neck
Skin color
R1: MR, 6 sc
R2: inc x6 (12)
R3: (1 sc, inc) x6 (18)
R4: (2 sc, inc) x6 (24)
R5–10: sc around (24)
R11: (2 sc, dec) x6 (18)
R12: (1 sc, dec) x6 (12)
Stuff firmly.
R13: BLO sc around (12) (neck ridge)
Torso & Bodice
R14: inc x6 (18)
R15: (2 sc, inc) x6 (24)
Switch to light green (dress bodice)
R16–20: sc around (24)
R21: (2 sc, dec) x6 (18)
R22: sc around (18)
FO. Leave tail for later attachment.
🦵 Legs (Make 2)
Skin color
R1: MR, 6 sc
R2–14: sc around (6)
FO first leg.
Make second, do not FO.
Join legs into hips:
Ch 3, attach to first leg with sc.
Continue working around both legs and the ch-bridge:
(6 sc leg + 3 ch + 6 sc leg + 3 opposite side of ch) = 18 sts total
R1–3 hips: sc around 18
Stuff legs firmly.
Leave long tail for sewing hips under torso.
💪 Arms (Make 2)
Skin color
R1: MR, 6 sc
R2–10: sc around (6)
Very lightly stuff.
FO and attach just below fairy’s head, angled slightly outward.
💇 Hair (Cap + Two Braided Curl Sections)
Hair Cap (Brown)
R1: MR, 6 sc
R2: inc x6 (12)
R3: (1 sc, inc) x6 (18)
FO. Stitch cap centered on head.
Side Curls (Make 2)
Ch 28–32
Working from 2nd ch:
2 sc in each chain to end
The strip will coil naturally.
Twist lightly, then stitch one curl to each side of head at ear level so they hang forward like styled fairy locks.
🌼 Flower Crown
Make 6–8 tiny daisies.
Mini Flowers (White)
R1: MR, 6 sc
R2: (ch 2, sl st into same st), sl st next st
Repeat petals around entire ring.
FO.
Yellow Center
Embroider a tiny French knot in center of each.
Crown Base
Light green
Ch 40–45 (adjust for head circumference)
Sew flower backs evenly along chain.
Tie behind head or stitch invisibly for permanent crown.
🌿 Leaf Petal Skirt
Worked directly onto waist (which is 18 sts).
Attach light green yarn into any waist stitch.
Repeat 6 times evenly around circle:
(sl st, ch 4, sc in 2nd ch, hdc, dc in next ch, skip 2 sts)
You’ll have 6 pointed leaf petals arranged evenly around the hem.
🪽 Wings (Make 2)
White
R1: MR, 6 sc
R2: inc x6 (12)
R3: (1 sc, inc) x6 (18)
Flatten to oval disks.
Pinch one side slightly inward to create the characteristic dual-lobe wing shape.
Sew both wings to upper back, tips angled outward.
❄️ Snowdrop Flowers (3–5 total)
Each flower consists of:
- green bud top
- 3 elongated petals
- yellow stamens inside
- a wired stem
Stem (Light Green)
Ch 35–45 (vary heights)
Turn, sc down chain.
Before closing, insert craft wire:
- cut wire slightly shorter than stem
- bend top and bottom into tiny loops so ends never poke through
Crochet snugly over wire as you sc down the chain.
Leave tails for attaching at base.
Green Bud Top
Light green
R1: MR, 6 sc
R2–3: sc around (6)
Do not overstuff — it should look compact.
FO.
Snowdrop Petals (Make 3 per Flower)
White
Ch 8
Row 1: sc in 2nd ch, sc 5, inc in last (7)
Row 2: ch 1, turn, sc 7
Row 3: ch 1, turn, dec, sc 3, dec (5)
Row 4: ch 1, turn, dec, sc 1, dec (3)
FO, leave tail.
Attach all 3 petals evenly spaced around lower edge of the green bud, angled downward.
Yellow Stamens (2–3 each)
Yellow
Ch 3
Sl st back along chain
Sew inside center of snowdrop.
🌾 Leaf Blades (Make 5–7)
Light green
Ch 20
Row 1:
Start in 3rd ch from hook:
hdc, dc x15, hdc
3 sc into last ch to form tapered tip
Continue along opposite side of chain:
hdc, dc x15, hdc
sl st to starting point, FO.
Optional:
Surface slip stitch a central line to form a visible leaf vein.
Leave tails for sewing.
🌱 Base
Light green
R1: MR, 6 sc
R2: inc x6 (12)
R3: (1 sc, inc) x6 (18)
R4: (2 sc, inc) x6 (24)
R5: (3 sc, inc) x6 (30)
R6: (4 sc, inc) x6 (36)
R7: (5 sc, inc) x6 (42)
R8: (6 sc, inc) x6 (48)
Stop increasing when circle reaches 8–9 cm diameter (will be ~48–54 sts depending on yarn tension).
R9–10: sc around base (no increases)
FO.
Mount base neatly onto a wooden circle with stitching or strong fabric glue.
Finish with a clean edge surface slip stitch if desired.
🧺 Assembly
Fairy Placement
Stitch hips securely at center of base.
Ensure she stands fully upright.
Snowdrops
Use varying stem heights.
Place tallest flowers toward the back, medium height at sides, shortest near front.
Attach stems by stitching through base.
Add leaves near stems to mimic natural clustering.
Final Composition
- Fairy centered
- Snowdrops framing her in a gentle arc
- Leaf blades filling gaps
Ensure petals face downward and curve naturally.
💡 Extra Enhancement Ideas
🌟 Add shimmer yarn lines inside wings
🌟 A tiny matching leaf-tip shoe on each foot
🌟 Speckled embroidery on petals
🌟 Light pastel shading around bud tops
This fairy garden scene is a wonderful handmade gift, spring centerpiece, or collector’s display. 🌸🧚