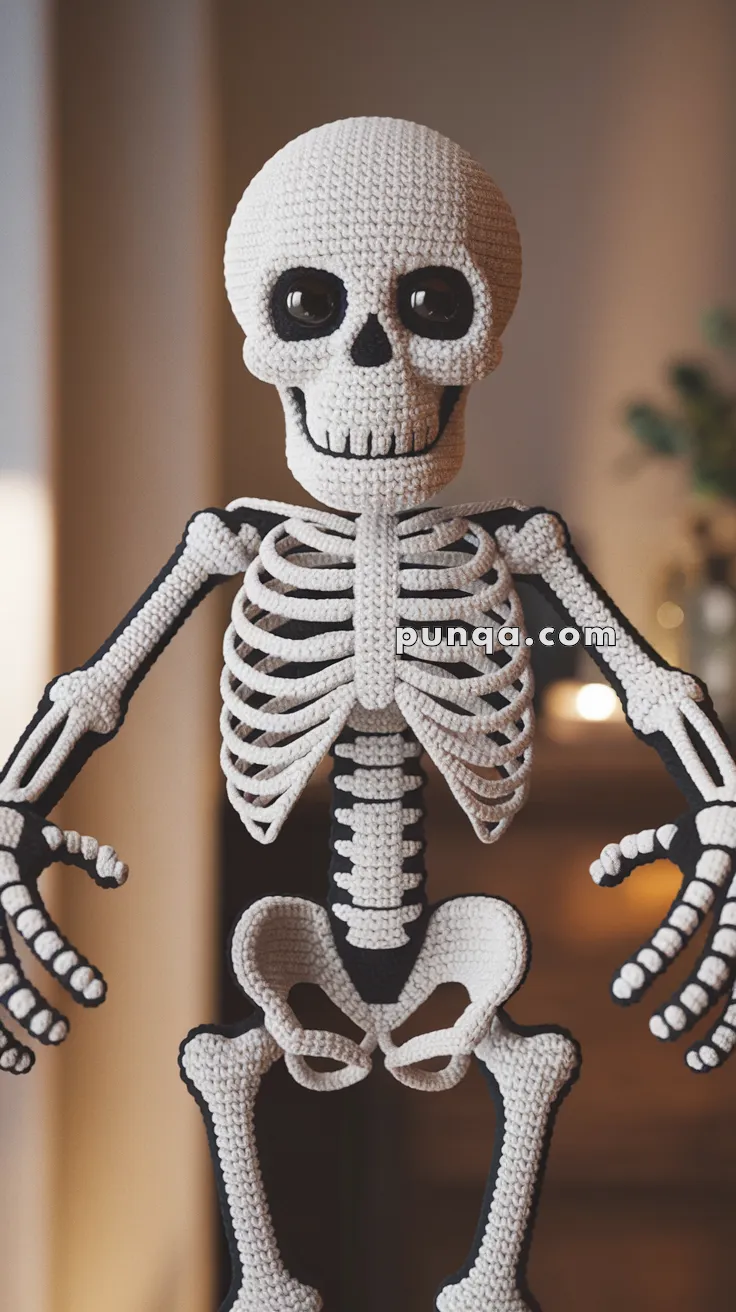
💀 Amigurumi Skeleton Crochet Pattern
This full-body amigurumi skeleton features an oversized rounded skull, deep eye sockets, a smiling jaw, layered ribcage, visible spine, shaped pelvis, and long articulated limbs with detailed fingers. The white bones are layered over a black inner body to create strong contrast and a realistic skeletal silhouette. The finished piece is tall, sculptural, and ideal as a striking decorative display.
✨ Skill Level
Advanced — includes sculptural shaping, layered bone appliqué, and structured assembly.
📏 Finished Size
Approx. 60–70 cm (24–28 in) tall using DK yarn and a 2.5–3 mm hook.
🧶 Materials
-
DK yarn: White (bones) and Black (inner body/core)
-
14–16 mm black safety eyes
-
Polyester stuffing
-
Tapestry needle
-
Stitch markers
-
Thin craft wire (for fingers and arms)
-
Optional stand or base for display
🪡 Abbreviations (US Terms)
MR — magic ring
sc — single crochet
inc — increase
dec — decrease
ch — chain
sl st — slip stitch
BLO — back loop only
FO — fasten off
☠️ Skull
Head Dome (White)
R1: MR 6
R2: inc ×6 (12)
R3: (sc, inc) ×6 (18)
R4: (2 sc, inc) ×6 (24)
R5: (3 sc, inc) ×6 (30)
R6: (4 sc, inc) ×6 (36)
R7: (5 sc, inc) ×6 (42)
R8–15: sc around (42)
Insert safety eyes wide apart.
R16: (5 sc, dec) ×6 (36)
R17: (4 sc, dec) ×6 (30)
Stuff firmly
R18: (3 sc, dec) ×6 (24)
Jaw Extension
R19–23: sc around (24) to form the elongated jaw
Stuff lightly
R24: (2 sc, dec) ×6 (18)
R25: (sc, dec) ×6 (12)
R26: dec ×6 (6)
FO and close.
Eye Sockets & Face
Crochet two flat black circles and sew around the eyes to create deep sockets. Embroider a triangular nose opening. Stitch a wide curved smile and add short vertical stitches for teeth.
🦴 Inner Body Core (Black)
This piece forms the shadowed silhouette behind the bones.
R1: MR 8
R2: inc ×8 (16)
R3–45: sc around (16)
Stuff lightly but keep flexible. This column runs from neck to pelvis.
🦴 Spine Overlay
With white yarn, surface stitch evenly spaced horizontal bars down the black core to form vertebrae. Add a longer vertical white strip at the upper center to suggest the spinal column front.
🦴 Ribcage
Sternum
Ch 6
Rows 1–10: sc across
FO
Sew vertically to the front upper torso.
Ribs (Make 6 pairs)
Each rib:
Ch 20
Row 1: sc across
Row 2: sc BLO across
FO
Shape each rib into a strong curve. Sew ribs symmetrically along both sides of the spine, angling downward. Attach front tips to the sternum so the ribs arch forward.
🦴 Clavicles & Shoulder Bones
Ch 10, sc back. Make 2 and sew horizontally across the upper chest. Add small curved stitches extending toward the shoulders.
🦴 Pelvis
With white yarn:
R1: MR 6
R2: inc ×6 (12)
R3: (sc, inc) ×6 (18)
R4–6: sc around
FO
Flatten slightly. Stitch a curved divider across the center to create two pelvic openings. Sew pelvis securely to the bottom of the black core.
🦴 Arms (Make 2)
Upper Arm (White)
MR 6
Increase to 10
Work 12 rounds
Stuff lightly
Lower Arm
MR 6
Increase to 8
Work 12 rounds
Join to upper arm.
Hands
Palm: MR 6 → inc to 10
Fingers: crochet 5 thin tubes (8–10 rounds each). Insert wire into each finger and the palm. Sew fingers evenly spaced. Outline finger segments with short black stitches to suggest joints.
Attach arms to the sides of the ribcage.
🦴 Full-Length Legs (Make 2)
Thigh
MR 6
R2: inc ×6 (12)
R3–16: sc around (12)
Stuff lightly.
Knee Joint
R17–18: sc around (12)
Add a horizontal white stitch line to suggest the kneecap.
Shin (Extended Length)
R19–36: sc around (12)
Stuff firmly for stability.
🦴 Feet (Make 2)
Foot Base
R1: MR 6
R2: inc ×6 (12)
R3: (sc, inc) ×6 (18)
R4–6: sc around (18)
Flatten slightly to form a sole.
Toes
At the front edge of the foot, crochet 5 short toe bumps:
For each toe:
Attach yarn → ch 3 → sl st back into base
Repeat across the front to create defined toes.
Stuff lightly and sew feet to the bottom of each leg, angled slightly outward for balance.
Attach completed legs securely into the pelvis openings.
🧵 Assembly
Sew skull securely to the top of the black core. Attach pelvis at the bottom. Reinforce all joins with multiple passes of yarn. Align ribs symmetrically. Attach limbs evenly. Add black outlining stitches along the outer edges of arms and legs to emphasize bone contours.
✨ Finishing Touches
Gently bend fingers and arms into a natural pose. Adjust rib curves and smooth stuffing. Mount on a stand if desired for stability.
🦴 Final Thoughts
This sculptural skeleton combines layered crochet construction with strong contrast and anatomical styling. The oversized skull, curved ribcage, and articulated limbs create a dramatic handmade figure that stands out as both eerie and playful — a bold showcase of advanced amigurumi craftsmanship.