Oh, the delightful world of amigurumi! 🧶 Crafting these adorable little creations truly has a magic of its own. I remember the first time I stumbled upon the idea of crocheting an amigurumi shrimp, and it was love at first sight. Shrimp, with their quirky shapes and charming antennae, make for irresistibly cute and whimsical crochet projects. The beauty of creating an amigurumi shrimp lies in its simplicity and the joy it brings as it takes shape under your fingers. Each stitch is a step closer to bringing a tiny sea creature to life, and there’s something so fulfilling about seeing those tiny features come together.
The process itself is a playful adventure. Armed with a crochet hook and some colorful yarn, I dive right in, starting with a magic ring. It’s amazing how a simple combination of loops and stitches can transform into a miniature crustacean! The pattern usually involves crocheting in rounds, which is perfect for capturing the shrimp’s cylindrical body. As I add each detail, from its little legs to its curvy tail, it’s hard not to smile. The finishing touches, like the addition of tiny eyes or a playful expression, truly give it personality. By the end, I’m left with not just a piece of yarn art, but a new, quirky companion that brings a touch of oceanic charm to my collection. 🦐✨
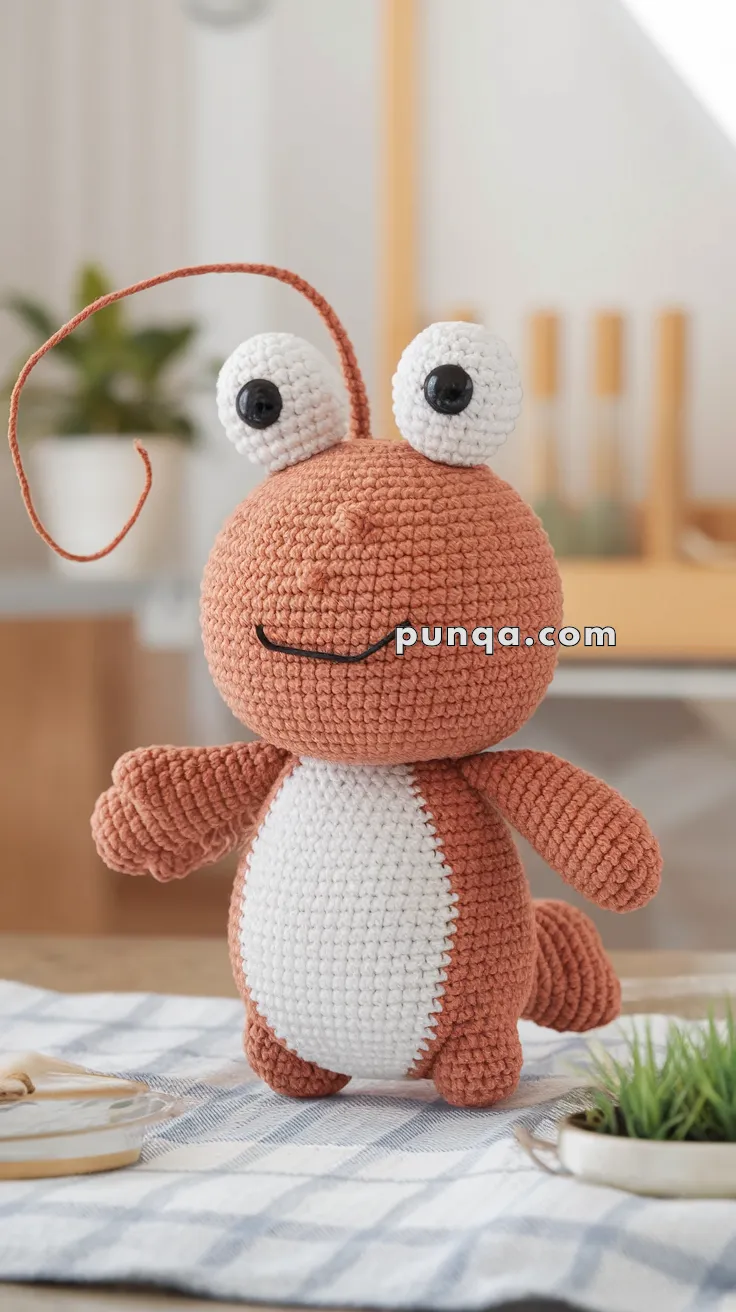
🍤 Amigurumi Shrimp Crochet Pattern
Say hello to this adorable amigurumi shrimp friend! With its round belly, waving arms, big cartoon eyes, and a happy embroidered smile, this soft shellfish brings charm and cheer to any sea creature collection or nursery shelf.
✨ Skill Level
Beginner to Intermediate – Includes basic shaping, color changes, and soft embroidery.
📏 Finished Size
Approx. 20–22 cm (8–9 inches) tall using worsted weight yarn and a 3.5 mm hook.
🧶 Materials
Yarn (Worsted weight):
-
Terracotta or shrimp pink (Main body, arms, legs, tail, antennae)
-
White (Belly panel, eyes)
-
Black (Embroidery thread for smile and eye pupils)
Other Supplies:
-
Crochet hook: 3.5 mm
-
10 mm safety eyes or black buttons
-
Tapestry needle
-
Stitch marker
-
Polyester stuffing
-
Scissors
-
Pipe cleaner or floral wire (optional for antenna)
🧵 Abbreviations (US Terms)
-
MR – Magic Ring
-
sc – Single Crochet
-
inc – Increase
-
dec – Decrease
-
ch – Chain
-
sl st – Slip Stitch
-
FO – Fasten Off
-
BLO – Back Loop Only
🦐 Head & Body (Work in one piece – Start from top)
Using terracotta:
-
MR, 6 sc
-
inc x6 (12)
-
(1 sc, inc) x6 (18)
-
(2 sc, inc) x6 (24)
-
(3 sc, inc) x6 (30)
6–12. sc (30) -
(3 sc, dec) x6 (24)
-
(2 sc, dec) x6 (18)
-
sc (18)
Switch to white:
16–20. sc (18) – Belly portion
Switch back to terracotta: -
(2 sc, inc) x6 (24)
22–26. sc (24)
Stuff firmly as you go -
(2 sc, dec) x6 (18)
-
(1 sc, dec) x6 (12)
-
dec x6 (6)
FO and close
🧼 Belly Panel (White – optional separate piece)
Ch 10
Row 1: sc in 2nd ch and across (9)
Row 2–6: sc across (9), dec 1 st at both ends to taper
FO and sew to belly area if worked separately
👀 Eyes (Make 2 – White)
-
MR, 6 sc
-
inc x6 (12)
-
sc (12)
FO, insert safety eye or stitch black yarn in center
Sew each eye to top of head near the center
👃 Antennae (Make 2 – Terracotta)
Ch 30
Row 1: sl st in each ch back
FO, insert into top of head and secure with a knot or stitch
Optionally use wire for curl
💪 Arms (Make 2 – Terracotta)
-
MR, 6 sc
2–8. sc (6)
Stuff lightly, FO
Sew to upper sides of the body
🦵 Legs (Make 2 – Terracotta)
-
MR, 6 sc
2–6. sc (6)
FO, stuff lightly, sew to bottom front of body
🦐 Tail
-
MR, 6 sc
-
inc x6 (12)
3–5. sc (12) -
(1 sc, dec) x4 (8)
-
sc (8)
Flatten and sew to the back base of body
😊 Smile
Using black embroidery thread:
Stitch a sideways “smile line” near the center of the head
✂️ Final Assembly
-
Position eyes and antennae first for balance
-
Sew arms in upward waving pose or down for a chill look
-
Stitch legs slightly forward so shrimp can sit
-
Tail should gently curl out or upward
-
Add blush or cheeks with yarn or crayon for extra cuteness
💡 Customization Ideas
-
Add stripes along the back using slip stitches
-
Crochet bubbles or seaweed for background
-
Make it in different shellfish tones for a whole shrimp squad
This bubbly little shrimp is sure to wiggle its way into your heart and onto your hooks! 🧶🦐✨