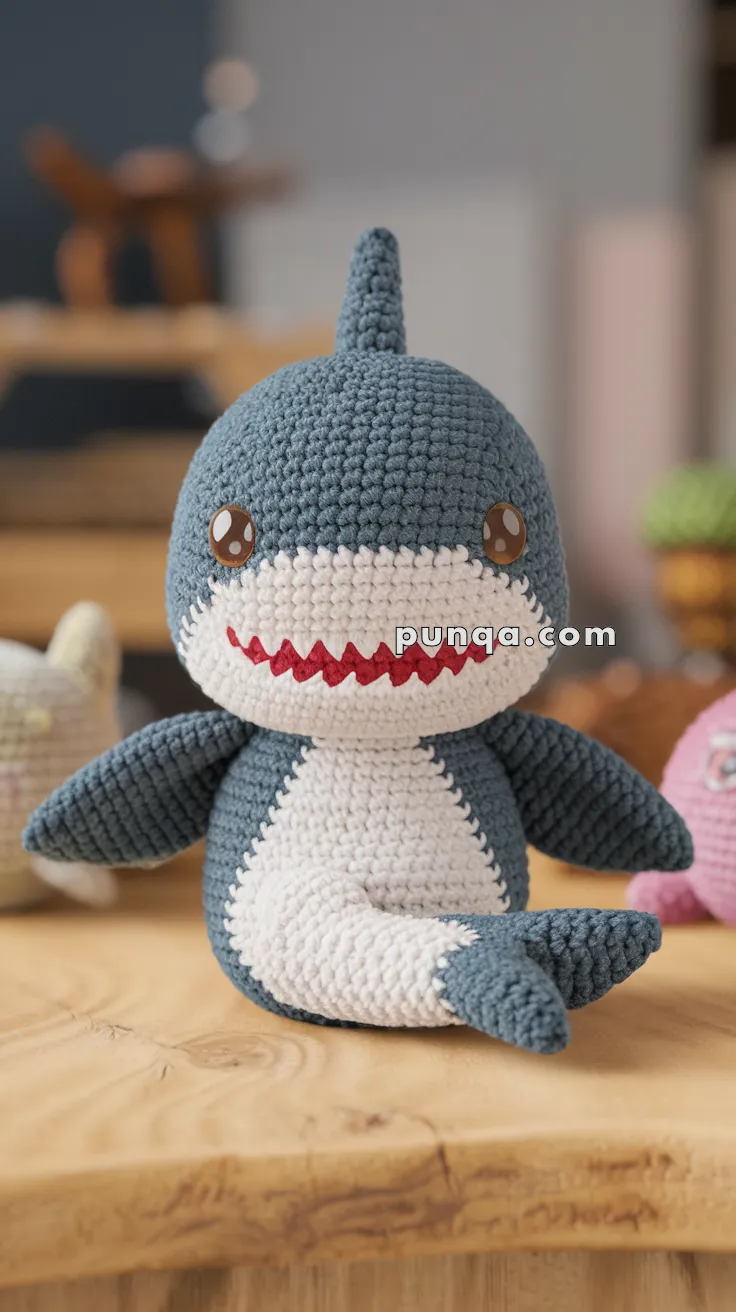
Make a splash in your crochet collection with the Amigurumi Shark Baby, a project that’s as playful as it is adorable! 🦈🧶 This pattern creates a round-headed, chubby shark baby with a clearly defined white face patch, a wide embroidered zig-zag smile, and short rounded side fins. With its single upright dorsal fin and curved seated body, complete with a forward-resting tail, this little shark is full of character and charm.
Perfect for ocean-themed décor, nursery accents, or as a fun gift for sea-life lovers, this shark baby is sure to bring waves of joy wherever it goes. Easy to stitch yet delightfully detailed, the Amigurumi Shark Baby is a joyful way to crochet coziness, personality, and a sprinkle of handmade magic—one loop at a time! 🌊✨🧵
🦈 Amigurumi Shark Baby Crochet Pattern
This sweet baby shark is designed with a rounded head-body shape, a front-only white belly, small side fins, a soft curved tail that rests forward, and a tiny dorsal fin — just like the plush shown in the photo. The proportions are intentionally chubby and balanced so the shark can sit comfortably without added supports.
The pattern is worked mostly in continuous rounds with simple shaping and clean color changes for a polished, professional finish.
✨ Skill Level
Easy–Intermediate — this project uses basic amigurumi shaping with color changes, simple embroidery, and small attached parts.
📏 Finished Size
Approx. 22–24 cm (8.5–9.5 in) tall when using DK yarn and a 2.5–3.0 mm hook.
🧶 Materials
Yarn (DK / Light Worsted):
-
Blue-grey: ~60 g (head, back, fins, tail, dorsal fin)
-
White: ~30 g (belly and mouth area)
-
Red: small amount (mouth embroidery)
Notions:
-
8–10 mm safety eyes (brown or black)
-
Polyester fiberfill
-
Tapestry needle
-
Stitch marker
-
Scissors
🧵 Abbreviations (US Terms)
-
MR – magic ring
-
sc – single crochet
-
inc – increase (2 sc in same stitch)
-
dec – invisible decrease
-
sl st – slip stitch
-
ch – chain
-
st(s) – stitch(es)
-
FO – fasten off
Work in a continuous spiral unless stated otherwise.
🧠 Head & Body (One Piece)
Start at the top of the head in blue-grey.
R1: MR 6 (6)
R2: inc ×6 (12)
R3: (sc, inc) ×6 (18)
R4: (2 sc, inc) ×6 (24)
R5: (3 sc, inc) ×6 (30)
R6: (4 sc, inc) ×6 (36)
R7–R14: sc around (36)
👉 Insert safety eyes between R10–11, about 8–9 stitches apart.
🐟 Front Belly Colorwork (White)
From this point, white is worked only across the front half of the body, not the full round.
R15–R18:
-
sc 12 in white (front belly)
-
sc 24 in blue-grey (back)
(36 sts each round)
Begin stuffing firmly, shaping a rounded belly.
🔽 Body Shaping
R19: (4 sc, dec) ×6 (30)
R20: (3 sc, dec) ×6 (24)
R21: (2 sc, dec) ×6 (18)
Stuff more firmly, especially the lower body.
R22: (sc, dec) ×6 (12)
🦷 Mouth & Teeth Embroidery
The mouth sits within the white belly area, slightly below the eyes.
-
Using red yarn, embroider a shallow curved smile.
-
Add a small zig-zag line along the top edge of the red to suggest cartoon teeth.
-
Keep the mouth compact and centered.
🦈 Tail (Curved, Stuffed – Photo Accurate)
The tail is tubular and softly curved, not flat.
Blue-grey yarn
R1: MR 6 (6)
R2: sc around (6)
R3: (sc, inc) ×3 (9)
R4–R6: sc around (9)
R7: (2 sc, inc) ×3 (12)
R8–R10: sc around (12)
Lightly stuff, flatten slightly near the base, and curve forward gently.
FO, leave a long tail.
Sew to the lower front of the body, angled upward so it rests forward as shown.
🪽 Side Fins (Make 2)
Blue-grey yarn
R1: MR 6 (6)
R2: inc ×6 (12)
R3–R4: sc around (12)
R5: (4 sc, dec) ×2 (10)
R6–R7: sc around (10)
Lightly stuff the base only.
Flatten and sew to the sides of the body just below the head curve.
🦈 Dorsal Fin
Blue-grey yarn
R1: MR 4 (4)
R2: inc ×4 (8)
R3–R5: sc around (8)
Do not stuff.
Flatten and sew to the top back of the head.
🪡 Assembly & Shaping
-
Ensure belly is centered and smooth.
-
Attach tail so it curves forward naturally.
-
Sew fins symmetrically at a slight downward angle.
-
Gently massage stuffing to keep a round, seated shape.
-
Adjust dorsal fin so it stands upright.
✨ Finishing Touches
-
Lightly steam fins (optional) for smooth edges
-
Secure embroidery ends inside the body
-
Shape tail curve by hand before final stitches tighten
🧸 Final Notes
This baby shark is designed to be soft, stable, and cuddly, with clean proportions and minimal seams. The rounded body, front-only belly, curved tail, and simple facial details give it a timeless plush look that works beautifully for gifts, nursery décor, or playful displays.
Happy crocheting — and enjoy bringing this gentle little shark to life! 🦈💙