Add a sprinkle of handmade holiday cheer to your table with these Amigurumi Santa Silverware Pouches! 🎅✨ Dressed in classic red with a cozy white trim, each pouch is a miniature Santa suit ready to cradle your cutlery in festive style. Whether you’re hosting a Christmas feast or simply want to surprise loved ones with a whimsical touch, these pouches bring warmth, charm, and a dash of crochet magic to every place setting.
Perfect for gifting, decorating, or delighting dinner guests, this pattern is a joyful blend of creativity and practicality. You can personalize each pouch with buttons, embroidery, or even tiny belt buckles for extra flair. Quick to stitch and endlessly adorable, these Santas are sure to become a beloved part of your holiday traditions—one stitch at a time! 🧶🎄🍽️
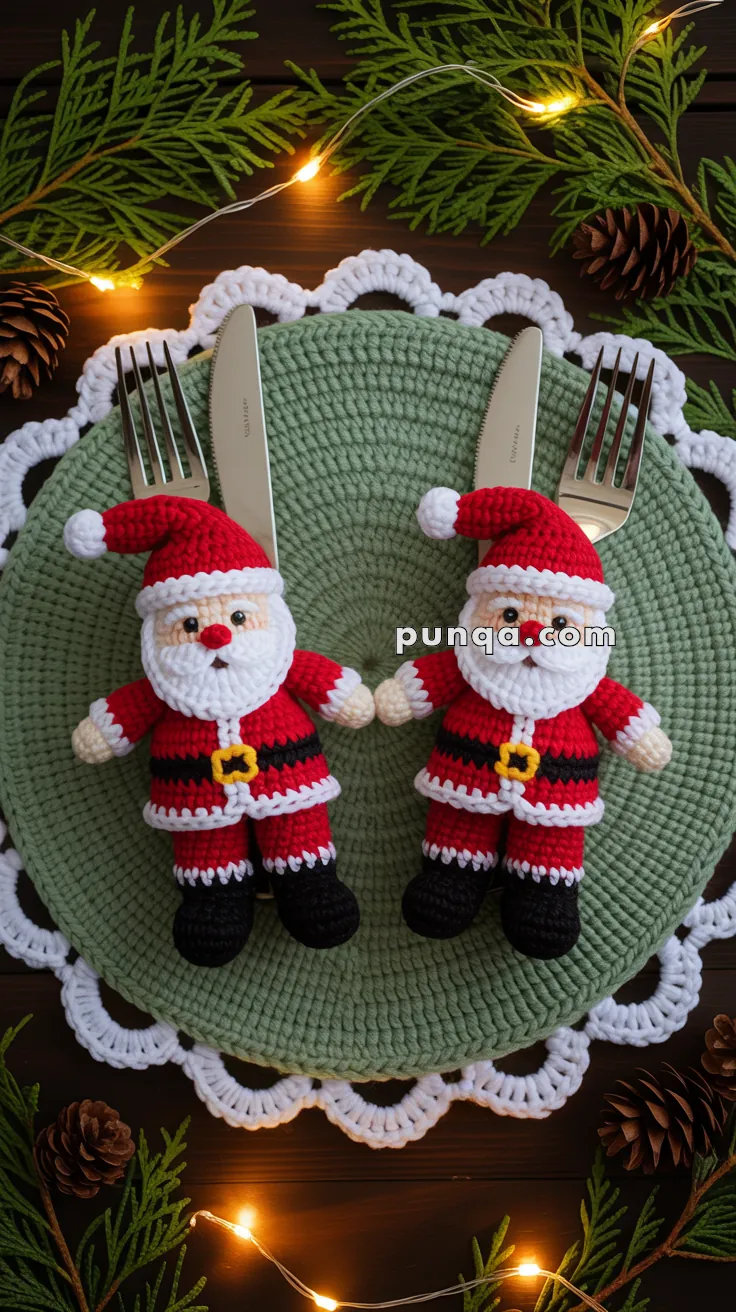
🎅 Amigurumi Santa Silverware Holders Crochet Pattern
Bring festive charm to your holiday table with these adorable Santa cutlery holders!
There’s something magical about handmade Christmas decorations, and these Amigurumi Santa Silverware Holders are the perfect blend of festive charm and practicality. Each little Santa holds a fork, knife, or spoon, transforming your holiday table into a winter wonderland. Plus, they make wonderful handmade gifts!
📋 Pattern Overview
Skill Level: Intermediate
Finished Size: Approximately 20-22 cm (8-9 inches) tall
Time to Complete: 4-6 hours per Santa
🧶 Materials You’ll Need
Yarn
I recommend DK or light worsted weight cotton or acrylic yarn in the following colors:
- Red – Santa’s suit and hat (50g)
- White – beard, trim, cuffs, and hat details (30g)
- Beige/Skin tone – face and hands (15g)
- Black – boots, belt, and eyes (20g)
- Yellow/Gold – belt buckle (small amount)
- Pink – cheeks (tiny amount, or use blush)
Other Supplies
- Crochet hook: 2.5mm or 3.0mm
- Fiberfill stuffing
- Black safety eyes: 8-10mm, or black yarn for embroidered eyes
- Yarn needle for sewing
- Stitch markers
- Scissors
- Optional: Small red pompom for nose, or crochet one
🪡 Abbreviations (US Terminology)
- MR = Magic Ring
- ch = chain
- sc = single crochet
- inc = increase (2 sc in same stitch)
- dec = decrease (sc2tog)
- sl st = slip stitch
- BLO = back loops only
- FLO = front loops only
- [ ] = total stitch count
- ( ) x # = repeat instructions in parentheses
🎄 Let’s Start Crocheting!
1. HEAD (Beige/Skin Color)
R1: MR, 6 sc [6]
R2: inc x 6 [12]
R3: (sc, inc) x 6 [18]
R4: (2 sc, inc) x 6 [24]
R5: (3 sc, inc) x 6 [30]
R6-R11: sc around [30] (6 rounds)
R12: (3 sc, dec) x 6 [24]
Insert safety eyes between R8-R9, about 8 stitches apart.
R13: (2 sc, dec) x 6 [18]
Stuff the head firmly.
R14: (sc, dec) x 6 [12]
R15: dec x 6 [6]
FO, close the gap with needle.
2. NOSE (Red)
R1: MR, 6 sc [6]
R2: sc around [6]
FO, leave long tail for sewing.
Sew the nose centered between the eyes, just below them.
3. BODY (Red & White)
The body is worked in a wider, flatter oval shape to create Santa’s coat appearance.
Starting with Red:
R1: MR, 6 sc [6]
R2: inc x 6 [12]
R3: (sc, inc) x 6 [18]
R4: (2 sc, inc) x 6 [24]
R5: (3 sc, inc) x 6 [30]
R6: (4 sc, inc) x 6 [36]
R7-R8: sc around [36]
R9 (White trim for coat bottom): sc around [36]
R10 (Back to Red): sc around [36]
R11-R16: sc around [36] (6 rounds)
R17 (Black belt): sc around [36]
R18 (Back to Red): sc around [36]
R19-R22: sc around [36]
Stuff body firmly.
R23: (4 sc, dec) x 6 [30]
R24: (3 sc, dec) x 6 [24]
FO, leave long tail for sewing to head.
4. LEGS WITH BOOTS (Make 2)
Starting with Black (boots):
R1: MR, 6 sc [6]
R2: inc x 6 [12]
R3: BLO: sc around [12]
R4-R5: sc around [12]
R6: (2 sc, dec) x 3 [9]
R7 (White trim): sc around [9]
R8 (Change to Red for pants): sc around [9]
R9-R14: sc around [9] (6 rounds)
FO, stuff firmly, leave tail for sewing.
5. ARMS WITH HANDS (Make 2)
Starting with Beige:
R1: MR, 6 sc [6]
R2: sc around [6]
R3: sc around [6]
R4 (Change to Red for sleeve): sc around [6]
R5-R10: sc around [6]
R11 (White cuff): sc around [6]
R12 (Back to Red): sc around [6]
FO, stuff lightly (keep arms flexible), leave tail for sewing.
6. SANTA HAT (Red & White)
Starting with Red:
R1: MR, 6 sc [6]
R2: inc x 6 [12]
R3: (sc, inc) x 6 [18]
R4: (2 sc, inc) x 6 [24]
R5: (3 sc, inc) x 6 [30]
R6-R12: sc around [30] (7 rounds)
R13 (White trim): sc around [30]
R14 (White trim): sc around [30]
FO, leave tail.
Make a white pompom and attach to the tip of the hat.
7. BEARD (White)
The beard is worked in rows to create a full, rounded shape.
Ch 16
Row 1: Starting in 2nd ch from hook, sc across [15]
Row 2: ch 1, turn, inc, 13 sc, inc [17]
Row 3: ch 1, turn, inc, 15 sc, inc [19]
Row 4: ch 1, turn, inc, 17 sc, inc [21]
Row 5-R8: ch 1, turn, sc across [21] (4 rows)
Row 9: ch 1, turn, dec, 17 sc, dec [19]
Row 10: ch 1, turn, dec, 15 sc, dec [17]
Row 11: ch 1, turn, dec, 13 sc, dec [15]
FO, leave tail for sewing.
Round the bottom edges by working sc around the perimeter if desired, for a softer look.
8. MUSTACHE (White, Make 2 pieces)
Ch 8
Row 1: Starting in 2nd ch from hook, sc across [7]
Row 2: ch 1, turn, sc across [7]
FO, leave tail.
Make 2 pieces and sew them curving outward above the beard, below the nose.
9. EYEBROWS (White, Make 2)
Ch 6
FO immediately, leaving long tail.
Sew in gentle arcs above each eye.
10. BELT BUCKLE (Yellow/Gold)
Ch 8, sl st to first ch to form a ring (rectangle shape)
R1: ch 1, sc 12 around the ring
FO, leave tail for sewing.
Sew buckle to the center front of the black belt line on the body.
11. COAT TRIM (White)
Create vertical white trim down the center front of Santa’s coat:
Ch 20 (adjust length to fit from neck to bottom of coat)
Row 1: Starting in 2nd ch from hook, sc across [19]
FO, leave tail.
Sew this strip vertically down the center front of the red coat.
12. CUTLERY POUCH (Red)
This is the pocket that holds the silverware, attached to Santa’s back.
R1: MR, 6 sc [6]
R2: inc x 6 [12]
R3: (sc, inc) x 6 [18]
R4: (2 sc, inc) x 6 [24]
R5-R20: sc around [24] (16 rounds, or adjust for the height of your silverware)
FO, leave very long tail for sewing.
Do not stuff the pouch – it needs to remain hollow for the silverware.
🎨 Assembly Instructions
Now comes the fun part – putting Santa together!
Step 1: Attach the Head
Sew the head firmly onto the top of the body using the long tail from the body. Make sure it’s centered and secure.
Step 2: Attach the Legs
Position the legs at the bottom front of the body, slightly apart (like Santa is standing). Sew them securely.
Step 3: Attach the Arms
Sew the arms to either side of the body at shoulder height (around R20-R22 of the body). Position them slightly forward, as if Santa is ready to hold something.
Step 4: Attach the Hat
Place the hat on top of Santa’s head, slightly tilted to one side for that classic droopy Santa hat look. Sew securely around the base.
Step 5: Attach the Beard
Position the beard covering the lower half of the face, from just below the nose. Sew around the edges, leaving it slightly puffy for dimension.
Step 6: Attach the Mustache
Sew the two mustache pieces horizontally above the beard and below the nose, curving them outward.
Step 7: Attach the Eyebrows
Sew the eyebrow pieces in gentle arcs above each eye.
Step 8: Belt and Buckle
The black belt line is already crocheted into the body. Now sew the yellow buckle to the center front.
Step 9: Coat Trim
Sew the white vertical trim strip down the center front of the coat, from neck to hem.
Step 10: Add Cheeks (Optional)
Use pink yarn to add small circular cheeks, or apply makeup blush lightly.
Step 11: Attach the Cutlery Pouch
This is the most important step! Position the pouch on Santa’s back, centered, with the opening at the top. Sew it very securely all around the edges, making sure it’s firmly attached and can support the weight of silverware.
✨ Finishing Touches
- Weave in all loose ends carefully
- Shape the beard to make it full and fluffy
- Adjust the hat so it drapes nicely
- Test the pouch by inserting a fork, knife, or spoon to make sure it’s secure
- Optional: Add a small jingle bell to the hat tip instead of a pompom!
🎁 Display & Use Ideas
These Santa silverware holders are perfect for:
✅ Holiday dinner tables – One at each place setting
✅ Christmas buffets – Display with coordinating cutlery
✅ Handmade gifts – Make a set for loved ones
✅ Holiday decor – Even without silverware, they’re adorable standing decorations
✅ Kids’ table – Children will love having their own Santa
💡 Tips for Success
Color Changes: When switching colors, complete the last stitch of the old color until 2 loops remain on hook, then yarn over with new color and pull through. This creates a clean color change.
Stuffing: Stuff firmly but not overly tight – you want Santa to hold his shape but still have a soft, huggable quality.
Pouch Security: The cutlery pouch must be sewn very securely, as it will bear weight. Use strong thread or double strand of yarn and sew through both the pouch and body multiple times.
Consistent Tension: Keep your tension even throughout for the best results. If one Santa turns out larger than the others, adjust your hook size.
🎄 Variations to Try
Different Santa Styles:
- Use darker skin-tone yarn for diverse representation
- Make Mrs. Claus versions with a dress and bun hairstyle
- Create elves by using green instead of red and adding pointed ears
- Make mini versions for napkin rings instead of silverware
Embellishments:
- Add tiny buttons down the coat front
- Sew on sequin “snowflakes”
- Use textured yarn for the beard and trim
- Add wire to the hat tip so it can be posed
Happy Holidays and Happy Crocheting! 🎅🎄✨


These are so cute I can hardly wait to make them