Keep your holiday movie nights merry and organized with the Amigurumi Santa Couch Arm Remote Holder, a festive and functional crochet creation that brings cheer to your living room! 🎅🛋️ With Santa’s jolly face stitched into a cozy armrest caddy, this clever design keeps your remotes, small gadgets, or even candy canes right within reach. It’s the perfect blend of seasonal charm and everyday convenience—because even Santa needs help keeping track of the remote!
This pattern is a joyful project for crocheters who love combining whimsy with practicality. You can customize Santa’s outfit, add embroidered snowflakes, or even tuck in a mini gift pouch for extra holiday magic. Whether you’re decking the halls or just trying to keep your couch clutter-free, the Santa Couch Arm Remote Holder is a delightful way to stitch up some festive flair—one merry loop at a time! 🧶🎄
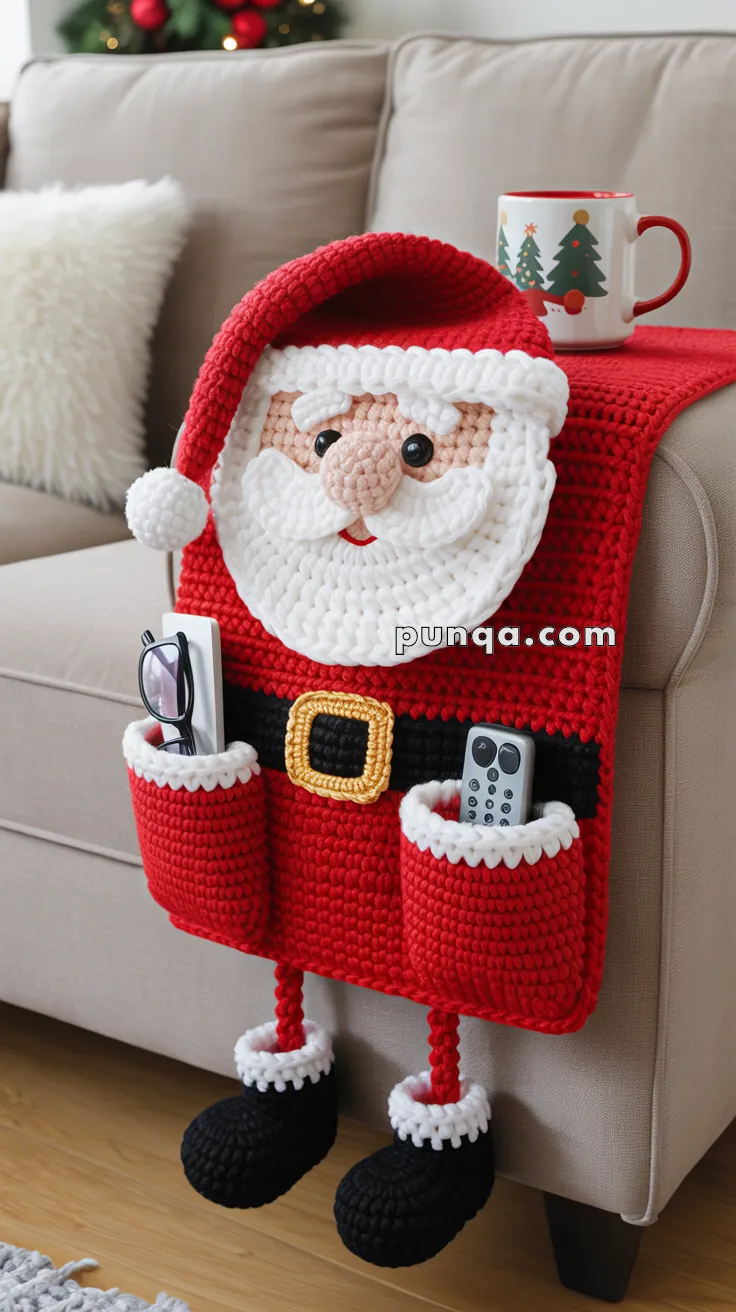
🎅 Crochet Santa Couch Arm Remote Holder Pattern
Keep your living room organized this holiday season with a touch of festive cheer! This Santa couch arm remote holder not only adds a cozy Christmas vibe but also helps you keep remotes, glasses, or phones neatly stored in Santa’s pockets.
✨ Skill Level
Intermediate – includes shaping, appliqué work, textured stitches, and assembly.
📏 Finished Size
- Base panel: Approx. 28–30 inches (71–76 cm) long × 10–12 inches (25–30 cm) wide
- Pockets: Approx. 7–8 inches (18–20 cm) wide × 7–8 inches deep
- Santa face: Approx. 8–9 inches (20–23 cm) diameter
🧶 Materials
- Red yarn (worsted weight, approx. 400g) – base, hat, suit, pockets
- White yarn (worsted weight, approx. 200g) – beard, hat trim, pocket trim, cuffs
- Peach/tan yarn (worsted weight, approx. 100g) – face & nose
- Black yarn (worsted weight, approx. 100g) – belt, boots, eyes (if embroidering)
- Gold/yellow yarn (worsted weight, approx. 20g) – belt buckle
- 18mm black safety eyes (or embroider with black yarn)
- Crochet hook: 5.0mm (H/8) or size needed for gauge
- Yarn needle
- Scissors
- Polyester fiberfill stuffing (for nose & boots)
- Stitch markers (optional)
Gauge
14 sc × 16 rows = 4 inches (10 cm) in single crochet Gauge is important for sizing – adjust hook if needed
📖 Abbreviations (US Terms)
- MR = Magic Ring
- sc = single crochet
- inc = increase (2 sc in one st)
- dec = decrease (sc2tog)
- sl st = slip stitch
- ch = chain
- st(s) = stitch(es)
- hdc = half double crochet
- dc = double crochet
- loop st = loop stitch (insert hook, wrap yarn around finger, pull through loop, complete sc)
- puff st = puff stitch (yo, insert hook, pull up loop) 3 times in same st, yo, pull through all loops
🧵 PATTERN INSTRUCTIONS
🟥 PART 1: Base Panel (Red)
Purpose: This is the main backing that drapes over your couch arm.
Ch 41 (or adjust for your couch arm width – measure and multiply inches × 3.5 for chain count)
Row 1: Sc in 2nd ch from hook, sc across. (40 sc)
Rows 2–120: Ch 1, turn, sc across. (40 sc per row)
Adjust row count for length – measure your couch arm from top to seat and add 6 inches for drape. Typical length: 28–32 inches.
Fasten off, weave in ends.
👤 PART 2: Santa Face (Peach/Tan)
Rnd 1: MR, 6 sc into ring. (6)
Rnd 2: Inc in each st around. (12)
Rnd 3: (Sc, inc) × 6. (18)
Rnd 4: (2 sc, inc) × 6. (24)
Rnd 5: (3 sc, inc) × 6. (30)
Rnd 6: (4 sc, inc) × 6. (36)
Rnd 7: (5 sc, inc) × 6. (42)
Rnd 8: (6 sc, inc) × 6. (48)
Rnd 9: (7 sc, inc) × 6. (54)
Rnd 10: (8 sc, inc) × 6. (60)
Rnds 11–16: Sc around. (60) – 6 rounds even
Fasten off with long tail for sewing.
Face should measure approximately 8–9 inches across.
👃 Nose (Peach/Tan)
Rnd 1: MR, 6 sc. (6)
Rnd 2: Inc around. (12)
Rnd 3: (Sc, inc) × 6. (18)
Rnds 4–6: Sc around. (18) – 3 rounds even
Stuff firmly with fiberfill.
Rnd 7: Dec × 9. (9)
Fasten off, leaving tail. Close opening and sew to center of face.
👀 Eyes
Option 1: Insert 18mm safety eyes between Rnds 11–12 of face, positioned about 10–12 sts apart, slightly above nose.
Option 2: Embroider eyes with black yarn using satin stitch, approximately 1 inch diameter each.
🤍 PART 3: Beard (White, Multi-Layer)
The beard should be full and fluffy! We’ll create it in layers.
Layer 1 (Bottom Layer – Scalloped Edge):
Ch 45
Row 1: Sc in 2nd ch from hook, sc across. (44 sc)
Row 2 (Scallop edge): Skip 1 st, (sc, hdc, 3 dc, hdc, sc) all in next st, skip 1 st, sl st in next st – repeat across for scalloped edge.
Fasten off with long tail.
Layer 2 (Middle Layer – Loop Stitch):
Ch 40
Row 1: Sc in 2nd ch from hook, sc across. (39 sc)
Rows 2–3: Loop st across (wrap yarn around finger before pulling through to create loops). (39 loop sts per row)
Fasten off with long tail.
Layer 3 (Top Layer – Fluffy Texture):
Ch 35
Row 1: Sc in 2nd ch from hook, sc across. (34 sc)
Row 2: Loop st across. (34 loop sts)
Fasten off with long tail.
Assembly: Stack layers with Layer 1 (longest) at bottom, Layer 2 in middle, Layer 3 on top. Sew all three layers together at the top edge, then position under Santa’s face in a curved, cloud-like shape. The beard should cover the lower third of the face.
👨 Mustache (White, Make 2)
Ch 12
Row 1: Sc in 2nd ch from hook, sc in next st, hdc in next 3 sts, dc in next 3 sts, hdc in next 2 sts, sc in last st.
Row 2: Ch 1, turn, loop st across for texture.
Fasten off.
Sew one piece on each side of nose, curving upward slightly.
🤨 Eyebrows (White, Make 2)
Ch 10
Sc across.
Fasten off.
Sew above eyes in gentle curve.
🎅 PART 4: Santa Hat (Red with White Trim)
Hat Body (Red):
Rnd 1: MR, 6 sc. (6)
Rnd 2: (Sc, inc) × 3. (9)
Rnd 3: (2 sc, inc) × 3. (12)
Rnd 4: (3 sc, inc) × 3. (15)
Continue increasing 3 sts per round until you reach 60 sts (to match face width).
Continue working even (60 sc per round) for 10–12 inches to create the tall hat shape.
Fasten off with long tail.
Hat Trim (White – Fluffy):
Join white yarn at bottom edge of hat.
Rnd 1: Loop st around. (60 loop sts)
Rnd 2: Loop st around. (60 loop sts)
Rnd 3: Sc around. (60 sc)
Fasten off.
Pom-Pom (White):
Rnd 1: MR, 6 sc. (6)
Rnd 2: Inc around. (12)
Rnd 3: (Sc, inc) × 6. (18)
Rnds 4–5: Sc around. (18)
Stuff firmly.
Rnd 6: Dec × 9. (9)
Rnd 7: Dec × 4, sc. (5)
Fasten off, close opening.
Sew pom-pom to tip of hat.
⬛ PART 5: Belt & Buckle
Belt (Black):
Ch 41 (to match base width)
Row 1: Sc in 2nd ch from hook, sc across. (40 sc)
Rows 2–6: Ch 1, turn, sc across. (40 sc per row) – 6 rows total for thick belt
Fasten off with long tail.
Buckle Frame (Gold/Yellow):
Ch 15
Row 1: Sc in 2nd ch from hook, sc across. (14 sc)
Rows 2–3: Ch 1, turn, sc across. (14 sc)
Row 4: Ch 1, turn, sc across top edge.
Continue around edges: Sc evenly around all 4 sides to create rectangular frame.
Fasten off.
Buckle Center Square (Black):
Ch 9
Rows 1–6: Sc across. (8 sc per row)
Fasten off.
Sew black center square inside gold frame. Attach buckle to center of belt.
🟥 PART 6: Pockets (Make 2, Red with White Trim)
Ch 30
Row 1: Sc in 2nd ch from hook, sc across. (29 sc)
Rows 2–30: Ch 1, turn, sc across. (29 sc per row) – 30 rows total
Pockets should measure approximately 8 inches wide × 8 inches tall.
Fasten off.
Pocket Trim (White – Fluffy):
Join white yarn at top edge of pocket.
Row 1: Loop st across. (29 loop sts)
Row 2: Loop st across. (29 loop sts)
Fasten off.
Make 2 pockets total.
🦵 PART 7: Legs (Make 2, Red with White Cuffs)
Ch 30
Row 1: Sc in 2nd ch from hook, sc across. (29 sc)
Rows 2–4: Ch 1, turn, sc across. (29 sc) – creates strap
Switch to white for cuff:
Rows 5–7: Ch 1, turn, loop st across. (29 loop sts per row) – 3 rows fluffy cuff
Fasten off with long tail.
Make 2 legs total.
🥾 PART 8: Boots (Make 2, Black)
Rnd 1: MR, 8 sc. (8)
Rnd 2: Inc around. (16)
Rnd 3: (Sc, inc) × 8. (24)
Rnd 4: (2 sc, inc) × 8. (32)
Rnds 5–8: Sc around. (32) – 4 rounds even
Rnd 9: (2 sc, dec) × 8. (24)
Rnd 10: (Sc, dec) × 8. (16)
Rnds 11–12: Sc around. (16)
Stuff boot firmly with fiberfill.
Flatten top opening and sl st across to close. This creates the boot shape.
Fasten off with long tail.
Make 2 boots total.
🧩 ASSEMBLY
Follow these steps carefully for best results:
Step 1: Position Face
Lay base panel flat. Position Santa face in the upper third of the panel (approximately 6–8 inches from the top edge). Pin in place and sew securely around all edges using whip stitch or running stitch.
Step 2: Attach Facial Features
- Sew nose to center of face
- Attach beard layers under face, creating a fluffy cloud shape
- Sew mustache pieces on either side of nose
- Sew eyebrows above eyes
- Ensure eyes are secure (if using safety eyes, they should already be inserted)
Step 3: Attach Hat
Position hat above face, tilting it slightly to one side for character. Sew around the bottom edge of hat trim, attaching it to the base panel. The hat should overlap the top of the face slightly.
Step 4: Attach Belt
Position belt horizontally across the panel, just below the beard (approximately at the middle of the base panel). Sew along top and bottom edges of belt. Attach buckle to center front of belt.
Step 5: Attach Pockets
Position two pockets side by side below the belt, evenly spaced. Leave approximately 2–3 inches between pockets. Sew along bottom and side edges of each pocket, leaving the top open for storage. Reinforce corners with extra stitches.
Step 6: Attach Legs
Position legs at the bottom edge of the base panel, centered under each pocket. Sew the red portion of each leg securely to the base panel.
Step 7: Attach Boots
Sew one boot to the white cuff at the bottom of each leg. Make sure boots dangle freely and are securely attached.
Step 8: Final Check
- Ensure all pieces are securely sewn
- Weave in all remaining ends
- Trim any excess yarn
- Test pockets to ensure they’re functional
🎄 TIPS & VARIATIONS
✨ For Extra Fluffiness: Cut loops after completing loop stitch rows and brush with a pet slicker brush for a fuller beard and trim.
✨ Alternative Eyes: Use buttons for a vintage look, or embroider them for child safety.
✨ Personalization: Add a jingle bell to the hat pom-pom, or embroider Santa’s name on the belt.
✨ Sizing: Measure your specific couch arm and adjust the base panel length accordingly before starting.
✨ Stiffening: For pockets that hold their shape better, line them with a piece of plastic canvas cut to size before attaching.
🌟 Your Santa Couch Arm Remote Holder is Complete!
This festive organizer will keep your remotes, glasses, phones, and treats handy all season long. Drape it over your couch arm and enjoy the holiday cheer! 🎅🎄