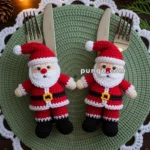
Bring a jolly twist to your holiday table with this Amigurumi Santa Claus Cutlery Holder—a festive little helper who’s ready to serve up smiles along with your silverware! 🎅🍴 With his fluffy beard, rosy cheeks, and classic red suit, this cheerful Santa adds a handmade touch of magic to every place setting. Whether you’re hosting a cozy Christmas dinner or crafting seasonal décor, he’s the perfect blend of charm and functionality.
Designed to cradle your cutlery with holiday flair, this pattern invites playful customization—add sparkly yarn for his belt, embroider twinkling eyes, or tuck a tiny candy cane into his pocket for extra sweetness. Make a matching set for the whole family or mix in other festive characters for a full crochet tablescape. Whether gifted, displayed, or used to surprise your guests, this Santa Claus Cutlery Holder is a joyful and satisfying project—perfect for stitching up a little holiday cheer, one loop at a time! 🧶🎄✨

🎅 Amigurumi Santa Claus Cutlery Holder Crochet Pattern
Add festive cheer to your holiday table with this adorable Santa Claus cutlery holder! This jolly Santa doubles as a practical utensil pouch while bringing Christmas spirit to your décor. Let’s crochet him step by step.
✂️ Skill Level
Intermediate – includes shaping, color changes, and detailed assembly.
📏 Finished Size
Approx. 26–28 cm (10–11 in) tall when made with DK yarn and a 2.75–3 mm hook.
🧶 Materials
Yarn (DK weight cotton or acrylic):
- Red – suit, hat, pants, arms, sack
- White – beard, trims, cuffs, edges, pom-pom
- Beige – face, ears, hands
- Black – boots, belt
- Yellow – buckle
Other Supplies:
- Crochet hook: 2.5–3 mm
- 10–12 mm black safety eyes
- Fiberfill stuffing
- Yarn needle & stitch marker
- Scissors
- Optional: blush for cheeks
- Optional: stiff insert for sack rim
🧵 Abbreviations (US Terms)
MR – Magic Ring
sc – Single Crochet
inc – Increase (2 sc in same st)
dec – Decrease (sc 2 together)
ch – Chain
sl st – Slip Stitch
BLO – Back Loop Only
FO – Fasten Off
👨🦳 Head (Beige)
R1 – MR 6 sc (6)
R2 – inc × 6 (12)
R3 – (sc, inc) × 6 (18)
R4 – (2 sc, inc) × 6 (24)
R5 – (3 sc, inc) × 6 (30)
R6–R12 – sc around (30)
Insert safety eyes between R9–R10, about 7 stitches apart.
R13 – (3 sc, dec) × 6 (24)
R14 – (2 sc, dec) × 6 (18)
Stuff firmly.
R15 – (sc, dec) × 6 (12)
R16 – dec × 6 (6)
FO and close.
👃 Nose (Beige)
R1 – MR 6 sc (6)
R2 – (sc, inc) × 3 (9)
R3 – sc around (9)
FO and sew slightly below eye line.
Stuff lightly for a raised shape.
🧔 Beard, Mustache & Eyebrows (White)
Beard:
Ch 18.
Row 1 – sc in each ch (17).
Row 2 – inc at both ends, sc across.
Row 3 – sc across.
Row 4 – inc at both ends again for rounded bottom.
Row 5 – sc across, trim to fit jaw.
Stuff slightly at center for fullness.
Sew covering chin and cheeks as shown in photo.
Mustache:
Make 2.
Ch 7, sc across.
Curve gently upward and sew just above beard center.
Eyebrows (Optional):
Ch 4, sc back.
Sew arched above eyes (hidden under hat brim).
👄 Mouth
Use red thread or embroidery floss.
Stitch a small curved smile under mustache.
🎅 Santa Hat (Red with White Trim)
R1 – MR 6 sc (6)
R2 – (sc, inc) × 3 (9)
R3 – sc around (9)
R4 – (2 sc, inc) × 3 (12)
R5–R7 – sc around (12)
R8 – (3 sc, inc) × 3 (15)
R9–R11 – sc around (15)
R12 – (4 sc, inc) × 3 (18)
Continue increasing every few rounds until 42 sts.
R25 – sc around (42)
Switch to white: R26 – BLO sc around (42).
FO.
Add white pom-pom at tip.
Let hat droop slightly to Santa’s right side.
👕 Body (Red with Built-In Black Belt)
R1 – MR 6 sc (6)
R2 – inc × 6 (12)
R3 – (sc, inc) × 6 (18)
R4 – (2 sc, inc) × 6 (24)
R5 – (3 sc, inc) × 6 (30)
R6 – (4 sc, inc) × 6 (36)
R7–R12 – sc around (36)
Switch to black for belt area:
R13–R14 – sc around (36)
Switch back to red:
R15–R21 – sc around (36)
Switch to white:
R22 – (sc, hdc, sc in same st, sl st next) × repeat for scalloped trim.
Stuff body firmly.
👖 Legs (Red Pants with White Cuffs)
Make 2 identical.
R1 – MR 6 sc (6)
R2 – inc × 6 (12)
R3 – (1 sc, inc) × 6 (18)
R4–R6 – sc around (18)
Switch to white:
R7 – sc around (18) → ankle cuffs
Switch to red:
R8–R18 – sc around (18)
FO first leg.
Do not cut yarn on second leg.
Join Legs to Body:
R19 – ch 3, join first leg, sc around both legs (39 total).
R20–R25 – sc around (39).
Stuff legs and lower torso firmly.
🥾 Boots (Black)
Make 2 identical.
R1 – MR 6 sc (6)
R2 – inc × 6 (12)
R3 – (1 sc, inc) × 6 (18)
R4–R6 – sc around (18)
R7 – (4 sc, dec) × 3 (15)
R8 – sc around (15)
R9 – (3 sc, dec) × 3 (12)
Stuff firmly and sew to bottom of white cuffs.
🧤 Arms (Beige → White → Red)
Make 2 identical.
R1 – MR 6 sc (6)
R2 – inc × 6 (12)
R3 – (2 sc, dec) × 3 (9)
Switch to white:
R4–R5 – sc around (9) → sleeve cuffs
Switch to red:
R6–R13 – sc around (9)
Stuff lightly.
FO and sew to sides of body.
Optional: Embroider a small “Y” line to define thumb.
🧣 Belt Buckle (Yellow, Flat Rectangle)
Ch 8.
Row 1 – sc in 2nd ch and across (7), ch 1, turn.
Row 2 – sc across (7), ch 1, turn.
Row 3 – sc across (7).
FO.
Sew flat onto the black belt area.
🎁 Santa’s Sack Cutlery Holder (Red)
R1 – MR 6 sc (6)
R2 – inc × 6 (12)
R3 – (sc, inc) × 6 (18)
R4 – (2 sc, inc) × 6 (24)
R5 – (3 sc, inc) × 6 (30)
R6 – (4 sc, inc) × 6 (36)
R7 – (5 sc, inc) × 6 (42)
R8–R25 – sc around (42)
FO and weave end.
Insert optional stiffener at rim for structure.
Sew securely to Santa’s back with open top facing upward.
Ensure sack stands slightly taller than shoulders, as shown in the photo.
🧩 Assembly
1️⃣ Sew head to body.
2️⃣ Attach beard, mustache, and (optional) eyebrows.
3️⃣ Stitch mouth and nose in place.
4️⃣ Sew hat onto head; bend tip naturally to right.
5️⃣ Attach arms at shoulder level.
6️⃣ Sew boots to leg bottoms.
7️⃣ Sew buckle flat onto the black belt area.
8️⃣ Attach sack to back.
🎄 Finishing Touches
- Lightly blush cheeks for warmth.
- Shape beard to be full and rounded; you may lightly stuff behind center.
- Straighten hat trim evenly around head.
- Adjust sack rim to remain open for cutlery.
- Place utensils inside for display.
🌟 Result
✔ Red suit with separate pants and white cuffs
✔ Distinct black boots attached under pants
✔ Built-in black belt with flat yellow buckle
✔ Full rounded beard and curved mustache
✔ Optional subtle eyebrows under hat brim
✔ Large red sack for utensils
🥰 Final Words
Your Amigurumi Santa Claus Cutlery Holder is ready to spread Christmas cheer! This project makes a thoughtful handmade gift and a practical holiday decoration that will surely impress your guests.