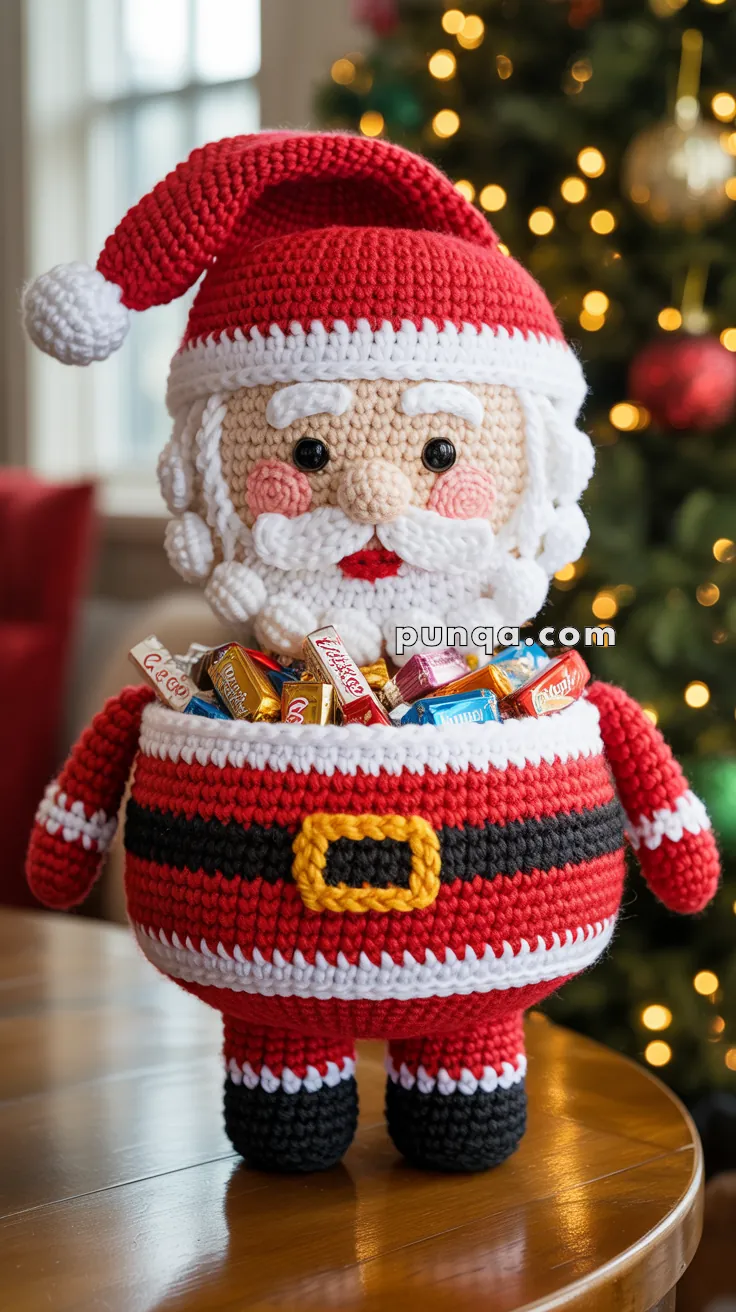
Sweeten up your holiday décor with the Amigurumi Santa Candy-Bowl, a crochet project that’s as festive as it is functional! 🎅🧶 With his rosy cheeks, curly beard, soft draping hat, round tummy, and adorable tiny legs, this cheerful Santa is ready to spread joy while keeping your favorite chocolates close at hand. He’s the perfect blend of playful design and practical use, making him a delightful centerpiece for any Christmas gathering.
Whether perched on a table, greeting guests at the entryway, or gifted to someone who loves whimsical handmade treasures, this candy-holding Santa is sure to make everyone smile. Easy to display and brimming with personality, the Amigurumi Santa Candy-Bowl is a joyful way to crochet celebration, sweetness, and a sprinkle of handmade magic—one loop at a time! 🍫✨🎄
🎅 Santa Candy Bowl Amigurumi Pattern
Create a delightful centerpiece for the holidays with this charming Santa candy bowl! With its round belly basket, soft textured beard, cozy red suit, and friendly expression, this Santa is both decorative and functional. He’s perfect for greeting guests, holding treats, or adding festive warmth to your holiday display. Every detail—from the draped hat to the curly beard—brings extra personality and handcrafted magic to your seasonal decor.
✨ Skill Level
Intermediate — includes shaping, structured bowl reinforcement, facial layering, and accessory construction.
📏 Finished Size
Measures approximately 30–33 cm (12–13″) tall including hat.
🧶 Materials
Worsted weight (4) yarn:
- Red – suit, hat, arms
- White – beard, hat brim, suit trim, bowl rim
- Beige – face
- Black – boots, belt
- Yellow – buckle
- Pink – cheeks
Hooks:
- 4.0 mm (main)
- 3.0 mm (details)
Notions:
- 14 mm safety eyes
- Polyfill stuffing
- Plastic canvas or a lightweight plastic bowl for inner structure
- Yarn needle
- Scissors
- Optional: glass microbeads or rice for weight fully enclosed in fabric pouch
Total yarn needed: around 180–200 g
🔤 Abbreviations (US Terms)
MR — magic ring
sc — single crochet
inc — increase (2 sc in same st)
dec — invisible decrease
ch — chain
sl st — slip stitch
FO — fasten off
BLO — back loop only
😊 Head (Beige)
R1: MR 6
R2: inc ×6 = 12
R3: (sc, inc) ×6 = 18
R4: (2 sc, inc) ×6 = 24
R5: (3 sc, inc) ×6 = 30
R6: (4 sc, inc) ×6 = 36
R7: (5 sc, inc) ×6 = 42
R8–R15: sc 42
Insert 14 mm eyes between R11–12, about 8–9 stitches apart.
R16: (5 sc, dec) ×6 = 36
R17: (4 sc, dec) ×6 = 30
R18: (3 sc, dec) ×6 = 24
R19: (2 sc, dec) ×6 = 18
Stuff firmly.
R20: (sc, dec) ×6 = 12
R21: dec ×6 = 6
FO and close.
😊 Nose (Beige)
R1: MR 6
R2: inc ×6 = 12
R3–R4: sc 12
R5: (sc, dec) ×4 = 8
Lightly stuff and sew in center of face.
💗 Cheeks (Pink, make 2)
R1: MR 7 (7)
FO and sew under eyes.
🤍 Eyebrows (White, make 2)
Ch 8
Row 1: sc 7
FO and sew flat above each eye.
🤍 Side Hair Curls (White, make 2)
R1: MR 6
R2: sc around (6)
FO and attach on each side of the face at eye level.
🤍 Mustache (Make 2)
R1: MR 6
R2: inc ×6 = 12
R3: (sc, inc) ×6 = 18
R4: sc around (18)
Sew both halves together under the nose.
🤍 Beard Curls (Make 8–10)
R1: MR 6
R2: sc 6
R3: sc 6
FO and gather into a cluster below the mustache.
🎅 Hat
Hat Cone (Red)
R1: MR 6
R2: (sc, inc) ×3 = 9
R3: (2 sc, inc) ×3 = 12
R4–5: sc 12
R6: (3 sc, inc) ×3 = 15
R7–9: sc 15
R10: (4 sc, inc) ×3 = 18
R11–16: sc 18
R17: (5 sc, inc) ×3 = 21
R18–25: sc 21
R26: (6 sc, inc) ×3 = 24
R27–35: sc 24
Continue adding straight rounds until hat is long enough to bend naturally forward.
White Hat Brim
Attach white yarn at base.
R1: sc around
R2: sc around
R3: sl st around
FO.
Pom-Pom Ball
R1: MR 6
R2: inc ×6 = 12
R3: sc 12
R4: dec ×6 = 6
FO and sew.
🎅 Arms (Make 2)
R1: MR 6
R2: inc ×6 = 12
R3–12: sc 12
Change to white
R13–14: sc 12
Stuff lightly, FO, and attach just below the bowl rim.
🥾 Legs (Make 2)
Boots (Black)
R1: MR 6
R2: inc ×6 = 12
R3: (sc, inc) ×6 = 18
R4–6: sc 18
White Trim
R7: change to white, BLO sc 18
R8: sc 18
Red Legs
R9–R15: change to red, sc 18
FO and stuff firmly.
🍬 Structured Candy Bowl Body
Bottom Base (Red)
R1: MR 6
R2: inc ×6 = 12
R3: (sc, inc) ×6 = 18
R4: (2 sc, inc) ×6 = 24
R5: (3 sc, inc) ×6 = 30
R6: (4 sc, inc) ×6 = 36
R7: (5 sc, inc) ×6 = 42
R8: (6 sc, inc) ×6 = 48
R9: (7 sc, inc) ×6 = 54
R10: BLO sc 54
Bowl Walls (Red, Black, Red)
R11–R18: red sc 54
R19–R21: black sc 54
R22–R30: red sc 54
White Rim
R31–R32: white sc around
R33: sl st around
FO.
🖤 Belt Strap (Black)
Ch 54
Row 1: sc 53
Row 2: sc 53
Attach around bowl.
💛 Buckle (Yellow)
Ch 20, join
R1: sc around
R2: sc around
FO and attach on belt front.
🧱 Making the Candy Bowl Firm & Steady
Choose one stabilizer method:
Option A – Plastic Bowl Insert (best look)
Place a lightweight plastic bowl inside the crocheted belly.
Option B – Plastic Canvas Wall
Cut a strip of plastic canvas the same height as bowl walls and curve it inside.
Option C – Cardboard + Plastic Canvas Base
Cut a round base to insert at the bottom.
✔ The structure keeps the bowl perfectly round
✔ Candy weight won’t collapse the walls
✔ Santa stays upright and sturdy
🧱 How to Keep the Amigurumi Standing
Inside the base:
- Add a circle of plastic canvas.
- Create a small pouch filled with beans or microbeads.
Sew it shut securely and place at the bottom. - Stuff legs extra firmly.
- Attach legs directly under the reinforced base for proper balance.
🧷 Assembly
- Sew legs evenly under the reinforced bowl base.
- Insert bowl stabilizer.
- Sew arms onto sides just below the white rim.
- Attach the belt and buckle.
- Sew the head on top so part of the beard rests slightly over the rim.
- Attach side curls, mustache, beard cluster, cheeks, eyebrows, and nose.
- Add the small red mouth.
- Place hat on the head, bend forward, and secure with a hidden stitch.
- Attach pom-pom.
Your Santa is ready to be filled with candies or treats!
🎁 Final Touches
Give Santa a gentle shaping squeeze, fluff his beard curls, and fill his bowl with wrapped goodies. He creates the warmest welcome on an entry table, fireplace mantle, or Christmas buffet. This cheerful little helper is sure to bring smiles and holiday spirit to everyone who passes by.


super merci