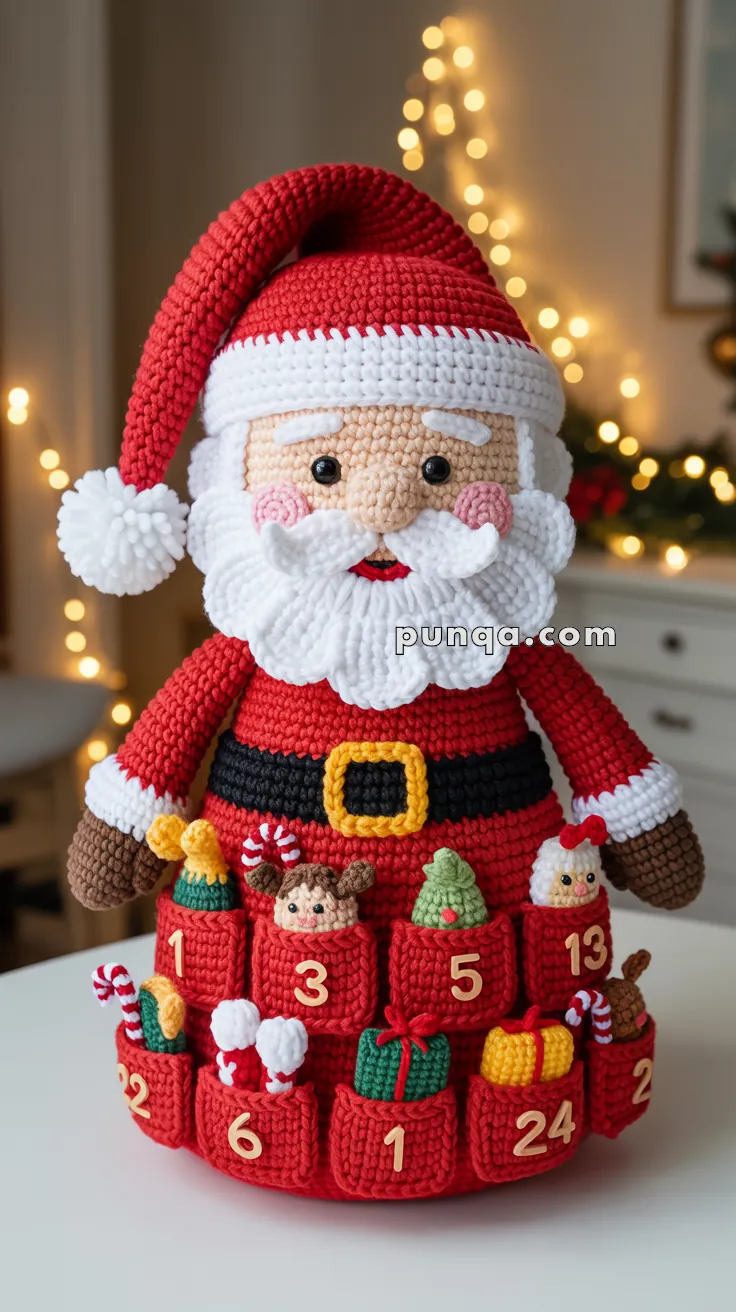
Celebrate the countdown to Christmas in the most festive way with the Amigurumi Santa Advent Calendar, a crochet project that’s as joyful as it is eye-catching! 🎅🧶 This large, plush Santa features a sculpted face, a curved hat, layered fluffy beard, and soft side hair, all brought together in a bell-shaped body that’s brimming with holiday charm. With 24 neatly stitched pockets, he’s ready to hold tiny surprises and treats, making each day of December feel extra magical.
Perfect as a centerpiece for your holiday décor, this Santa Advent Calendar is both practical and whimsical. Whether displayed in the living room, gifted to loved ones, or treasured as a handmade heirloom, the Amigurumi Santa Advent Calendar is a delightful way to crochet tradition, coziness, and a sprinkle of handmade magic—one loop at a time! 🎄✨🧵
🎅🏻Amigurumi Santa Advent Calendar Crochet Pattern
There’s something truly heartwarming about creating a handmade holiday piece that becomes part of the family traditions. This plush Santa Advent Calendar is designed to feel as magical as it looks — soft chenille textures, a sculpted friendly face, a curved drooping hat, and a beautifully flared advent body with twenty-four charming pockets. Each pocket can be filled with miniature toys, treats, or surprises, and this version includes an optional set of tiny crochet items to match the festive scene in the inspiration photo. Whether displayed on a wall, hanging from a door, or gifted to someone special, this Santa brings handmade warmth and joy to the holidays.
✂️ Skill Level
Advanced — includes sculpting, shaping, layered textures, shaping bends in chenille, and miniature toy construction.
📏 Finished Size
Using super bulky chenille yarn + 6.5 mm hook:
- Height: 55–65 cm
- Width: 32–38 cm
- Pocket size: 4.5–5 cm
Mini toys measure 3–6 cm.
🧶 Materials
Yarn
- Super Bulky Chenille:
- Red – body, hat, pockets (250–300 g)
- White – beard, hat brim, eyebrows, side hair, cuffs (150 g)
- Beige – face (50 g)
- Black – belt (40 g)
- Brown – mittens (30 g)
- DK/Worsted Yarn:
- Cream/white – pocket numbers
- Green, red, brown, yellow – mini toys
- Beige – mini faces
Hooks
- 6.0–7.0 mm (main chenille work)
- 2.5–3.5 mm (mini toys + numbers)
Notions
14 mm safety eyes
Tapestry needle
Stuffing
Small cardboard/plastic circle (optional for base)
Blush or fabric paint
🔤 Abbreviations
sc – single crochet
inc – increase
dec – decrease
sl st – slip stitch
ch – chain
MR – magic ring
FLO – front loop only
BLO – back loop only
( ) – repeat instructions
[ ] – final stitch count
👤 Head (Beige)
- MR 6 [6]
- inc x6 [12]
- (sc, inc) x6 [18]
- (2 sc, inc) x6 [24]
- (3 sc, inc) x6 [30]
- (4 sc, inc) x6 [36]
- (5 sc, inc) x6 [42]
8–14. sc around [42]
Place safety eyes between R10–11, spaced 7 stitches apart.
- (5 sc, dec) x6 [36]
- (4 sc, dec) x6 [30]
Lightly stuff. - (3 sc, dec) x6 [24]
- (2 sc, dec) x6 [18]
Fasten off and close.
🎨 Face Sculpting
Thread a long beige strand:
- Insert at back of head; exit beside right eye.
- Loop under eye and re-enter one stitch away. Pull gently to sink.
- Repeat for left eye.
- Tie off at back and hide ends.
👃 Nose
- MR 6
- (sc, inc) x3 [9]
- sc around
Stuff lightly and sew between eyes.
🤍 Eyebrows (White, Puffy)
Make 2:
- MR 4 [4]
- inc x4 [8]
- sc around [8]
Flatten slightly and sew above each eye.
🤍 Side Hair (White)
Make 2:
- MR 5 [5]
- (sc, inc) x2, sc [7]
- sc around [7]
Sew to each side of head under hat line.
😄 Mouth
Use thin red yarn.
Embroider a small curved smile just under the mustache location.
🧔 Layered Scallop Beard (White)
Top Beard Layer
- Ch 28
- Rows 1–3: sc across [27]
Scallops along one edge:
(sc, 3 dc, sc in same st), skip 2 sts → repeat.
Lower Beard Layer
- Ch 22
- Rows 1–3: sc across [21]
Work scallops same as above.
Sew layers overlapping naturally.
👨🦰 Mustache (White)
- Ch 16
- Work across: sc, hdc, dc, dc, dc, hdc, sc, then repeat mirrored shaping.
Curve and sew above beard.
🎅 Curved Hat (Red)
Start cone:
- MR 4
- sc around [4]
- (sc, inc) x2 [6]
- sc around
- (2 sc, inc) x2 [8]
- sc around
- (3 sc, inc) x2 [10]
Continue increasing every 2–3 rounds until ~30–34 sts.
Work even rounds for slouch.
Curved shaping:
On the side that will bend, work 5–7 BLO stitches for 3–4 rows.
🤍 Hat Brim (White)
Attach white yarn:
- sc around
- (sc, inc) around for puff
- sc around
Add pom-pom to tip.
🧥 Body – Bell Shape (Red)
- MR 6
- inc x6 [12]
- (sc, inc) x6 [18]
- (2 sc, inc) x6 [24]
- (3 sc, inc) x6 [30]
- (4 sc, inc) x6 [36]
- (5 sc, inc) x6 [42]
- (6 sc, inc) x6 [48]
- (7 sc, inc) x6 [54]
- (8 sc, inc) x6 [60]
Work 8–12 rounds of sc even.
Add bell flare:
Next round BLO sc.
Work 3–5 more rounds of sc.
Optional: insert cardboard base.
🖤 Belt
- Ch length matching body circumference
- Rows 1–3: sc across
Wrap and sew at mid-body.
🟨 Buckle
- Ch 16
- Rows 1–3: sc across
Sew as a square at center. Add inner bars with surface crochet if desired.
🤲 Arms (Red + White + Brown)
Sleeves:
- MR 6
- (sc, inc) x3 [9]
3–7. sc around
Cuffs:
Switch white for 2 rounds sc.
Mittens:
- MR 6
- (sc, inc) x3 [9]
3–4. sc around
Lightly stuff; attach to cuffs and then to body.
🎁 Advent Pockets × 24 (Red)
- Ch 8
- Rows 1–4: sc across [7]
Sew pockets in straight rows, leaving the top open.
🔢 Pocket Numbers (Cream/White)
Each advent pocket is finished with a number from 1–24. For the clearest, most traditional look, use cream or white yarn, which stands out beautifully against the red pockets. Below are several numbering methods so you can choose the finish that best suits your project or matches the style seen in the inspiration photo.
Option A – Crocheted Appliqué Numbers (DK Yarn)
This method creates soft, slightly raised numbers that look clean and handmade.
- Use cream DK yarn and a 2.5–3.5 mm hook.
- Create thin bars: ch 6–8 → sc back along the chain.
- Shape digits by sewing bar pieces together.
- Keep stitches tight so the numbers remain crisp and legible.
This creates a flat appliqué similar to cut felt, while still fully crocheted.
Option B – Embroidered Numbers
This is the closest match to the inspiration picture, which features smooth, flat, perfectly shaped digits.
- Use cream or white embroidery thread or thin yarn.
- Work numbers directly onto pocket fronts.
- Use backstitch or chain stitch for clean outlines.
- Add a light shadow stitch with a slightly darker cream for extra definition (optional).
This method is fast, precise, and produces beautifully readable numbers.
Option C – Felt or Faux-Felt Numbers
The reference image appears to use flat cut appliqué-style numbers. If you want the closest match:
- Cut numbers from cream felt or faux-felt.
- Keep edges clean and rounded.
- Glue or sew onto each pocket.
- Use fabric glue for a smooth, permanent finish.
This option creates the crispest, clearest numbers and is extremely quick to apply.
Option D – Surface Slip Stitch Numbers
For crocheters who want numbers attached without sewing separate appliqués:
- Work the pocket in red.
- With cream yarn, use slip stitch embroidery to “draw” the number directly onto the crocheted surface.
- Keep tension even to avoid puckering.
This produces a flat, modern look with minimal bulk.
Option E – Pre-Made Wooden or Faux-Wood Tags (Decorative Variation)
For a rustic, Scandinavian-inspired look:
- Use small flat wooden number tags.
- Glue or stitch onto the pocket.
- Choose cream, beige, or natural wood tones to match the photo’s aesthetic.
This adds a charming texture contrast to the chenille.
Placement
Attach numbers 1–24 starting at the bottom row and working upward. This creates the classic advent countdown layout and frames Santa’s body beautifully.
✨ Mini Pocket Toys (DK Yarn)
These toys are optional but match the visual style of the reference. They fit neatly into the 24 pockets.
🍬 Candy Cane
- With white ch 12.
- sc row.
- Switch red → sc row.
- Switch white → sc row.
- Switch red → sc row.
Bend top into cane shape.
🎄 Mini Christmas Tree
Cone:
- MR 4
- (sc, inc) to 6
- sc
- (2 sc, inc) to 8
- sc
- (3 sc, inc) to 10
- sc
Trunk:
- MR 5
- sc around for 2 rounds
Decorate with small French knots.
🎁 Mini Present
- Ch 5
- Work 4 rows sc → small rectangle
Fold into cube, sew edges, lightly stuff.
Wrap with contrasting yarn as ribbon.
🧝 Mini Elf / Child Figure
Head:
- MR 6
- (sc, inc) to 9
- sc
- (sc, dec) to 6
Body:
- MR 5
- sc
- (sc, inc) to 7
- sc
- (sc, dec) to 5
Arms:
Ch 5 → sc back. Make 2.
Hat:
- MR 3
- sc
- (sc, inc) to 4
Sew head ↔ body; attach arms & hat.
🎅 Mini Santa
Follow Mini Elf instructions but use:
- Red body
- White beard: small scallop (sc, 2 dc, sc)
- Mini hat with tiny pom-pom
- Black yarn belt
🦌 Mini Reindeer
Head:
- MR 6
- (sc, inc) to 9
- sc
- (sc, dec) to 6
Body:
- MR 5
- sc
- (sc, inc) to 7
- sc
- (sc, dec) to 5
Antlers:
Ch 5 → sl st back.
Add tiny branch if desired.
Add embroidered nose & simple legs (chains sewn underneath).
🧵 Final Assembly
- Sew head onto top of body.
- Attach side hair, beard layers, mustache, eyebrows, and nose.
- Add mouth and blush.
- Position hat and secure, shaping curve forward.
- Attach arms.
- Sew belt and buckle.
- Sew pockets in rows.
- Add numbers.
- Fill pockets with mini toys.
🎉 Closing Notes
This Santa Advent Calendar is designed to be a treasured, reusable keepsake that brings charm and anticipation to the holiday season. With its soft textures, friendly face, and a full set of delightful mini toys tucked into the pockets, it becomes more than a decoration — it becomes part of the joy of counting down to Christmas. Whether made for your own home or gifted to someone special, this Santa is sure to spark smiles every December.