Welcome to the delicious and whimsical world of amigurumi! 🥪✨ Today, I’m excited to share my free crochet pattern for an Amigurumi Sandwich—a fun and textured creation perfect for food lovers, playful décor, or anyone who enjoys crafting adorable and lifelike plush designs! 🧶 Whether you love stitching up miniature treats, experimenting with layered textures, or simply want to add a cute sandwich to your handmade lineup, this pattern will guide you through crafting a beautifully sculpted plush with soft bread slices, colorful fillings, and a touch of handmade charm! 🍅
This design embraces warm colors, stacked shaping, and delightful details to bring a comforting and quirky presence to your crochet projects! 🧶✨ I’ve carefully outlined each step to ensure your Amigurumi Sandwich turns out just right—ready to brighten up your space or become a treasured handmade gift! 🎁 So grab your hooks, pick out golden browns, fresh greens, and vibrant reds, and let’s stitch up a tasty sandwich! 🥪
🥪 Amigurumi Sandwich – Free Crochet Pattern
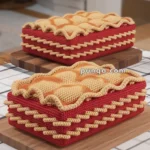
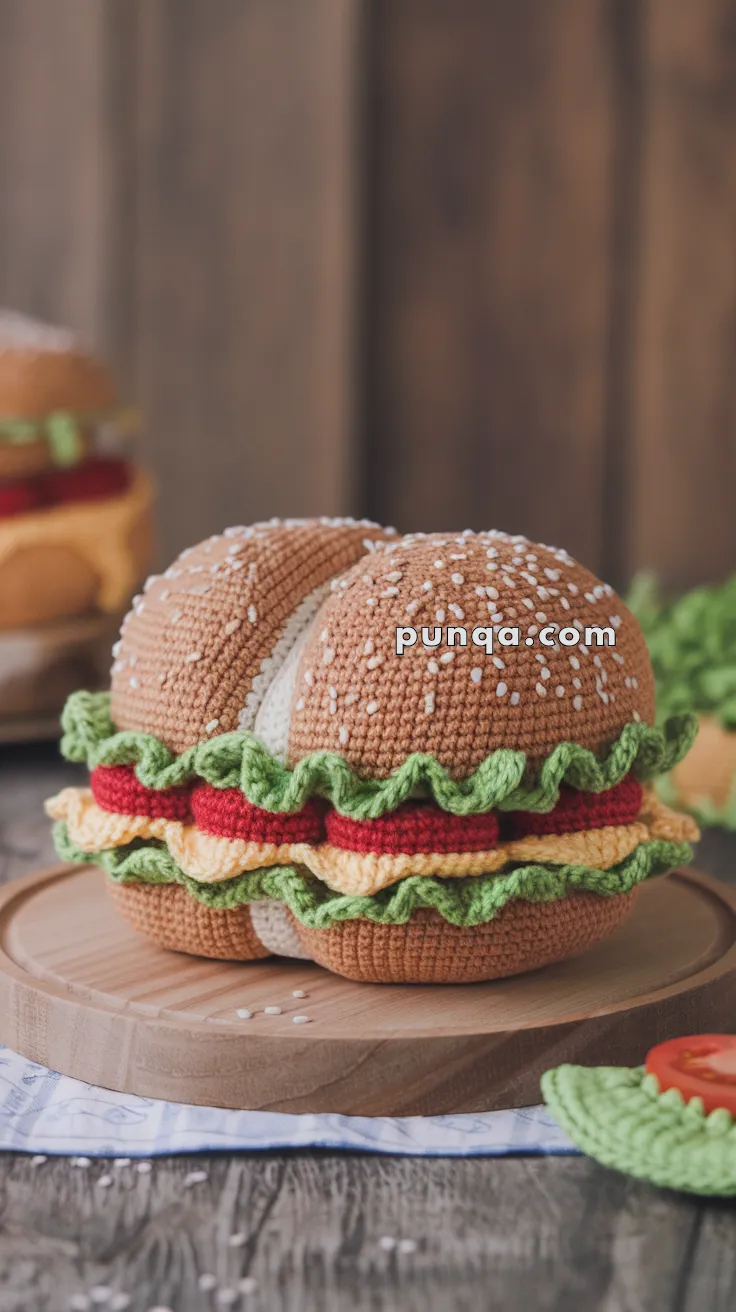
This cute sandwich design includes soft buns, ruffled lettuce, tomato slices, cheese layers, and embroidered sesame seeds – perfect for playtime or decor.
✨ Skill Level
Beginner to Intermediate – Basic shaping and sewing required.
📏 Finished Size
Approximately 15 cm wide × 10 cm tall when assembled.
🧶 Materials
-
Worsted weight yarn in:
-
Light brown (bun)
-
White (mayonnaise)
-
Red (tomato)
-
Yellow (cheese)
-
Green (lettuce)
-
-
3.5 mm crochet hook
-
Polyester stuffing
-
Yarn needle
-
White embroidery floss for sesame seeds
-
Stitch markers (optional)
🧵 Abbreviations (US terms)
MR – Magic Ring
sc – Single Crochet
inc – Increase
dec – Decrease
sl st – Slip Stitch
ch – Chain
FO – Fasten Off
st – Stitch
BLO – Back Loops Only
🥯 Bun (Make 2 – Top and Bottom)
With light brown yarn:
Round 1: MR, 6 sc
Round 2: inc in each st around (12)
Round 3: (1 sc, inc) x6 (18)
Round 4: (2 sc, inc) x6 (24)
Round 5: (3 sc, inc) x6 (30)
Round 6: (4 sc, inc) x6 (36)
Round 7: (5 sc, inc) x6 (42)
Rounds 8–14: sc around (42)
Round 15: BLO sc around (42) — creates a nice seam definition
Round 16: (5 sc, dec) x6 (36)
Round 17: (4 sc, dec) x6 (30)
Stuff firmly
Round 18: (3 sc, dec) x6 (24)
Round 19: (2 sc, dec) x6 (18)
Round 20: (1 sc, dec) x6 (12)
Round 21: dec x6 (6)
FO and close the opening.
Optional: Embroider small sesame seeds on top bun using short white straight stitches.
🥬 Lettuce (Make 2)
With green yarn:
Ch 50
Row 1: sc in each ch
Row 2: (sc, inc) repeat across
Row 3: (sc, sc, inc) repeat across
FO with long tail and sew in a wavy pattern between layers.
🍅 Tomato Slice (Make 2)
With red yarn:
Round 1: MR, 6 sc
Round 2: inc in each st (12)
Round 3: (1 sc, inc) x6 (18)
Round 4: (2 sc, inc) x6 (24)
FO and flatten into a circle. Position between lettuce and cheese layers.
🧀 Cheese Slice (Make 2)
With yellow yarn:
Ch 11
Rows 1–8: sc in each st across (10)
FO and block to make a square. You can pinch or trim corners for a “melting” look.
🧂 Mayo Center
With white yarn:
Ch 40
Row 1: sc across
Row 2: (1 sc, inc) repeat
FO and shape into a loose ruffle. Attach in center or between layers.
🔧 Assembly
-
Stack layers in this order:
-
Bottom bun
-
Lettuce
-
Cheese
-
Tomato
-
Mayo
-
Lettuce
-
Top bun
-
-
Use yarn tails to sew each layer neatly together. Whip stitch around the edge or invisibly stitch between stitches.
-
Lightly stuff layers for volume if desired.
🎉 Final Touches
Add a face if you want to make it kawaii-style! Use black safety eyes and a little pink or red yarn for a smile.