Welcome to the vibrant and rhythmic world of amigurumi! 💃✨ Today, I’m excited to share my free crochet pattern for an Amigurumi Salsa Dancer—a lively and expressive creation perfect for dance lovers, festival enthusiasts, or anyone who enjoys crafting dynamic and stylish plush designs! 🧶 Whether you love stitching up graceful figures or simply want to add a dazzling salsa dancer to your handmade lineup, this pattern will guide you through crafting a beautifully sculpted plush with elegant posture, and a touch of fiery charm! 🔥
This design embraces bold colors, intricate shaping, and playful details to bring an energetic and passionate presence to your crochet projects! 🧶✨ I’ve carefully outlined each step to ensure your Amigurumi Salsa Dancer turns out just right—ready to spin into your collection or become a treasured handmade gift! 🎁 So grab your hooks and let’s stitch up a stunning salsa dancer! 💃
💃 Amigurumi Salsa Dancer Crochet Pattern
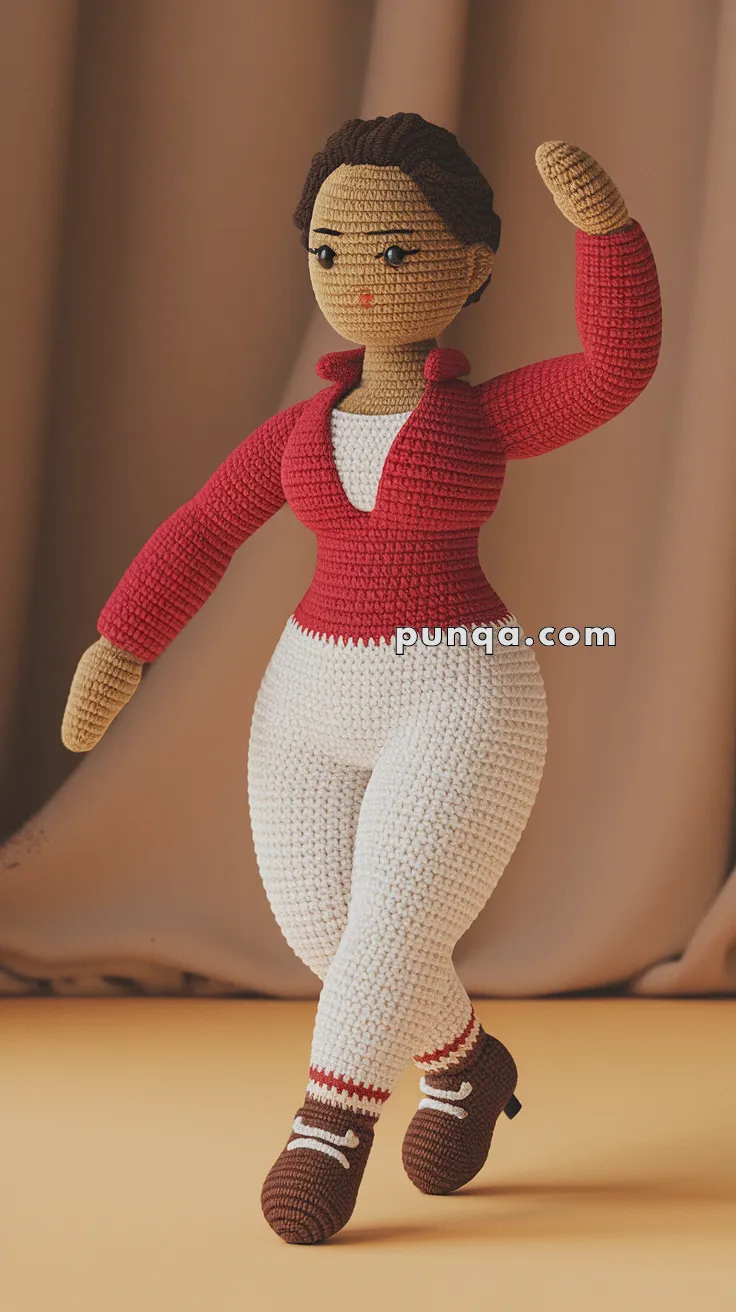
There’s something magical about capturing movement in yarn—and this salsa dancer does exactly that. With her raised arm, crossed legs, elegant red wrap blouse, and fitted white pants, she looks as if she’s frozen mid-step in a graceful dance pose. This pattern is designed to create a slim, feminine doll with smooth shaping, realistic proportions, and charming details like lace-up dance shoes and a low bun hairstyle.
Perfect as a decorative piece, a handmade gift, or a unique collector’s doll, this dancer brings warmth and personality to any crochet project.
✨ Skill Level
Intermediate to Advanced
Includes shaping, color changes, and optional wire support for posing.
📏 Finished Size
Approx. 28–30 cm (11–12 inches) tall when posed
(using sport or DK yarn and a 2.5 mm hook)
🧶 Materials
Yarn (Sport or DK weight):
-
Skin tone (head, neck, hands)
-
White or cream (pants and undershirt panel)
-
Red (blouse)
-
Dark brown (hair and shoes)
Supplies:
-
2.5 mm crochet hook
-
8–10 mm safety eyes
-
Polyester fiberfill stuffing
-
Thin craft wire or pipe cleaners (optional for arms and legs)
-
Yarn needle
-
Stitch marker
-
Black embroidery thread (eyebrows, lashes)
-
Red embroidery thread (lips)
🧵 Abbreviations (US Terms)
MR – Magic ring
sc – Single crochet
inc – Increase
dec – Invisible decrease
ch – Chain
sl st – Slip stitch
BLO – Back loop only
FLO – Front loop only
FO – Fasten off
Work in continuous rounds unless stated otherwise.
👠 Legs & Shoes (Make 2)
Start with dark brown (shoes)
R1: MR, 6 sc (6)
R2: inc x6 (12)
R3: (sc, inc) x6 (18)
R4–6: sc around (18)
Create shoe edge:
R7: FLO sc around (18)
Shape ankle:
R8: (2 sc, dec) x4, 2 sc (14)
R9–10: sc around (14)
Change to white (pants)
R11–26: sc around (14)
Stuff lightly.
FO first leg only. Make second leg and do not fasten off.
🔗 Join Legs & Hips
Ch 3, join first leg.
Continue around both legs and chains:
14 + 3 + 14 + 3 = 34 sts
R1–10: sc around (34)
👖 Lower Torso (White Undershirt Section)
R11–14: sc around (34)
Change to red (blouse)
Waist shaping:
R15: (3 sc, dec) x6, 4 sc (28)
R16–17: sc around (28)
R18: (2 sc, dec) x6, 4 sc (22)
R19–20: sc around (22)
R21: (sc, dec) x6, 4 sc (16)
R22: sc around (16)
Stuff firmly to keep a slim waist and defined chest.
FO, leaving a long tail for sewing head.
💪 Arms (Make 2)
Start with skin tone
R1: MR, 6 sc (6)
R2: inc x6 (12)
R3–5: sc around (12)
Elbow shaping:
R6: (2 sc, dec) x3 (9)
Change to red (sleeve)
R7: BLO sc around (9)
R8–18: sc around (9)
Stuff lightly.
FO, leaving long tail.
(Optional: insert wire for poseable arms.)
🧠 Head
With skin tone:
R1: MR, 6 sc (6)
R2: inc x6 (12)
R3: (sc, inc) x6 (18)
R4: (2 sc, inc) x6 (24)
R5: (3 sc, inc) x6 (30)
R6: (4 sc, inc) x6 (36)
R7–14: sc around (36)
Insert safety eyes between R10–11, about 6–7 stitches apart.
R15: (4 sc, dec) x6 (30)
R16: (3 sc, dec) x6 (24)
R17: (2 sc, dec) x6 (18)
R18: (sc, dec) x6 (12)
R19: dec x6 (6)
Stuff firmly.
FO and close.
Embroider:
-
Thin black eyebrows
-
Small lashes (optional)
-
Tiny red lips
💇 Hair (Low Bun Style)
Hair cap:
R1: MR, 6 sc (6)
R2: inc x6 (12)
R3: (sc, inc) x6 (18)
R4–6: sc around (18)
FO and sew to back of head.
Bun:
R1: MR, 6 sc
R2: inc x6 (12)
R3–5: sc around (12)
Stuff lightly and sew to lower back of head.
👚 White Undershirt Panel (Front Insert)
With white yarn:
Ch 8
Rows 1–4: sc across (7)
FO.
Sew vertically at the center front of torso to form the white V-shaped insert.
👚 Red Blouse Collar
With red yarn:
Ch 20
Sc in 2nd ch from hook and across
FO.
Shape into a soft V and sew around neckline.
👠 Shoe Laces (Embroidered)
With white yarn:
-
Stitch 2–3 short horizontal lines on each shoe front to resemble dance shoe laces.
🧵 Assembly
-
Sew head onto torso
-
Attach arms: one raised upward, one angled slightly downward
-
Position legs so one crosses slightly in front of the other
-
Attach hair bun
-
Sew white undershirt panel and red collar
-
Embroider facial features
-
Shape shoes and body for balance
(Optional: insert wire through torso and arms before final assembly for a stable dance pose.)
💡 Finishing Tips
-
Stuff firmly for smooth curves
-
Slightly tilt the head for expression
-
Curve the raised arm gently upward
-
Cross the ankles for a natural dance stance
-
Keep blouse snug to emphasize the waist
🎉 Final Result
Your completed Salsa Dancer will feature:
✔ Slim feminine silhouette
✔ Red wrap-style blouse with white inset
✔ Fitted white pants
✔ Brown dance shoes with white laces
✔ Raised arm salsa pose
✔ Smooth low bun hairstyle
A graceful amigurumi dancer full of movement and charm—ready to bring rhythm and joy to your handmade collection. 💃🧶