Welcome to the adventurous and space-inspired world of amigurumi! 🚀✨ Today, I’m excited to share my free crochet pattern for an Amigurumi Rocket Keychain—a fun and compact creation perfect for space lovers, sci-fi enthusiasts, or anyone who enjoys crafting adorable and portable plush designs! 🧶 Whether you love stitching up tiny spacecraft, experimenting with sleek shaping, or simply want to add a cosmic rocket to your handmade lineup, this pattern will guide you through crafting a beautifully sculpted plush with bold fins, a classic rocket body, and a touch of interstellar charm! 🌌
This design embraces vibrant reds, cool blues, and precise shaping to bring a dynamic and playful presence to your crochet projects! 🧶✨ I’ve carefully outlined each step to ensure your Amigurumi Rocket Keychain turns out just right—ready to clip onto your bag, keys, or become a treasured handmade gift! 🎁 So grab your hooks, pick out galactic hues, and let’s stitch up a fantastic rocket keychain! 🚀
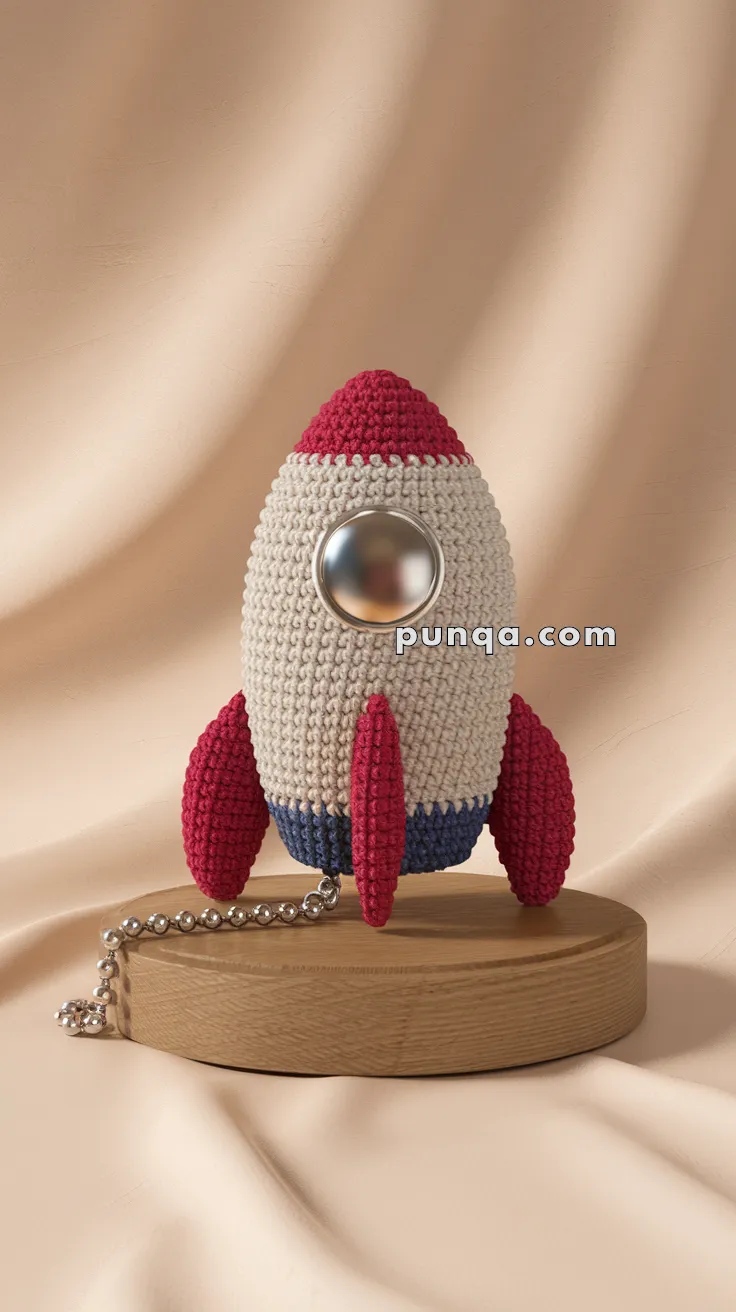
🚀 Amigurumi Rocket Keychain Crochet Pattern
Blast off into cuteness with this handmade amigurumi rocket keychain! With its classic red tip, cream body, blue base, and bold red fins, this little spacecraft is perfect for gifting, decorating, or attaching to backpacks and keys. Complete with a shiny window detail, it’s an out-of-this-world project for space lovers of all ages.
✨ Skill Level
Beginner to Intermediate – Basic amigurumi skills such as increases, decreases, and color changes involved.
📏 Finished Size
Approximately 4–5 inches (10–13 cm) tall when using DK weight yarn and a 2.5–3.0 mm hook.
🧶 Materials
Yarn (DK weight):
-
Color A: Red (nose cone and fins)
-
Color B: Beige or off-white (body)
-
Color C: Blue (engine base)
Notions:
-
Metallic bead, button, or silver felt circle (for the window)
-
Polyfill stuffing
-
Crochet hook: 2.5–3.0 mm
-
Tapestry needle
-
Stitch marker
-
Keychain ring or ball chain
🧵 Abbreviations (US Terms)
MR – Magic Ring
sc – Single Crochet
inc – Increase (2 sc in one stitch)
dec – Decrease (sc two stitches together)
sl st – Slip Stitch
FO – Fasten Off
🪐 Rocket Body
Work in a continuous spiral.
Start with Color A (Red):
-
MR, 6 sc (6)
-
inc x6 (12)
-
(1 sc, inc) x6 (18)
-
(2 sc, inc) x6 (24)
-
(3 sc, inc) x6 (30)
-
Rounds 6–7: sc around (30)
Switch to Color B (Beige):
-
Rounds 8–18: sc around (30)
Switch to Color C (Blue):
-
Round 19: (3 sc, dec) x6 (24)
-
Round 20: (2 sc, dec) x6 (18)
-
Round 21: (1 sc, dec) x6 (12)
-
Round 22: dec x6 (6)
Stuff firmly.
FO, weave yarn tail through front loops of last round and pull tight to close.
🦾 Rocket Fins
Make 3 with Color A:
-
MR, 6 sc (6)
-
(1 sc, inc) x3 (9)
-
Rounds 3–5: sc around (9)
Stuff lightly. FO and sew evenly spaced around the lower sides of the rocket body.
🪞 Window Detail
Cut a silver felt circle, or use a metallic button or flat bead.
Attach it to the center of the beige section of the rocket using glue or by stitching it on securely.
🔗 Keychain Loop
Attach a keychain ring or ball chain to the top of the rocket.
Reinforce with extra stitches through the tip to ensure durability.
✂️ Finishing Touches
-
Sew all three fins securely to the body.
-
Weave in all yarn ends neatly.
-
Gently shape the rocket by adjusting the stuffing.
-
Ensure the window detail is attached firmly, especially if using glue.
💡 Customization Ideas
-
Use glow-in-the-dark yarn for a space-night glow.
-
Embroider stars or planetary symbols onto the body.
-
Create a mini version using thinner thread for zipper pulls or earrings.
This fun little rocket is quick to make, exciting to gift, and adds a splash of imagination to your everyday accessories. Launch your creativity today!