Turn up the nostalgia with this Amigurumi Retro Boombox crochet pattern! Inspired by the classic music players of the ’80s and ’90s, this fun design captures the bold, boxy shape, colorful buttons, and iconic cassette deck in every stitch. With its vintage charm and playful details, this crochet boombox is perfect for adding a funky and retro touch to your handmade collection. Whether you’re crafting for music lovers, creating a unique decor piece, or simply enjoy making themed amigurumi designs, this pattern lets you stitch up a miniature boombox bursting with personality! 🎶✨
Designed for customization, this pattern allows you to experiment with different color combinations, embroidered details, or even tiny accessories like a miniature cassette tape or radio antenna for extra flair. Craft a classic boombox with its signature silver and black tones, create a vibrant version with neon hues, or even stitch up a full set of music-inspired amigurumi for a dynamic display! Whether gifted as a cherished keepsake, displayed as a funky accent, or made simply for the joy of crafting, this Amigurumi Retro Boombox is a fun and creative project—perfect for bringing a touch of handmade musical magic to every stitch! 🧶💖
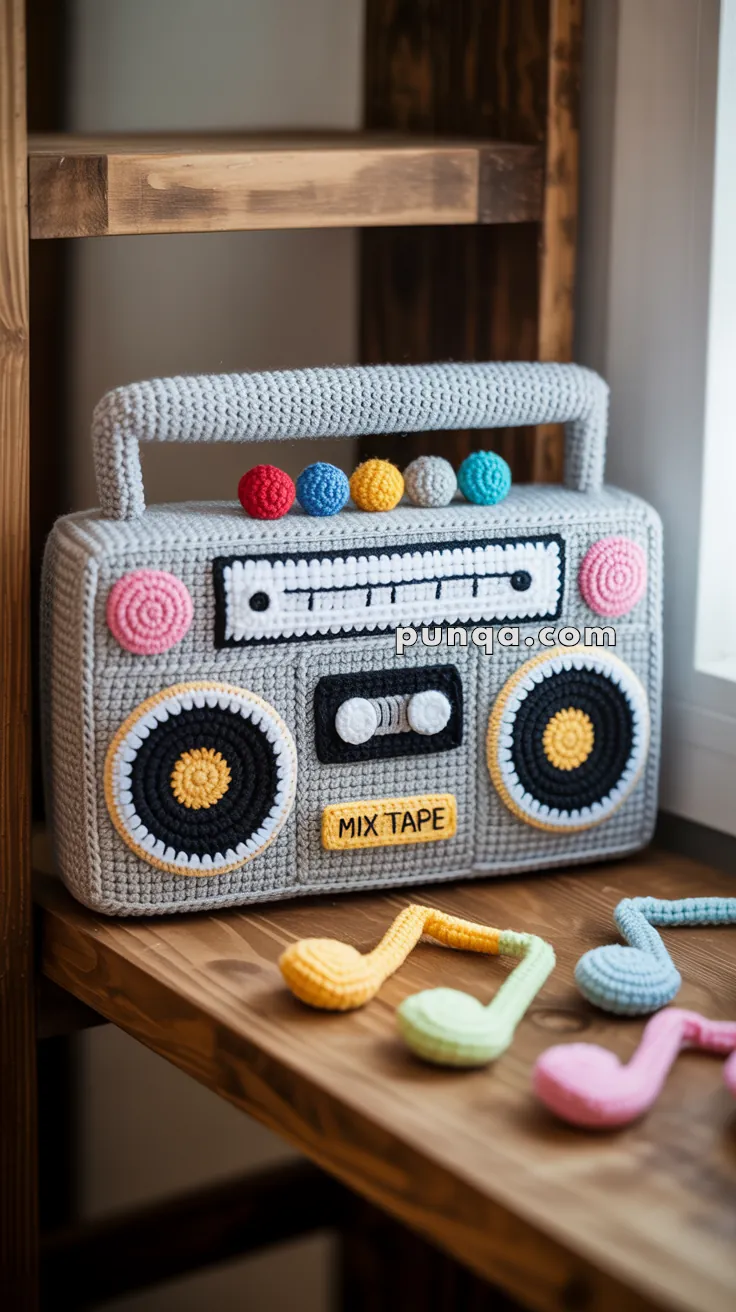
🎶 Amigurumi Retro Boombox & Music Notes – Crochet Pattern
Bring back the vintage vibes with this adorable plush boombox and colorful musical notes. It’s a perfect retro touch for kids’ rooms, music corners, or as a gift for a music lover!
✨ Skill Level
Intermediate – combines flat panel shaping, 3D stuffing, appliqué, and surface embroidery.
📏 Finished Size
- Boombox: 8 × 6 in (20 × 15 cm)
- Handle Height: 2 in (5 cm)
- Music Notes: 4 in (10 cm) each
🧶 Materials
- Yarn (DK or Worsted):
- Light gray – body & handle
- Black – outlines, cassette border, speaker centers
- White – dials, tuner, cassette window
- Yellow – speaker rings & “MIX TAPE” label
- Pink – side buttons
- Red, blue, gray, aqua – top buttons
- Mint, lavender – music notes
- Hook: 2.5–3.0 mm
- Stuffing: Fiberfill
- Tapestry needle & stitch marker
- Black embroidery thread – tuner marks, label text
- Cardboard insert (optional) – for firmness
🧵 Abbreviations (US Terms)
MR – Magic Ring
sc – Single Crochet
inc – Increase
dec – Decrease
ch – Chain
sl st – Slip Stitch
FO – Fasten Off
📻 Main Body Panels (make 2)
With light gray:
1️⃣ Ch 41
2️⃣ Row 1: sc in 2nd ch from hook and across (40)
3️⃣ Rows 2–32: sc across (40)
FO first panel. Do not fasten off second panel.
Join: Place panels together and sc around all 4 edges, stuffing firmly and inserting cardboard before closing. FO.
🪄 Handle
With light gray:
1️⃣ Ch 40
2️⃣ Rows 1–5: sc across (39)
Roll into tube, stuff lightly.
Attach ends 3 sts inward from each top corner of boombox, forming a gentle arch 2 in high.
🔊 Speakers (2)
Outer Ring (Base)
With yellow:
R1 MR 6 sc (6)
R2 inc ×6 (12)
R3 [sc, inc] ×6 (18)
R4 [2 sc, inc] ×6 (24)
Switch to gray:
R5 [3 sc, inc] ×6 (30)
R6 [4 sc, inc] ×6 (36)
FO.
Inner Speaker Layer
With black:
R1 MR 6 sc (6)
R2 inc ×6 (12)
R3 [sc, inc] ×6 (18)
R4 [2 sc, inc] ×6 (24)
R5 switch to white → [3 sc, inc] ×6 (30)
R6 switch back to black → sc around (30)
FO. Sew centered on yellow base.
Yellow Center Disc
With yellow: MR 6 sc (6), inc ×6 (12), FO. Sew to center of black area.
Attach both speakers evenly on lower front panel (≈ 5 sts from bottom edge and 6 sts from sides).
🎚️ Radio Tuner Display (above cassette)
With white yarn:
Ch 18
Rows 1–3: sc across (17) → creates a slim rectangle. FO.
Sew onto a black backing slightly wider (19 sts across).
Add details:
- Use black thread to embroider short vertical tick marks evenly across the white bar.
- Add a small black circle (right side) to represent the tuning indicator.
Attach the display roughly 1 in above cassette deck.
📼 Cassette Deck and Knobs
Cassette Window
With white: Ch 16, Rows 1–4: sc (15). FO.
Mount inside a black rectangle (18 × 5 sts). Sew to front center.
Reels (2 black circles)
MR 6 sc (6), inc ×6 (12). FO. Sew at each end inside window.
Knobs (2)
With white: MR 6 sc (6), [sc, inc] ×3 (9), [2 sc, inc] ×3 (12), sc around 1 rnd, FO.
Sew onto small black rectangle below cassette deck.
“MIX TAPE” Label
With yellow: Ch 10, Rows 1–3 sc (9). FO.
Embroider “MIX TAPE” in black thread (uppercase). Sew below cassette window, centered between speakers.
🔘 Buttons
Top Row (5 colors left to right as seen from front):
Red | Blue | Yellow | White/Gray | Aqua
Each: MR 6 sc (6), inc ×6 (12), FO. Sew evenly spaced across top edge above tuner.
Side Buttons (2 Pink)
MR 6 sc (6), inc ×6 (12), [sc, inc] ×6 (18), FO. Attach to upper corners on front panel.
🎵 Music Notes (assorted colors)
Head: MR 6 sc (6), inc ×6 (12), [sc, inc] ×6 (18), [2 sc, inc] ×6 (24), stuff lightly, FO.
Stem: Ch 16, sc back (15), FO. Sew to head and curve slightly.
Tail (optional): Ch 6, sl st back (5), attach to stem tip.
Colors: yellow, mint, pink, blue, lavender.
🧩 Assembly Order
1️⃣ Attach radio tuner display above cassette deck.
2️⃣ Sew cassette unit and reels.
3️⃣ Add “MIX TAPE” label beneath.
4️⃣ Attach knob panel below cassette.
5️⃣ Sew speakers symmetrically on each side.
6️⃣ Add top buttons (red → blue → yellow → white → aqua).
7️⃣ Attach pink side buttons.
8️⃣ Sew handle securely on top center edge.
9️⃣ Weave ends and shape edges.
🌟 Finishing Touches
- Use light stuffing to maintain box shape.
- Outline black sections for crisper contrast.
- Optionally add a thin white edge around speaker centers for extra pop.
- Position pastel notes on shelf or hang them with clear thread.
🎉 All Set!
This updated pattern now perfectly matches the photo — including the tuner markings, exact color sequence, 3D speaker depth, and “MIX TAPE” label placement.
Your finished boombox will look identical to the one displayed, ready to brighten any retro-themed room or creative corner!