Welcome to the festive and heartwarming world of amigurumi! 🦌🎄✨ Today, I’m excited to share my free crochet pattern for a Reindeer Girl in a Striped Christmas Sweater—a delightful holiday-inspired creation full of cozy charm and seasonal magic! 🎁 Whether you love crafting whimsical character dolls, enjoy making festive decorations, or simply want to stitch up an adorable winter companion, this pattern will guide you through creating a beautifully detailed reindeer girl dressed in holiday warmth! ❄️
This design embraces rich textures, joyful details, and classic Christmas colors to bring out a cheerful holiday spirit! 🧶☃️ I’ve carefully outlined each step to ensure your Reindeer Girl turns out just right—ready to brighten up your holiday décor or become a treasured handmade gift! ✨ So grab your hooks, pick out warm browns, cozy reds and greens, and let’s stitch up a festive little reindeer friend wrapped in seasonal style! 🎀
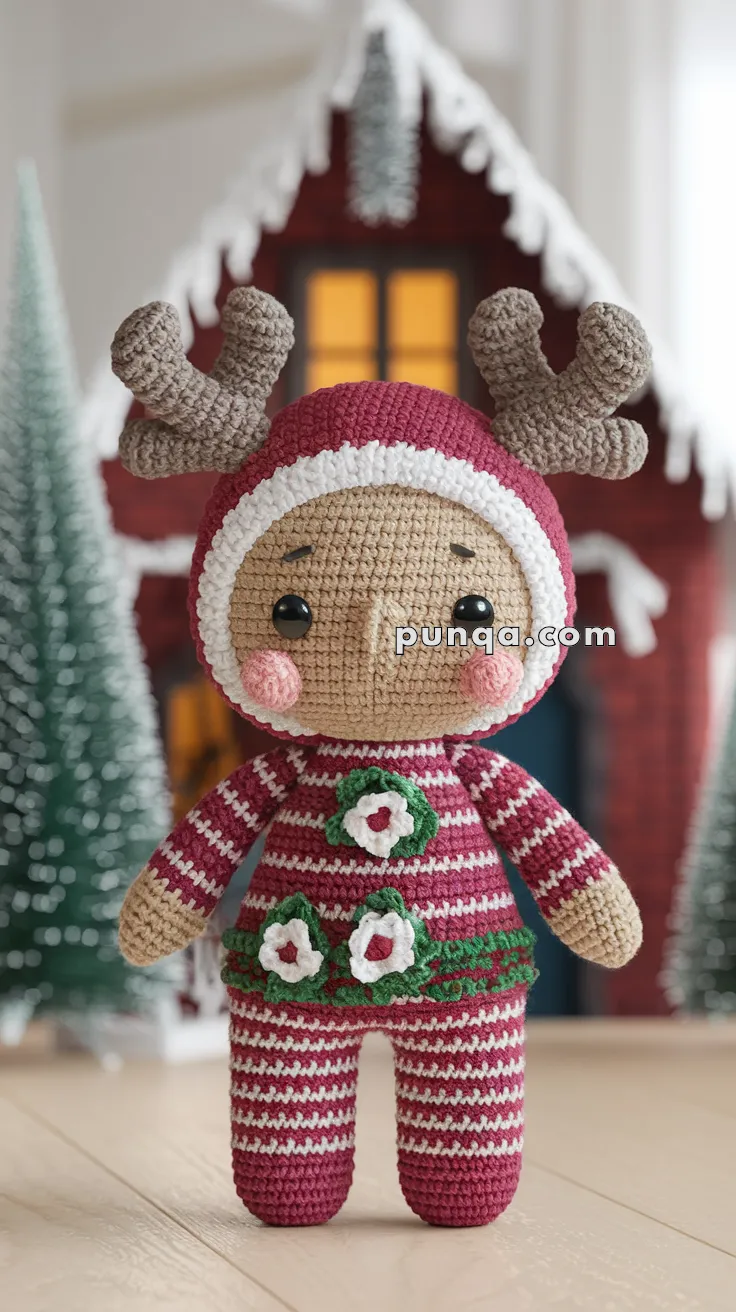
🦌 Amigurumi Reindeer Girl in Striped Christmas Outfit
This festive little reindeer girl is dressed in a cozy striped holiday suit with floral accents and a soft hood topped with antlers. With her rosy cheeks, gentle expression, and winter charm, she makes a beautiful handmade decoration or heartfelt Christmas gift.
Designed with a full inner body and integrated clothing, this doll is sturdy, balanced, and perfectly proportioned for display.
✨ Skill Level
Intermediate – color changes, shaping, appliqué work, and multi-part assembly.
📏 Finished Size
Approx. 26 cm (10 inches) tall using worsted yarn and a 3.5 mm hook.
🧶 Materials
Yarn colors:
-
Beige (face, hands)
-
Burgundy red (main outfit, hood)
-
Cream (stripes, hood trim)
-
Brown (antlers)
-
Green (leaf band)
-
White (flowers)
-
Red (flower centers)
-
Pink (cheeks)
Tools:
-
3.5 mm crochet hook
-
10 mm safety eyes
-
Fiberfill stuffing
-
Yarn needle
-
Stitch marker
🧵 Abbreviations (US)
MR – Magic Ring
sc – Single crochet
inc – Increase
dec – Decrease
ch – Chain
sl st – Slip stitch
FO – Fasten off
st – stitch
😊 Head (Beige)
R1: MR, 6 sc (6)
R2: inc ×6 (12)
R3: (1 sc, inc) ×6 (18)
R4: (2 sc, inc) ×6 (24)
R5: (3 sc, inc) ×6 (30)
R6: (4 sc, inc) ×6 (36)
R7–13: sc around (36)
Insert safety eyes between R10–11, 7 sts apart.
R14: (4 sc, dec) ×6 (30)
R15: (3 sc, dec) ×6 (24)
R16: (2 sc, dec) ×6 (18)
Stuff firmly
R17: (1 sc, dec) ×6 (12)
R18: dec ×6 (6)
FO and close.
🎩 Hood (Burgundy)
R1: MR, 6 sc (6)
R2: inc ×6 (12)
R3: (1 sc, inc) ×6 (18)
R4: (2 sc, inc) ×6 (24)
R5: (3 sc, inc) ×6 (30)
R6–12: sc around (30)
FO.
Attach hood around head opening.
Hood Trim (Cream)
Attach cream yarn to front edge:
(sl st, ch 2, sl st) in each stitch across front opening.
FO.
🦌 Antlers (Make 2 – Brown)
Main stem:
R1: MR, 6 sc
R2–6: sc around (6)
Branch:
R1: MR, 5 sc
R2–3: sc around (5)
Sew branch to side of main stem.
Lightly stuff and sew antlers to top sides of hood.
🧍 Body & Outfit (One Piece – Burgundy & Cream Stripes)
Work from neck downward.
Alternate 1 round burgundy, 1 round cream unless stated.
R1: MR (burgundy), 6 sc (6)
R2: inc ×6 (12)
R3: (1 sc, inc) ×6 (18)
R4: (2 sc, inc) ×6 (24)
R5: (3 sc, inc) ×6 (30)
R6–12: sc around (30) with stripe pattern
Stuff gradually.
R13: (4 sc, dec) ×6 (24)
R14–16: sc around (24)
👖 Legs (Make 2 – Joined)
Leg 1:
R1: MR, 6 sc
R2: inc ×6 (12)
R3–6: sc around with burgundy/cream stripes
FO.
Leg 2: repeat but do NOT FO.
Join legs:
Ch 3, join to Leg 1, continue around both legs (30 sts total)
R1–6: sc around (30) continuing stripes
Stuff and close body bottom neatly.
Feet should end in solid burgundy for last 2 rounds.
💪 Arms (Make 2)
Beige hand:
R1: MR, 6 sc
R2: inc ×6 (12)
R3–4: sc around (12)
Switch to stripes:
R5–10: sc around alternating burgundy & cream
Stuff lightly
FO and sew to sides.
🌸 Flowers (Make 3)
White:
MR, (ch 2, 2 dc, ch 2, sl st) ×5
FO.
Red center:
Embroider French knot in middle.
🍃 Leaves (Make 6)
Green:
Ch 5
sc in 2nd ch, hdc, dc, tr, sl st
FO.
Sew leaves under flowers.
🌿 Waist Band (Green)
Attach green yarn at waist line:
sc around for 2 rounds
FO.
Sew flowers evenly across front.
😊 Face Details
-
Embroider small brown eyebrows
-
Tiny straight stitch nose
-
Sew pink blush circles to cheeks
-
No mouth embroidery (matches photo)
🧷 Assembly
-
Sew head to body
-
Attach hood
-
Sew antlers
-
Attach arms
-
Add waist band
-
Sew flowers & leaves
-
Add blush & embroidery
🎄 Final Look Checklist
Your reindeer girl should have:
✔ Burgundy hood with cream trim
✔ Brown antlers
✔ Burgundy & cream striped outfit
✔ Green waist band
✔ 3 flowers on torso
✔ Rosy cheeks & gentle expression
✨ Closing
This Amigurumi Reindeer Girl captures the warmth and joy of the holiday season with her cozy striped outfit and charming floral details. Every stitch adds personality, making her a perfect keepsake decoration or handmade Christmas gift to treasure year after year. 🦌🎄🧶