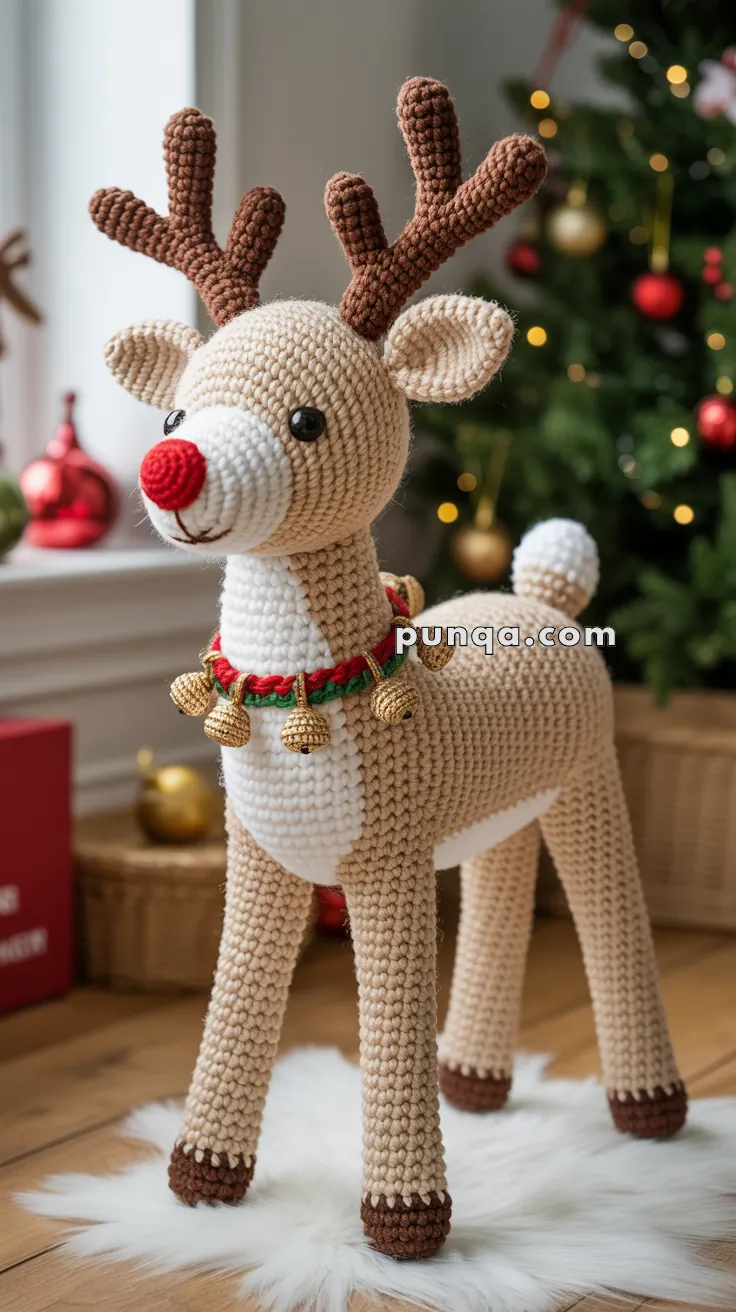
Prance into the holiday spirit with this adorable Amigurumi Reindeer crochet pattern! 🦌🎄 With its sweet face, cozy antlers, and festive charm, this cuddly companion is ready to light up your winter décor—whether it’s Rudolph with a red nose or a classic reindeer friend. Perfect for gifting, decorating, or adding to your seasonal amigurumi lineup, this little reindeer brings handmade warmth to every snowy scene.
Designed with playful shaping and cheerful details, this pattern invites you to explore fun accessories like scarves, sweaters, or even a tiny sleigh for extra flair. You can customize your reindeer with different yarn textures, holiday colors, or embroidered accents to match your festive style. Whether perched on a mantel, tucked into a stocking, or starring in a handmade winter wonderland, this Reindeer Amigurumi is a joyful and satisfying project—perfect for stitching up a little holiday magic, one loop at a time! 🧶❄️✨
🦌 Amigurumi Reindeer Crochet Pattern
Bring a touch of handmade Christmas wonder into your home with this beautifully detailed amigurumi reindeer. With its soft beige coat, bright red nose, full antlers, and jingling collar, this reindeer stands tall and proud — just like the one by your Christmas tree!
✨ Skill Level
Intermediate to Advanced – includes shaping, color changes, and light wiring for stability.
📏 Finished Size
Approx. 40–45 cm (16–18 inches) tall (including antlers).
🧶 Materials
- Worsted weight yarn:
- Light beige – main body, head, neck, tail, ears, legs
- White – muzzle and belly patch
- Dark brown – antlers and hooves
- Red – nose and collar trim
- Green – collar stripe
- Gold – bells (crocheted or real)
- Crochet hook: 3.0–3.5 mm
- 12 mm black safety eyes
- Fiberfill stuffing
- Wire options:
- Floral wire or strong pipe cleaners (for antlers)
- 4 sturdy wire pieces or thin wooden dowels (for legs)
- 1 piece for neck (optional, for head tilt stability)
- Tapestry needle, stitch markers, scissors, glue (optional for bells)
🧵 Abbreviations (US Terms)
MR – Magic Ring
sc – Single Crochet
inc – Increase (2 sc in same st)
dec – Decrease (sc 2 together)
sl st – Slip Stitch
ch – Chain
FLO – Front Loop Only
BLO – Back Loop Only
🦌 Pattern Instructions
Head (Light Beige)
- MR, 6 sc (6)
- inc ×6 (12)
- (sc, inc) ×6 (18)
- (2 sc, inc) ×6 (24)
- (3 sc, inc) ×6 (30)
- (4 sc, inc) ×6 (36)
7–16. sc around (36) - (4 sc, dec) ×6 (30)
- (3 sc, dec) ×6 (24)
- (2 sc, dec) ×6 (18)
- (sc, dec) ×6 (12)
- dec ×6 (6), FO.
👉 Insert safety eyes between rounds 9–10, about 7 sts apart.
👉 Firmly stuff and shape into an oval snout-forward form.
Muzzle & Red Nose
Muzzle (White):
- MR, 6 (6)
- inc ×6 (12)
- (sc, inc) ×6 (18)
4–7. sc around (18), FO.
Nose (Red):
- MR, 6 (6)
- inc ×6 (12)
- (sc, inc) ×6 (18), FO.
Stuff lightly and sew to center of muzzle.
Sew the muzzle to the lower front of head, slightly overlapping round 13.
Embroider a small curved smile under the muzzle.
Ears (Make 2 – Light Beige)
- MR, 6 sc (6)
- (sc, inc) ×3 (9)
- (2 sc, inc) ×3 (12)
4–6. sc around (12) - (2 sc, dec) ×3 (9)
Flatten and FO.
Sew slightly behind and below the antler base, curving them slightly forward.
Antlers (Dark Brown – With Wire Support, 3 Branches Each)
Trunk:
- MR, 6 sc (6)
- (sc, inc) ×3 (9)
3–24. sc around (9).
Insert floral wire through center for shaping.
Branch A (Lower):
- MR, 6 sc (6)
2–12. sc around (6), insert wire, FO.
Branch B (Mid):
- MR, 6 sc (6)
2–11. sc around (6), insert wire, FO.
Branch C (Upper Small):
- MR, 6 sc (6)
2–8. sc around (6), insert wire, FO.
Assembly:
- Sew Branch A at R10 of trunk (angled outward-forward)
- Sew Branch B at R15 (angled outward)
- Sew Branch C at R20 (angled upward)
Shape slightly curved forward and outward for fullness.
Repeat for second antler (mirror positioning).
Attach securely on head top, spaced evenly apart.
Neck (Light Beige – Optional Wire for Support)
- MR, 8 sc (8)
- inc ×8 (16)
- (3 sc, inc) ×4 (20)
4–12. sc around (20)
Stuff firmly; insert a single piece of thin wire from top to bottom if desired.
Sew to front-top of body so it leans forward slightly.
Attach head with a gentle upward tilt.
Body (Light Beige – Worked Around an Oval)
- Ch 16, sc in 2nd ch, sc 13, 3 sc in last ch; rotate, sc 13, inc (32)
- inc, sc 13, inc, sc, inc, sc 13, inc, sc (36)
- (sc, inc), sc 13, (sc, inc), sc, (sc, inc), sc 13, (sc, inc), sc (40)
- sc around (40)
5–16. sc around (40) - (8 sc, dec) ×4 (36)
- sc around (36)
- (7 sc, dec) ×4 (32)
20–21. sc around (32) - (6 sc, dec) ×4 (28)
- (5 sc, dec) ×4 (24)
- sc around (24), FO.
Stuff firmly into a horizontal oval shape.
White Belly Patch
Ch 9, sc in 2nd ch, sc 6, 3 sc in last; rotate, sc 6, inc (18)
Work 3–4 rounds evenly to form an oval (~26–28 sts).
Sew smoothly from chest underside down to lower belly.
Legs (Make 4 – Dark Brown + White Trim + Light Beige)
Hoof (Dark Brown):
- MR, 6 sc (6)
- inc ×6 (12)
- (sc, inc) ×6 (18)
4–5. sc around (18) - (sc, dec) ×6 (12)
Switch to white: - BLO sc around (12) (for small white line)
Switch to light beige:
8–28 (front) / 8–32 (back). sc around (12)
👉 Insert dowels or wire before stuffing.
👉 Stuff evenly but not rigid; reindeer should stand naturally.
FO with long tails for sewing.
Leg Placement (Standing Pose):
- Front legs: under chest patch, parallel, 6–7 sts apart.
- Back legs: under back body section, slightly rearward, 6 sts apart.
All legs vertical, forming a rectangle footprint for balance.
Tail (Light Beige)
- MR, 6 sc (6)
- inc ×6 (12)
3–4. sc around (12), FO.
Stuff lightly and sew to top of rump.
(Use same beige yarn for natural blend.)
Collar with Bells
Collar (Red):
Ch enough to fit around neck snugly, sc across in red.
Surface stitch green down center.
Attach five small crocheted gold bells or real ones.
Crochet Bells (Gold):
- MR, 6 sc (6)
- (sc, inc) ×3 (9)
3–4. sc around (9) - (sc, dec) ×3 (6), FO.
Stuff lightly, sew evenly spaced.
🎄 Assembly Order
- Sew neck to front of body.
- Insert optional wire through neck for tilt support.
- Attach head (slightly upturned).
- Sew legs beneath the body so reindeer stands balanced.
- Add tail to rump.
- Attach antlers and ears symmetrically.
- Add collar and bells.
- Embroider small curved mouth.
✨ Final Touches
Your reindeer should now have:
- A sleek horizontal body
- Defined neck and lifted head
- Sturdy, straight-standing wired legs
- Three-branched antlers for fullness
- Beige tail and ears
- White chest patch and muzzle
- Red nose and gentle smile
- Festive collar with dangling bells
Your reindeer is now complete! With sturdy legs, a glowing red nose, and a jingling collar, this handmade friend is ready to spread holiday cheer. Place him by the Christmas tree, gift him to someone special, or let him lead Santa’s sleigh in your festive display.