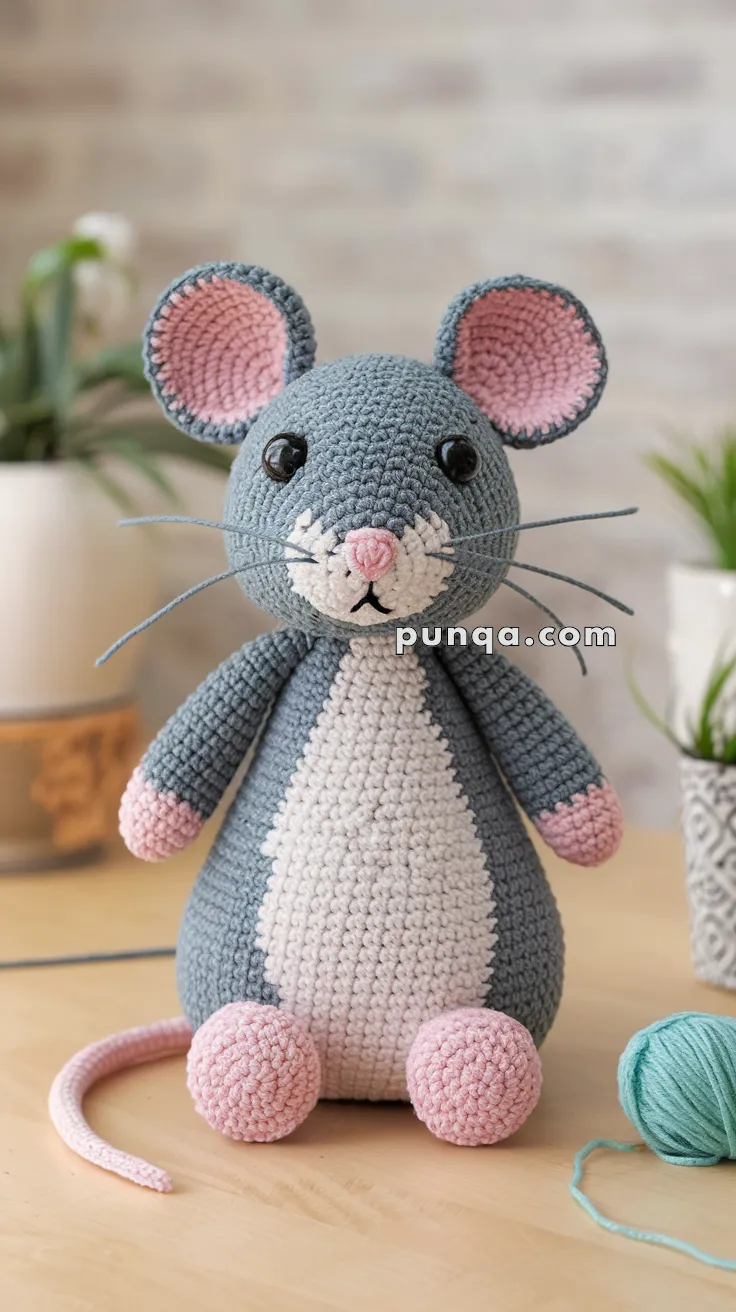
Say hello to the Amigurumi Rat, a surprisingly sweet and snuggly crochet creation that’s full of charm and character! 🐀🧶 With its round little body, soft pink paws, long curling tail, and big expressive ears, this adorable plush is ready to scamper into your heart. Whether you’re crafting a quirky gift, adding to your animal collection, or just love making unique amigurumi friends, this rat brings a playful twist to your handmade lineup.
Perfect for crocheters who enjoy soft textures and whimsical details, this pattern invites you to stitch up a creature that’s equal parts cuddly and curious. Add a tiny piece of cheese, customize the colors, or pair it with other critters for a fun display. The Amigurumi Rat is a joyful way to stitch up personality, sweetness, and a sprinkle of handmade magic—one loop at a time! 🧵✨💕

🐭 Amigurumi Rat Crochet Pattern
Meet your new favorite handmade friend — this cute and cuddly crochet rat!
With its round body, soft pink paws, long curling tail, and big expressive ears, this adorable plush will melt your heart. Its gentle grey body and creamy belly make it an irresistible addition to any amigurumi collection.
✨ Skill Level
Beginner to Intermediate – Simple shaping and color changes, ideal for anyone comfortable with working in the round.
📏 Finished Size
Approximately 22–25 cm (9–10 inches) tall when made with DK or light-worsted weight yarn using a 3.0 mm crochet hook.
🧶 Materials
Yarn (DK / Light-Worsted Weight):
-
Grey – main color (head, body, arms, outer ears)
-
Light pink – hands, feet, tail, inner ears, nose
-
Cream or light beige – belly patch and snout
-
Black embroidery thread – mouth and whiskers
Tools & Supplies:
-
3.0 mm crochet hook
-
10–12 mm black safety eyes
-
Polyester fiberfill stuffing
-
Tapestry needle
-
Stitch markers
-
Scissors
🔤 Abbreviations (US Terms)
MR – Magic ring
sc – Single crochet
inc – Increase (2 sc in same stitch)
dec – Decrease (sc2tog)
ch – Chain
sl st – Slip stitch
FO – Fasten off
BLO – Back loop only
Work continuously in spiral rounds unless otherwise stated.
🧑 Head (Grey)
-
MR, 6 sc (6)
-
inc x6 (12)
-
(1 sc, inc) x6 (18)
-
(2 sc, inc) x6 (24)
-
(3 sc, inc) x6 (30)
-
(4 sc, inc) x6 (36)
7–13. sc around (36)
👉 Insert 10–12 mm safety eyes between rounds 9–10, spaced about 8 stitches apart.
-
(4 sc, dec) x6 (30)
-
(3 sc, dec) x6 (24)
-
(2 sc, dec) x6 (18)
-
(1 sc, dec) x6 (12)
Stuff firmly. -
dec x6 (6), FO and close tightly.
🐽 Snout and Nose
Snout (Cream/Beige):
-
MR, 6 sc (6)
-
(1 sc, inc) x3 (9)
3–4. sc around (9)
FO, flatten slightly. Sew the snout centered just below the eyes.
Nose (Pink):
-
MR, 4 sc, sl st to join, FO.
Sew at the top center of the snout.
Face Embroidery:
Using black thread, embroider a short vertical line from the nose down, ending in a small “Y” shape for the mouth.
Add 3 whiskers on each side using thin black cord or thread.
👂 Ears (Make 2 – Grey Outer, Pink Inner)
Inner Ear (Pink):
-
MR, 6 sc (6)
-
inc x6 (12)
-
(1 sc, inc) x6 (18)
FO.
Outer Ear (Grey):
Repeat the same steps as the inner ear.
Place the pink circle on top of the grey one (wrong sides facing), sew together along the edges.
Fold slightly at the base to create a natural curve and sew to the top sides of the head, about 4–5 stitches apart.
🧍 Body (Grey with Beige Belly)
-
MR, 6 sc (6)
-
inc x6 (12)
-
(1 sc, inc) x6 (18)
-
(2 sc, inc) x6 (24)
-
(3 sc, inc) x6 (30)
-
(4 sc, inc) x6 (36)
7–18. sc around (36) – the body should form a large, rounded cone shape. -
(4 sc, dec) x6 (30)
-
(3 sc, dec) x6 (24)
-
(2 sc, dec) x6 (18)
-
(1 sc, dec) x6 (12)
Stuff firmly as you go. -
dec x6 (6), FO and close.
Belly Patch (Cream):
Ch 8
Row 1: sc across (7)
Rows 2–10: sc across, decreasing slightly on sides to form an oval.
FO, then sew vertically down the front center of the body, from neck to near the base.
🐾 Arms (Make 2 – Grey + Pink)
Start with Pink (Hands):
-
MR, 6 sc (6)
-
inc x6 (12)
-
(1 sc, dec) x4 (8)
Change to Grey.
4–9. sc around (8)
FO and stuff lightly.
Sew to body sides slightly below the head, angled forward.
👣 Legs (Make 2 – Pink + Grey)
Start with Pink (Feet):
-
MR, 6 sc (6)
-
inc x6 (12)
3–5. sc around (12) -
(1 sc, dec) x4 (8)
Change to Grey.
7–9. sc around (8)
Stuff firmly.
Sew to the lower sides of the body, spaced evenly so the rat can sit flat.
🐁 Tail (Pink)
Ch 45 (or desired length).
Row 1: sc in each ch across.
FO and sew securely to the back bottom center of the body, curving it gently to one side.
✂️ Finishing Touches
-
Embroider three whiskers on each side of the snout.
-
Double-check that the ears are large, round, and slightly cupped.
-
The belly patch should align neatly from chest to base.
-
Optional: Add light blush or fabric paint to the cheeks for extra cuteness.
💡 Customization Ideas
-
Use fluffy velvet yarn for an ultra-soft rat.
-
Make a white mouse version by swapping grey for white.
-
Add a tiny cheese wedge or bow accessory for character.
-
Use a pipe-cleaner tail inside the crochet tail for gentle shaping.
🧀 Your Adorable Rat is Complete!
This charming crochet rat has big pink ears, a chubby belly, and a sweet face that’s impossible not to love. Whether perched on your shelf or given as a thoughtful handmade gift, it’s sure to bring a smile to everyone who meets it.
Happy Crocheting! 🐭💗


