Oh, the magic of amigurumi! 🧶✨ There’s something utterly enchanting about taking a ball of yarn and transforming it into a delightful character, and one of my absolute favorites to create is an amigurumi Rapunzel. Why Rapunzel, you ask? Well, who can resist that long, flowing hair and the fairy-tale charm that comes with her story? Crafting an amigurumi Rapunzel allows me to dive into a world of creativity, where I can play with vibrant colors and intricate designs to bring this beloved character to life. The process is so therapeutic, a blend of planning and spontaneity, that I can’t help but get lost in it. It feels like weaving a bit of magic with every stitch, filling each loop with joy and anticipation.
The journey to creating a Rapunzel amigurumi pattern is like embarking on a fantastical adventure. It all begins with sketching out ideas, deciding on the size and features that will capture Rapunzel’s essence. Next comes the exciting part—choosing the perfect yarn shades to match her iconic golden locks and vibrant attire. I adore experimenting with different yarn textures, as they add a unique dimension to the finished piece. Once the planning phase is complete, it’s time to dive into crocheting, starting from the head and working my way down. With each stitch, I feel a sense of accomplishment as Rapunzel’s character takes shape under my fingers. And when I finally add those finishing touches, like her sparkling eyes and playful grin, I can’t help but smile. It’s as if I’ve woven a piece of my heart into every loop, creating not just a toy, but a true labor of love. 🌟
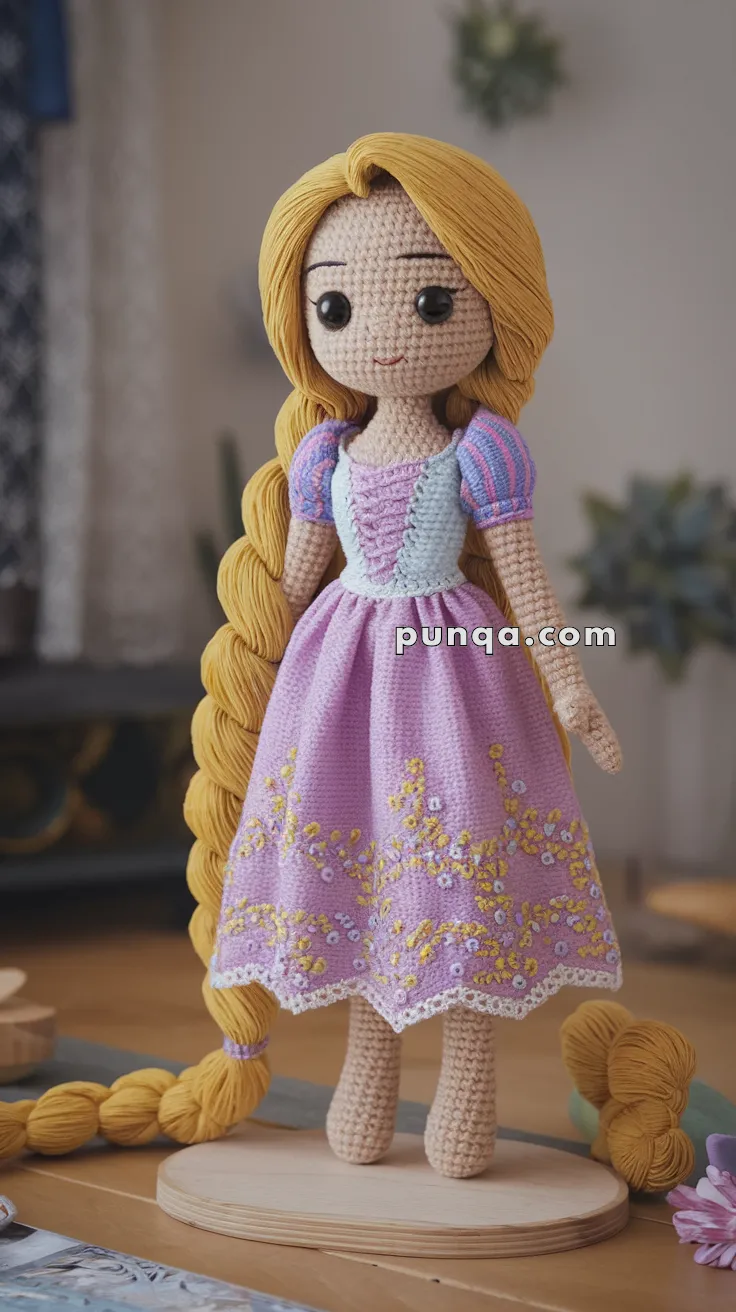
👸 Crochet Rapunzel Doll – FREE Amigurumi Pattern
Bring fairytales to life with this enchanting Rapunzel-inspired crochet doll 🌸✨. With her flowing golden braid and floral-embroidered dress, she’s the perfect project for Disney fans and amigurumi collectors alike.
🧶 Materials Needed
-
Worsted weight yarn in:
-
Skin tone (beige/peach)
-
Yellow (hair)
-
Purple & lilac (dress)
-
Light blue (corset)
-
Embroidery thread (yellow, white, green) for flowers
-
-
2.5 mm or 3.0 mm crochet hook
-
Safety eyes (10–12 mm)
-
Tapestry needle
-
Stitch markers
-
Scissors
-
Fiberfill stuffing
-
Optional: pink blush, small pearl or rhinestone embellishments
✂️ Abbreviations (US Terms)
-
MR – Magic Ring
-
sc – Single Crochet
-
inc – Increase
-
dec – Decrease
-
ch – Chain
-
sl st – Slip Stitch
-
BLO/FLO – Back/Front Loops Only
-
FO – Fasten Off
📏 Finished Size
Approx. 30–33 cm (12–13 inches) tall when made with DK or worsted yarn and 2.5–3.0 mm hook.
🧠 Skill Level
Intermediate – Involves color changes, dress embroidery, hair attachment, and shaping.
🪄 Crochet Pattern Instructions
👩 Head
Skin tone yarn:
-
MR, 6 sc
-
inc x6 → 12
-
(sc, inc) x6 → 18
-
(2 sc, inc) x6 → 24
-
(3 sc, inc) x6 → 30
-
(4 sc, inc) x6 → 36
7–17. sc around -
(4 sc, dec) x6 → 30
-
(3 sc, dec) x6 → 24
Insert safety eyes between rounds 10–11, 7 sts apart. Embroider lashes & brows. -
(2 sc, dec) x6 → 18
-
(sc, dec) x6 → 12
Stuff firmly and FO.
🧍 Body
Skin tone:
-
MR, 6 sc
-
inc x6 → 12
-
(sc, inc) x6 → 18
-
(2 sc, inc) x6 → 24
5–10. sc around
🔄 Change to lilac for top:
11–14. sc around
🔄 Switch to purple for skirt base: -
BLO, (4 sc, inc) x6 → 30
16–30. sc around
FO, stuff body firmly.
💃 Skirt (Add after attaching dress)
-
Join purple yarn in round 15 (BLO).
-
sc around
-
(sc, ch 2, skip 1) repeat – to form scallop lace
-
Use embroidery thread to add yellow flowers, white daisies, and green vines around the hem.
🦵 Legs (Make 2)
Skin tone yarn:
-
MR, 6 sc
-
inc x6 → 12
3–18. sc
FO and stuff. Sew to bottom of body.
💪 Arms (Make 2)
-
MR, 6 sc
-
inc x6 → 12
3–5. sc -
dec, 4 sc, dec, 4 sc → 10
7–14. sc
FO and sew to sides.
👗 Dress Details
Sleeves (make 2):
-
With pink or lilac yarn
-
MR, 6 sc, inc around to 12
-
Do 4 rows, then FO
-
Sew to top of arms
Corset:
-
Crochet a small rectangle with light blue yarn
-
Add scalloped trim with white yarn
-
Attach across front of torso
💛 Hair
Yellow yarn (or golden blonde):
-
Cut many 30–35 cm strands
-
Attach each strand to head using a latch hook method
-
Once full coverage is reached, braid all strands into one long thick braid
-
Tie braid with purple yarn band and sew to base of dress to keep it in place
-
Add optional flowers or ribbons 🎀
🧵 Assembly
-
Sew arms to body at shoulders
-
Sew legs to body
-
Attach head to neck
-
Add corset and skirt details
-
Sew braid securely and embellish
-
Embroider smile and apply blush
🌼 Finishing Touches
-
Embroider tiny floral motifs around her skirt
-
You can add a felt crown, necklace, or miniature accessories
-
Mount her on a wood base if you’d like a standing display
💫 Ready to Let Down Her Hair?
Your amigurumi Rapunzel is now complete! 💕 Whether she’s perched on a shelf, gifted to a fairytale fan, or part of a princess collection — she’s sure to spread joy and creativity.