Celebrate color and quirk with the Amigurumi Rainbow Skull Bouquet, a bold and playful crochet project that’s anything but ordinary! 🌈💀 This vibrant arrangement features a cheerful mix of rainbow-hued skulls, each stitched with personality and flair, making it perfect for Pride celebrations, gothic décor with a twist, or simply adding a splash of joy to your handmade collection. Whether displayed in a vase, gifted as a statement piece, or used as a keychain charm, this bouquet is a brilliant blend of spooky and sweet.
Ideal for crocheters who love mixing edgy motifs with joyful palettes, this pattern invites endless creativity. You can play with yarn textures, add glittery accents, or even pair it with matching rainbow roses for extra drama. Whether you’re crafting for a celebration or just expressing your colorful spirit, the Rainbow Skull Bouquet is a fabulous way to stitch up bold beauty—one radiant loop at a time! 🧶✨
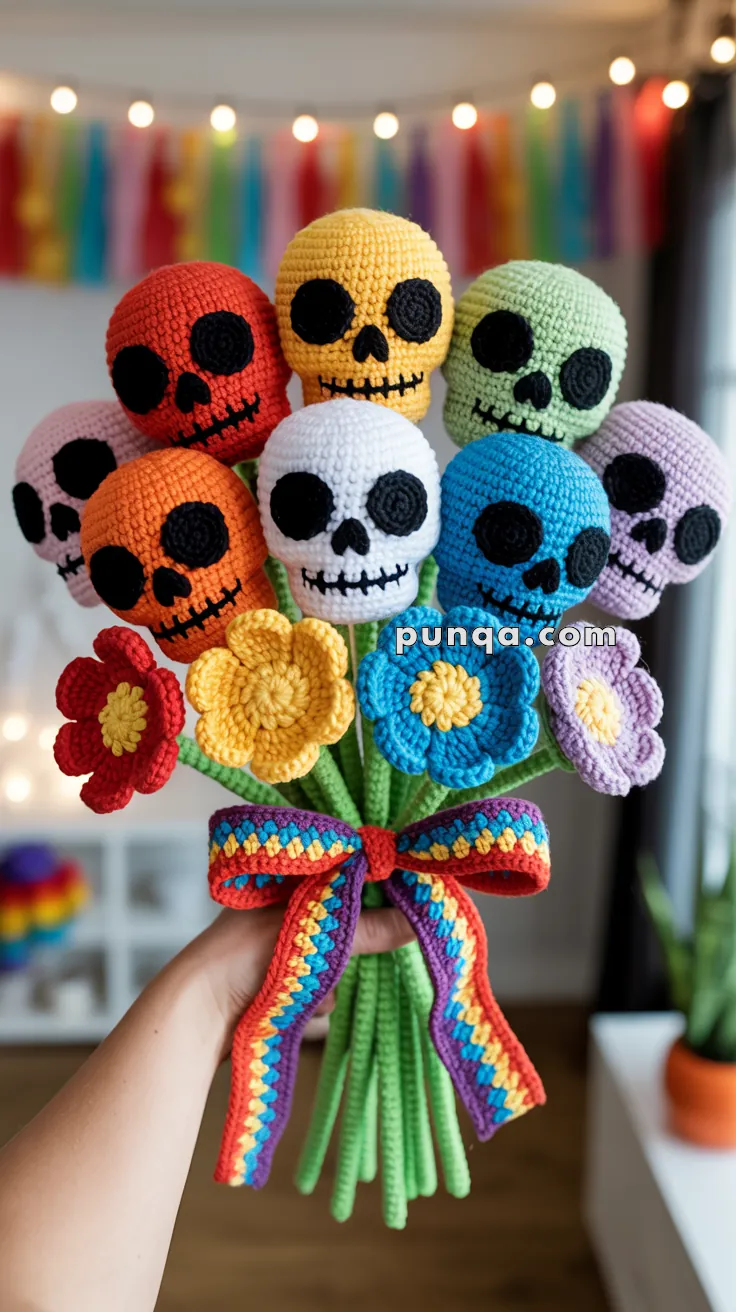
🌈💀 Rainbow Skull Bouquet Crochet Pattern
Bring the vibrant spirit of Día de los Muertos into your home with this stunning Rainbow Skull Bouquet! This whimsical creation combines colorful crocheted skulls with cheerful flowers, all bundled together with a bold rainbow bow. Perfect for Halloween, Day of the Dead celebrations, or as a unique year-round decoration that’s equal parts spooky and cheerful!
📋 Pattern Information
Skill Level: Intermediate
Time to Complete: 8-12 hours for full bouquet
Finished Dimensions:
- Each skull: 9-10 cm tall × 8 cm wide
- Flower diameter: 7-8 cm
- Stem length: 22-25 cm
- Complete bouquet height: ~30 cm
🧶 Materials Needed
Yarn
DK weight yarn (light worsted / 8-ply) in the following colors:
- Skull colors: White, yellow, orange, red, coral/salmon, light green, blue, light purple, lavender (1 ball each)
- Black: for eyes and noses (1 ball)
- Cream/off-white: for teeth (small amount)
- Green: for stems (2-3 balls)
- Flower petals: Red, yellow, blue, purple (1 ball each)
- Flower centers: Yellow/gold (1 ball)
- Rainbow bow: Red, orange, yellow, green, blue, purple (1 ball each)
Other Supplies
- Crochet hook: 3.0 mm (US C/2 or D/3)
- Yarn needle for sewing
- Scissors
- Polyester fiberfill stuffing
- Floral wire or thick pipe cleaners (22-24 gauge, 9-12 pieces)
- Hot glue gun (optional, for securing stems)
- Stitch markers (helpful)
- Black embroidery floss (optional, for mouth lines)
🔤 Abbreviations (US Terms)
- MR = Magic Ring
- ch = chain
- sc = single crochet
- hdc = half double crochet
- dc = double crochet
- inc = increase (2 sc in same stitch)
- dec = invisible decrease (sc2tog)
- sl st = slip stitch
- FO = fasten off
- BLO = back loop only
- st(s) = stitch(es)
- R = Round
💀 SKULL PATTERN (Make 8-9 in various colors)
Head/Main Skull Shape
R1: MR, 6 sc (6)
R2: inc × 6 (12)
R3: (sc, inc) × 6 (18)
R4: (2 sc, inc) × 6 (24)
R5: (3 sc, inc) × 6 (30)
R6: (4 sc, inc) × 6 (36)
R7-13: sc around (36) — 7 rounds even
R14: (4 sc, dec) × 6 (30)
R15: (3 sc, dec) × 6 (24)
R16: (2 sc, dec) × 6 (18)
👉 Stuff firmly, shaping into skull form with slightly flattened front
R17: (sc, dec) × 6 (12)
R18: dec × 6 (6)
FO, leaving long tail. Weave through remaining stitches and pull tight to close.
👉 PRO TIP: When stuffing, push filling toward the back and sides to create a flatter “face” area for attaching features.
Eye Sockets (Make 2 per skull in BLACK)
R1: MR, 6 sc (6)
R2: inc × 6 (12)
R3: (sc, inc) × 6 (18)
R4: sc around (18)
sl st, FO leaving long tail for sewing.
👉 NOTE: These are larger than typical eyes to create the dramatic look from the photo. When attaching, place them fairly high on the face, spaced about 1-2 stitches apart.
Nose (Make 1 per skull in BLACK)
R1: MR, 6 sc (6)
R2: (sc, inc) × 3 (9)
R3: sc around (9)
R4: (sc, dec) × 3 (6)
sl st, FO leaving long tail.
👉 SHAPING: Pinch the final round into an upside-down heart or triangle shape when sewing to skull. Position centered below and between the eyes.
Teeth (Make 5-6 per skull in CREAM/OFF-WHITE)
Method 1 – Tiny Rectangles:
- Ch 4
- Turn, sc in 2nd ch from hook and across (3 sc)
- Ch 1, turn, sc across (3 sc)
- Repeat for 2-3 rows total
- FO, leaving tail for sewing
Method 2 – Small Ovals:
- Ch 4
- Sc in 2nd ch from hook, sc 1, 3 sc in last ch
- Working on opposite side: sc 1, inc in last st
- FO
👉 Make 5-6 teeth per skull. They should be tiny – about 0.5 cm each.
Mouth Line (Embroidery)
Using black embroidery floss or yarn:
- Embroider a slightly curved smile line across lower face (about 1/3 down from nose)
- The line should curve gently upward at the ends for a friendly skull expression
- Sew teeth along this line, spacing evenly with small gaps between
👉 PLACEMENT TIP: Start from the center tooth and work outward for symmetry.
🌿 STEM PATTERN (Make 8-12 total)
Preparation: Cut floral wire to 25-28 cm length (slightly longer than finished stem).
R1: With GREEN yarn, ch 8, sl st to first ch to form ring (or MR with 8 sc)
R2-50: sc around (8) — work in continuous spiral
👉 IMPORTANT: After about round 5, insert your floral wire through the center. Continue crocheting around it. Add light stuffing as you go if desired for fuller stems.
R51: sc around (8), sl st, FO leaving 15-20 cm tail for attachment.
Finishing:
- Leave about 2 cm of wire extending from the top
- Apply small dot of hot glue to wire tip
- Insert into bottom of skull and glue in place
- Use yarn tail to sew stem securely to skull base, going around multiple times
🌸 FLOWER PATTERN (Make 3-4 in various colors)
Flower Center (YELLOW/GOLD)
R1: MR, 6 sc (6)
R2: inc × 6 (12)
R3: (sc, inc) × 6 (18)
R4: sc around (18)
sl st, FO leaving long tail.
👉 The center should be slightly domed/puffy.
Flower Petals (Make 5 per flower)
R1: MR, ch 2 (counts as first hdc), 9 hdc in ring (10)
R2: ch 2, hdc in same st, 2 hdc in each st around (20)
R3: ch 2, (hdc, inc-hdc) × 10 (30)
sl st to beginning ch, FO leaving long tail.
👉 Each petal should be a flat circle about 4-5 cm wide.
Flower Assembly
- Lay out 5 petals in a circular pattern, overlapping edges slightly
- Sew petals together where they meet (just a few stitches each)
- Position center on top, covering the petal joins
- Sew center securely to all petals
- Attach to top of stem (same method as skulls)
👉 COLOR COMBINATIONS FROM PHOTO:
- Red petals with yellow center
- Yellow petals with yellow center
- Blue petals with yellow center
- Purple/lavender petals with yellow center
🎀 RAINBOW BOW PATTERN
Bow Strips (Make 2)
With RED yarn:
- Ch 60 (or length to reach ~25 cm)
- Row 1: sc in 2nd ch from hook and across (59 sc)
- Row 2: ch 1, turn, sc across in BLO (59)
Continue in stripe pattern, changing colors every 2 rows:
- Rows 3-4: ORANGE
- Rows 5-6: YELLOW
- Rows 7-8: GREEN
- Rows 9-10: BLUE
- Rows 11-12: PURPLE
- Repeat sequence once more (Rows 13-24)
- FO after final purple row
👉 You should have a long striped rectangle about 25 cm × 5 cm.
Make a second identical strip.
Bow Center Band
- Ch 12 with RED
- Row 1: sc in 2nd ch from hook and across (11 sc)
- Rows 2-4: ch 1, turn, sc across (11)
- Continue color stripes (2 rows each color) for about 20-22 rows total
- FO
Bow Assembly
- Take first strip and fold into a loop, crossing ends in back
- Pinch center and sew to secure the “bow” shape
- Repeat with second strip
- Stack the two loops perpendicular to each other (like a bow)
- Wrap center band around middle, sewing in back to secure
- Leave long tails of yarn for tying around bouquet
👉 FINAL LOOK: Your bow should have 4 visible loops and a striped center band.
🪡 BOUQUET ASSEMBLY
Step 1: Prepare Your Elements
- 8-9 completed skulls on stems (in rainbow order: red, orange, yellow, green, blue, purple, plus white/cream variations)
- 3-4 flowers on stems
- 1 rainbow bow
Step 2: Arrange the Bouquet
Back row (tallest): 4-5 skulls
Middle row: Mix of 3-4 skulls and 2 flowers
Front row: 1-2 flowers
👉 ARRANGEMENT TIP:
- Place tallest skulls in back center
- Alternate colors throughout (don’t put same colors together)
- Fan out slightly for visual interest
- Flowers should peek between skulls
Step 3: Secure Stems
- Hold all stems together at midpoint (~10-12 cm from bottom)
- Wrap tightly with green yarn several times
- Tie off and trim excess
- You can also wrap with floral tape for extra security
Step 4: Attach Bow
- Wrap bow around the stem bundle where you tied them
- Position bow in front, tails hanging down
- Tie tightly in back with yarn tails
- Arrange bow loops for fullness
- Trim ribbon tails to desired length (10-15 cm)
Step 5: Final Shaping
- Bend individual stems slightly to create natural bouquet shape
- Ensure all faces are visible from front
- Adjust flower positions
- Fluff bow and make sure rainbow colors show
💡 Tips for Photo-Accurate Results
Color Selection
The photo shows pastel and bright tones together. Aim for:
- 1-2 white or cream skulls
- 1-2 vibrant primary colors (red, blue, yellow)
- Remaining in softer shades (coral, mint, lavender, peach)
Facial Feature Placement
- Eyes: Position high on face, about 1/3 down from top
- Space eyes: 1-2 stitches apart at closest point
- Nose: Centered, just touching bottom of eye area
- Mouth: 1/3 of the way up from bottom
- Teeth: 5 teeth works best visually (center tooth + 2 on each side)
Achieving the “Cute Skull” Expression
- Slightly upward curved mouth = friendly
- Large round eyes = cute rather than scary
- Small nose = less intimidating
- Visible teeth = character without being frightening
Making Flowers Pop
- Use bright, saturated colors for petals
- Always use yellow/gold centers for consistency
- Make sure centers are well-stuffed and domed
- Sew petals with even spacing for symmetry
Stem Strength
- Don’t skip the wire! It’s essential for poseable stems
- If stems feel floppy, use thicker wire (20 gauge)
- Make sure wire extends fully through stem
- Hot glue at top prevents wire from sliding
📸 Display Ideas
✨ Standing Display: Use a tall vase or cylinder (leave wire ends long to rest in vase)
✨ Wall Hanging: Add a loop to back for hanging as flat wall art
✨ Table Centerpiece: Trim stems shorter for low arrangement
✨ Ofrenda Decoration: Perfect for Day of the Dead altars
✨ Photo Prop: Great for seasonal photography
🎨 Customization Ideas
Color Variations
- Pastel Rainbow: All soft colors for spring/Easter version
- Neon Brights: Ultra-vibrant for modern aesthetic
- Monochrome: All white skulls with white flowers and silver bow
- Traditional DOTD: Orange, pink, purple, yellow (traditional Mexican palette)
Size Adjustments
- Mini Bouquet: Use sport weight yarn and 2.5mm hook (skulls ~5-6cm)
- Giant Bouquet: Use chunky yarn and 6mm hook (skulls ~15cm)
Alternative Flowers
- Replace some flowers with crocheted roses
- Add marigolds (traditional DOTD flowers)
- Include small hearts instead of flowers
Extra Details
- Add rhinestones to eye centers for sparkle
- Embroider decorative swirls on foreheads (DOTD style)
- Use glitter yarn for bow
- Add small bells hidden in flowers
❓ Troubleshooting
Problem: Skulls look lumpy or misshapen
Solution: Stuff more firmly and shape with your hands as you stuff. Push filling into top/back for rounder heads.
Problem: Eyes won’t stay flat against face
Solution: Sew around entire perimeter with matching thread, pulling slightly tight every few stitches.
Problem: Teeth keep falling off
Solution: Use fabric glue in addition to sewing, or embroider teeth directly with white yarn (satin stitch).
Problem: Stems are floppy
Solution: Use thicker gauge wire (20g instead of 24g) or double up on thinner wire.
Problem: Bow won’t stay puffy
Solution: Add a small piece of cardboard inside each loop before wrapping center band.
Problem: Bouquet won’t stay arranged
Solution: Wire stems together at 2 points (once near top, once near bottom) before adding bow.
⏱️ Time Breakdown
- Each skull: 45-60 minutes (including features)
- Each flower: 30-40 minutes
- Each stem: 20-30 minutes
- Bow: 60-90 minutes
- Assembly: 30-45 minutes
- TOTAL: 10-14 hours for complete bouquet
🌟 Final Thoughts
This Rainbow Skull Bouquet is a true labor of love that combines technical crochet skills with creative assembly. The result is a stunning, one-of-a-kind piece that celebrates life, color, and the beautiful tradition of Día de los Muertos.
Every skull has personality, every flower adds joy, and together they create something truly special. Whether you make this for yourself or as a gift, it’s sure to bring smiles and start conversations!
Don’t forget to:
- Take photos of your finished bouquet
- Share with the crochet community
- Experiment with your own color combinations
- Most importantly – have fun and enjoy the process!
📌 Pattern Notes
- Gauge: Not critical for this project, but consistent tension is important
- Pattern is worked in continuous spirals unless otherwise noted
- Weave in ends as you go to make finishing easier
Happy crocheting! 🌈💀🌸


Que lindo ramo
Ahora al buscar el patron lo veo y es muy claro a seguir
Lo hare
Gracias