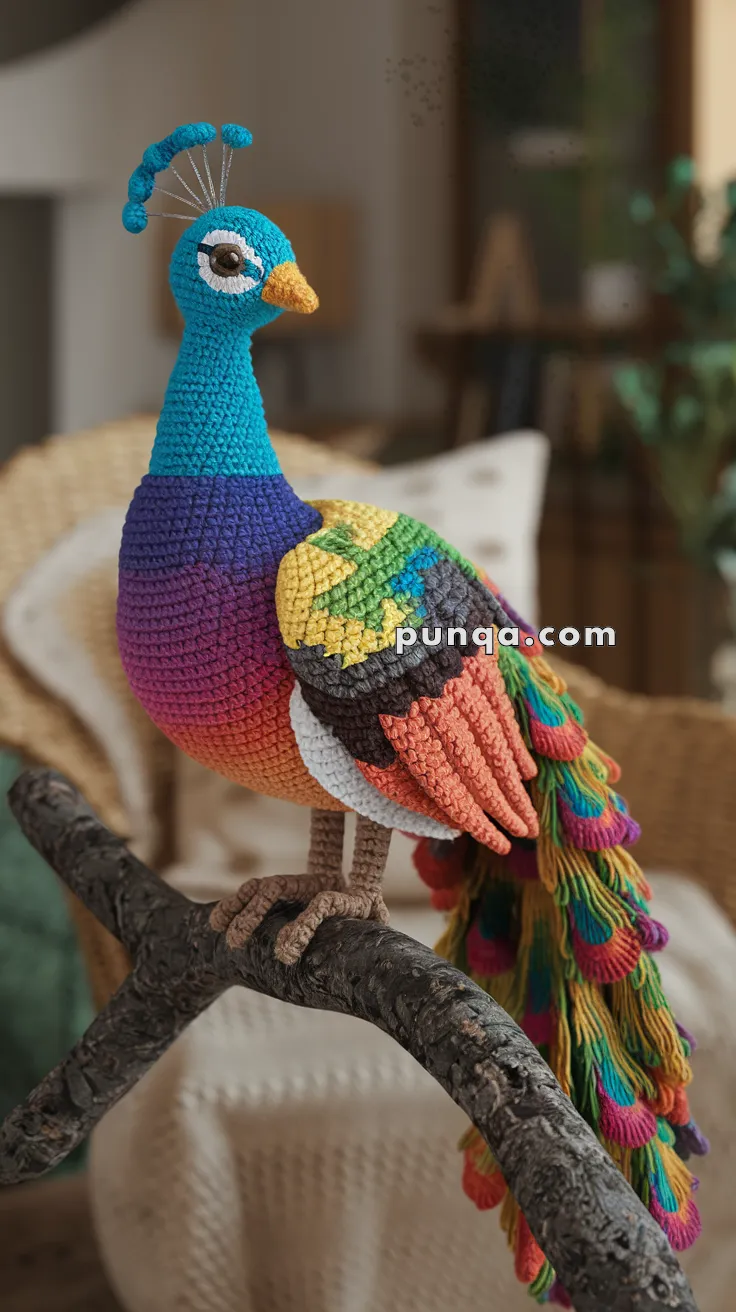
Strut your stuff with the Amigurumi Rainbow Peacock, a dazzling crochet creation that’s bursting with color, pride, and personality! 🦚🌈 With its vibrant tail feathers, elegant shape, and whimsical charm, this plush peacock is a joyful celebration of diversity and handmade artistry. Whether perched on a shelf, gifted to a loved one, or added to your amigurumi menagerie, this radiant bird is sure to turn heads and spark smiles.
This pattern is a fabulous choice for crocheters who love bold hues and sculptural flair. You can brush out the tail for extra fluff, play with gradient yarns, or add sparkly accents to make your peacock truly shine. Whether you’re crafting for Pride Month, decorating with flair, or simply embracing your love of color, the Amigurumi Rainbow Peacock is a vibrant way to stitch up joy—one glorious feather at a time! 🧶✨
🦚 Rainbow Peacock Amigurumi Crochet Pattern
Bring a burst of color and elegance into your home with this stunning Rainbow Peacock Amigurumi. With its graceful neck, expressive eyes, sculpted wings, and vibrant cascading tail, this decorative bird is a captivating piece of handmade art. The rich jewel tones, intricate feather layers, and charming details make it a rewarding project for advanced crocheters who enjoy colorwork and shaping.
✨ Skill Level
Advanced – includes shaping, layered assembly, color transitions, and detailed tail construction.
📏 Finished Size
Approximately 30–35 cm (12–14 inches) tall when made with DK or light worsted yarn and a 2.5–3 mm hook.
🧶 Materials
Yarn – DK or light worsted (cotton recommended for definition):
• Turquoise – head, neck
• Teal – crest
• Royal blue – upper chest
• Purple – chest
• Magenta – chest transition
• Orange – belly and wing feathers
• Yellow – back mosaic
• Green – mosaic + tail fringe
• Dark brown – wing shading + mosaic outline
• White – eye patch + underwing
• Black – eye outline
• Pink, teal, blue, purple – tail accents
• Beige/tan – legs and feet
Tools & notions:
• 2.5–3 mm crochet hook
• Fiberfill
• Floral wire (legs, toes, crest)
• 10–12 mm safety eyes
• Scissors
• Tapestry needle
• Fabric stiffener (optional)
🪶 Head & Neck (Turquoise)
Round 1: MR, 6 sc
Round 2: inc around (12)
Round 3: sc, inc × 6 (18)
Rounds 4–10: sc around (18)
Round 11: 2 sc, inc × 6 (24)
Rounds 12–16: sc around (24)
Round 17: 3 sc, inc × 6 (30)
Rounds 18–27: sc around (30)
Stuff firmly, shaping neck with a slight forward lean.
🐦 Beak (Mustard/Golden Yellow)
Round 1: MR, 4 sc
Round 2: sc around (4)
Round 3: sc, inc × 2 (6)
Round 4: sc around (6)
Round 5: 2 sc, inc × 2 (8)
Round 6: sc around (8)
Round 7: dec twice, sc 4 (6)
Round 8: sc around (6)
Sew to head, angled slightly downward.
👁 Eyes
White Eye Patch (Make 2)
Round 1: MR, 6 sc
Round 2: inc around (12)
Round 3: sc, inc × 6 (18)
Round 4: Work 12 sc to elongate shape.
Flatten into a tall oval.
Assembly
• Insert safety eye into upper part of white patch.
• Surface-embroider a bold black outline.
• Add a turquoise eyelid: ch 10, sc 9, leave edges rounded; sew above the eye.
• Embroider 1–3 long black lashes.
Sew eyes to head.
🪭 Crest (Teal)
Make 3:
Round 1: MR, 4 sc
Round 2: inc × 4 (8)
Round 3: sc around (8)
Round 4: dec × 4 (4)
Shape into small teardrops.
Attach each bobble to the end of a thin wire stalk.
Insert all three wires into top of head.
🟦 Chest & Belly
Join royal blue at base of neck.
Royal Blue Chest:
Rounds 1–5: sc around (30)
Purple Section:
Rounds 6–10: sc around (30)
Magenta Transition:
Rounds 11–13: sc around (30)
Orange Belly:
Rounds 14–19: sc around (30)
Round 20: 3 sc, dec × 6 (24)
Round 21: 2 sc, dec × 6 (18)
Round 22: sc, dec × 6 (12)
Round 23: dec × 6 (6)
Close and weave.
Stuff firmly.
🤍 Side Patches (White, Make 2)
Ch 18
Row 1: sc 17
Rows 2–6: sc across, decreasing 1 st on one side every other row to form a curve.
Sew to sides of belly under wings.
🎨 Back Mosaic
Create an irregular shape approx. 10 × 12 rows in yellow.
Add green triangular shapes, small teal accents, and a wide dark brown angled block using tapestry or surface crochet.
Outline entire piece with dark brown embroidery for raised effect.
Sew to upper back.
🪽 Wings (Make 2)
Underwing (White)
Ch 24
Row 1: sc 23
Rows 2–7: sc across, decreasing 1 st on one side every other row.
Brown Border
Surface slip stitch a curved line along the entire edge.
Orange Ribbed Feathers (6–8 per wing)
Each feather:
Ch 18
Row 1: BLO sc 17
Rows 2–5: BLO sc
Rows 6–8: decrease 1 st each row to taper.
Layer from shortest to longest and sew over underwing.
Add a small yellow triangle at outer shoulder.
Attach wings to body at slight downward angle.
🧵 Tail (Fringe Feathers)
Tail Spine
Ch 12
Row 1: sc across (11)
Fringe Strands (Make 35–45)
Cut yarn in 45–55 cm lengths:
Green, yellow, orange, teal.
Use 2 strands together.
Fold and attach to tail spine with lark’s head knots.
Tail Eye Spots (Yarn-Wrapped)
Make 20–25:
- Wrap purple yarn around two fingers ~20 times.
- Wrap teal yarn ~10 times.
- Wrap pink or magenta ~10–12 times.
- Remove from fingers and pinch center.
- Wrap center tightly with green yarn to form an oval.
- Trim ends neatly.
Sew spots randomly to fringe ends for a natural pattern.
Attach tail spine to lower back.
🦢 Legs & Feet (Beige/Tan)
Legs
Round 1: MR, 5 sc
Rounds 2–16: sc around (5)
Insert floral wire, lightly stuff.
Toes
Each toe: ch 6, sc back (5)
Make 3 forward toes + 1 backward toe.
Wrap around wire structure.
Sew feet to legs.
Attach legs to underside of body.
🌿 Optional Branch Perch
Crochet a long tube in dark grey/brown yarn.
Slip over thick wire and bend into a natural branch shape.
Position bird so its toes curve naturally around branch.
🌟 Final Assembly
• Sew beak to head.
• Attach eyes, eyelids, and lashes.
• Insert crest wires.
• Join head to body.
• Stitch on white side patches.
• Add mosaic back piece.
• Attach both wings.
• Sew tail spine to back; arrange fringe strands for fullness.
• Add legs and pose on a perch or leave free-standing.
• Shape feathers lightly with steam if desired.
With its expressive face, vibrant feathers, and impressive tail, this peacock makes a beautiful decorative piece. Display it on a shelf, branch, or centerpiece and enjoy the vibrant detail that brings it to life. If you’d like, I can prepare a printable PDF version or create a companion baby peacock design.