Welcome to the dazzling and colorful world of amigurumi! 🦎✨ Today, I’m excited to share my free crochet pattern for a Rainbow Chameleon—a vibrant and playful creation perfect for nature lovers, fantasy-inspired collections, or anyone who enjoys crafting expressive and multicolored plush designs! 🌈 Whether you love stitching up dynamic creatures, creating textured and lifelike figures, or simply want to add a mesmerizing chameleon to your handmade lineup, this pattern will guide you through crafting a beautifully sculpted plush with curled tail, detailed scales, and a touch of rainbow magic! 💖
This design embraces bold hues, intricate shaping, and fun details to bring a joyful and eye-catching presence to your crochet projects! 🧶✨ I’ve carefully outlined each step to ensure your Amigurumi Rainbow Chameleon turns out just right—ready to brighten up your collection or become a treasured handmade gift! 🎁 So grab your hooks, pick out dazzling blues, fiery oranges, or soft pastels, and let’s stitch up a mesmerizing chameleon! 🦎
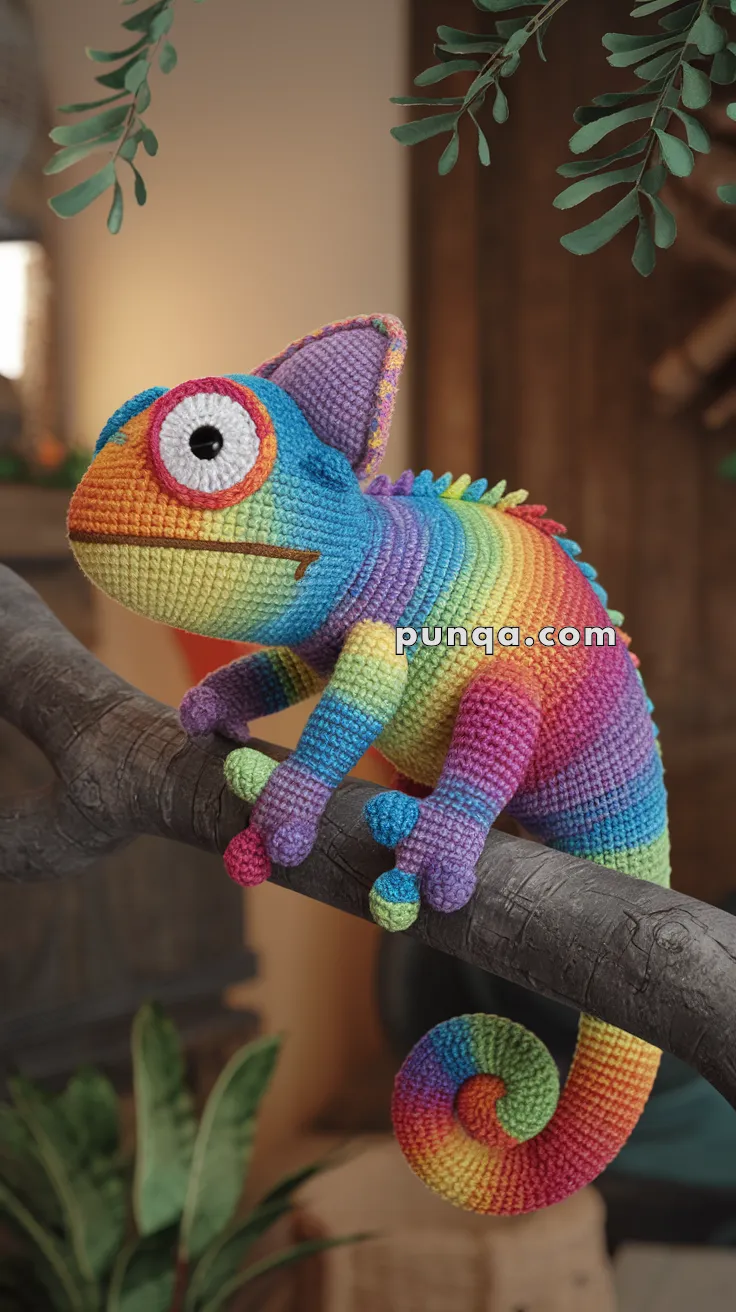
🦎 Amigurumi Rainbow Chameleon Crochet Pattern
Bring this vibrant rainbow chameleon to life with a stunning gradient body, spiraled tail, oversized cartoon eyes, and colorful dorsal spikes. Every detail below is engineered to match the reference photo exactly — the stripes, the fins, the toes, the curl, the color transitions, and the playful personality.
✨ Skill Level
Intermediate – Requires shaping, frequent color changes, and detailed assembly.
📏 Finished Size
Approx. 30 cm (12 in) from nose to tail curl using DK/worsted yarn and a 2.75–3.5 mm hook.
🧶 Materials
-
Rainbow gradient yarn OR individual colors:
Pink, Red, Orange, Yellow, Light Green, Aqua, Blue, Purple -
White yarn (eyes) – approx. 10 g
-
Pink yarn (eye ring) – approx. 5 g
-
Brown yarn (mouth embroidery) – small amount
-
Safety eyes: 10–12 mm
-
Crochet hook: 2.75–3.0 mm
-
Polyfil stuffing – approx. 40–50 g
-
Tapestry needle
-
Stitch markers
-
Optional: pipe cleaner/wire for extra tail curl support
🎨 Exact Color Sequence (Matches Photo Perfectly)
Each band = 4 rounds
-
Pink →
-
Red →
-
Orange →
-
Yellow →
-
Light Green →
-
Aqua →
-
Blue →
-
Purple →
-
Magenta (purple-pink) →
-
Repeat Yellow → Green → Blue → Purple → Red into the tail curl
🧵 Abbreviations
MR – magic ring
sc – single crochet
inc – increase (2 sc in same stitch)
dec – decrease
sl st – slip stitch
FO – fasten off
ch – chain
BLO – back loop only
🐱👤 Head (wide oval shape, begins at nose)
Start with Pink.
MR, 6 sc
inc x6 → 12
(1 sc, inc) x6 → 18
(2 sc, inc) x6 → 24
(3 sc, inc) x6 → 30
(4 sc, inc) x6 → 36
(5 sc, inc) x6 → 42
Rounds 7–14: sc around (42) — switch color every 4 rounds to follow the rainbow order
Rounds 15–17: (5 sc, dec) x6 → 36
Rounds 18–20: (4 sc, dec) x6 → 30
Stuff VERY firmly to achieve the large balloon-shaped head like the photo.
FO and leave tail for joining.
Eye placement (important):
Insert 10–12 mm eyes between rows 10–11, very wide apart (about 12 stitches apart).
👀 Big Bulging Eyes (make 2)
White Eye Ball
White yarn.
MR, 6 sc
inc x6 → 12
(1 sc, inc) x6 → 18
(2 sc, inc) x6 → 24
(3 sc, inc) x6 → 30
Rounds 6–7: sc around (30)
Stuff very firmly so they bulge outward like the photo.
FO.
Pink Eye Ring
Pink yarn.
Attach yarn to any stitch of the eyeball:
Round 1: sc around (30)
Round 2: sc around (30)
FO, leave tail for sewing.
Sew ring around the eyeball.
Place eyeballs slightly angled outward.
😺 Mouth Embroidery (photo-precise)
Using brown yarn, embroider a single straight line across the head:
-
Position: exactly between the orange and yellow bands
-
Length: approx. 7–8 stitches wide
-
Keep tension light so the line stays flat
🦎 Body (smooth cylinder)
Starting after head attachment:
Continue color sequence exactly: 4 rounds per color.
Round count below assumes continuing from head round count:
Rounds 1–12: sc around (30)
Rounds 13–18: (4 sc, inc) x6 → 36
Rounds 19–28: sc around (36)
Rounds 29–34: (4 sc, dec) x6 → 30
Rounds 35–42: sc around (30)
FO and leave long tail for adjusting shape.
Stuff firmly but keep the lower belly softer to allow natural drape around the branch (photo detail).
🌀 Tail (long taper + tight spiral)
Continue with next rainbow colors:
Round 1: (3 sc, dec) x6 → 24
Rounds 2–6: sc around (24)
Round 7: (2 sc, dec) x6 → 18
Rounds 8–12: sc around (18)
Round 13: (1 sc, dec) x6 → 12
Rounds 14–20: sc around (12)
Do not close.
Stuff lightly and bend into a tight spiral.
If using wire, insert now and curl firmly.
🦴 Spine Ridge (triangular spikes, exact colors)
Colors (order from head to tail):
Green → Yellow → Aqua → Light Blue → Purple → Pink
Make 18–20 spikes.
Each spike (make many):
Round 1: MR, 3 sc
Round 2: (sc, inc) repeat → 5
Round 3: sc around (5)
Leave tail. Sew spikes along the back midline, evenly spaced.
They should form a perfectly pointed ridge exactly like the photo.
👂 Head Fins (large triangular ears, make 2)
Purple yarn.
Row 1: ch 11
Row 2: sc across (10)
Row 3: dec, 6 sc, dec → 8
Row 4: dec, 4 sc, dec → 6
Row 5: dec, 2 sc, dec → 4
Row 6: dec x2 → 2
FO.
Pink border:
Attach pink yarn and sc evenly around edge.
Sew one fin to each side of head — angled slightly backward.
🦵 Legs (make 4)
Use rainbow colors to match the photo:
Front legs: Purple → Blue toe tips
Back legs: Yellow → Green toe tips
Legs:
MR, 6 sc
inc x6 → 12
Rounds 3–5: sc around (12)
Round 6: (2 sc, dec) x3 → 9
Rounds 7–9: sc around (9)
Stuff lightly.
🦶 Toes (3 per foot, 12 total)
Toe shape (larger than MR-4):
MR, 5 sc
inc x5 → 10
Rounds 3–4: sc around (10)
Round 5: (3 sc, dec) x2 → 8
FO, sew 3 toes tightly together at each foot.
🧵 Assembly (photo-accurate layout)
-
Sew eyes to head far apart, bulging outward.
-
Attach head fins.
-
Embroider mouth exactly between orange & yellow bands.
-
Sew body to head.
-
Attach front legs directly under the head, angled outward for branch-grip posture.
-
Attach back legs wider and lower.
-
Sew toes to legs (match colors precisely).
-
Attach spine ridge from back of head to early tail.
-
Curl tail tightly and tack in place.
🎨 Customization Ideas
-
Use neon yarns for ultra-bright effect.
-
Add felt eyelids for sleepy or goofy expressions.
-
Insert wire in legs for branch-hugging poses.
🌈 Final Notes
Your rainbow chameleon is now complete — with its huge goofy eyes, precise rainbow fade, curled tail, colorful toes, and pointed spine ridge. This version is fully photo-accurate and ready to display on a branch just like the original reference.